Photo Corners headlinesarchivemikepasini.com
![]()
A S C R A P B O O K O F S O L U T I O N S F O R T H E P H O T O G R A P H E R
![]()
Reviews of photography products that enhance the enjoyment of taking pictures. Published frequently but irregularly.
Big Lens App Is Free


12 February 2013
Controlling depth of field on a small sensor camera (like a digicam or a smartphone) has never been as easy as just changing the aperture. It seems like everything is always in focus on a small camera.
Designed for both the iPhone and iPad, Big Lens from Reallusion attempts to change that, providing a small sensor camera app just for fiddling around with what's sharp and what's blurred.
And the good news is that it's now free at the Apple App Store, saving you a dollar.
We downloaded it and gave it a try on an iPad 2.
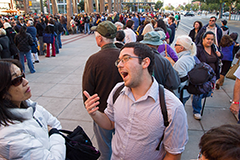
Original. Evrything in focus.
USING BIG LENS
When you Open the app, it displays a splash screen and then takes you to your first task: Load image.
The screen display is actually a help screen with three notes and a diagram to explain how Big Lens works.
You can, you learn, load an image from your album, your camera or just play with a sample image. Basic mode uses template masks while Advanced mode lets you manually define your focus mask.

Basic. Note the jacket behind our subject.

Advanced. Note the woman at left is in focus now.
First we tried Basic mode. Again, a helpful little screen showed us we could either move the red mask indicating what would be in focus using one finger or we could pinch and zoom to change the size of the focus area. The area was a circle.
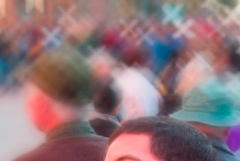
We pinched the circle a bit smaller, let go and as if by magic, got our subject in sharp focus and everything else around him nicely blurred.
But it was not quite the same sort of blur you get with depth of focus.
It's more the sort of blur you get in editing a two-dimensional image. So in our image, our subject is sharp but so is the jacket of the guy two places in line behind him, while the woman at his side listening to him is blurred because she's on the side of the frame.
Still, it's a nice effect.
And you can always switch to Advanced mode to more precisely set the focus zone. Which we did, painting in the two figures we wanted to be in focus and leaving that guy two up in line alone.
Worked like a charm.
OPTIONS
On the top of the screen you'll find a few options:

- Camera activates the built-in camera.
- HDR+ by default is off but we used it for our image (as you can see).
- Undo
- Share can save the edited image to your Camera Roll, email it or upload it to Facebook, Picasa or Dropbox.
MORE OPTIONS
And Big Lens has a few more options to play with. Along the bottom of the screen are six icons offering more control:

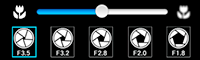
- Aperture provides five apertures: f3.5, f3.2, f2.8 (default), f2.0 and f1.8. And above them is a Macro slider, which can sharpen or blur the focused area. The aperture options determine how sharp the blurred areas are.
- Filter offers 24 options (including Original). There are a few interesting things on the list: Lomo1, Flare1, Warm, Vivid, Gray BG, Lomo2, Lomo3, Lomo4, Flare2, Cold, Red Sepia, Blue Sepia, Green Sepia, B&W, Pop Warm, Pop Cold, Dark BG, Sepia BG, Snow, Dream, Light ray1, Light ray 2, Fire. We tried Gray BG and Light ray 2 and both were well executed. A slider on top adjusts how strongly the effect is applied.

- Lens applies one of nine masks to the lens shape. Look for the effect on the blurred part of your image.

- Mask changes the mask to either a circle or a rectangle.
- Focus and Blur appear instead of Mask when you use Advanced masking. A slider lets you adjust the effect.
- Compare shows you the original when you hold your finger on the icon. You can quickly jump back and forth to see how you're doing.

Star Lens. Detail shows effect in background.
One thing to note when playing with the filters is that if you drag a finger across the screen, you'll move the focus area.
CONCLUSION
Available from the App Store or iTunes, Big Lens gives you some intriguing options for using sharpness and blur in your images. It isn't quite depth of field as we know it, but it's a lot easier than fiddling with layers and Guassian blur and Fade controls in Photoshop Touch to edit sharpness and blur.