Photo Corners headlinesarchivemikepasini.com
![]()
A S C R A P B O O K O F S O L U T I O N S F O R T H E P H O T O G R A P H E R
![]()
Reviews of photography products that enhance the enjoyment of taking pictures. Published frequently but irregularly.
Making Photo Coasters


4 March 2013
We were desperately shopping for 11x14-inch frames the other day when it occurred to us that Michaels has plenty of frames. Michaels is a craft store and a drive away, so we aren't often in there.
And we're not recommending it. Unless you're a crafter, that is.
A quick tour of the store and our admiration for crafters increased measurably. And when we got our purchases home, it went off the chart.
That's because no matter what we bought, it was damaged in some profound return-for-refund sense. The frames were dinged and nicked. And the shrink-wrapped set of four glass coasters (like this one) were chipped and slathered in some plaster-like muck on the sides.
Defects! we snarled. But no, these weren't defects at all. They were craft challenges. Turn this black mud hen into a white swan, you creative genius!
Well, like we said, it's a drive back to the store.
CLEANING COASTERS
Because the coasters were shrink wrapped, we hadn't noticed the chips on the glass edges in the store. Or the dinged up black holder. We might have passed on it if we had, but at $9.99, we bit.
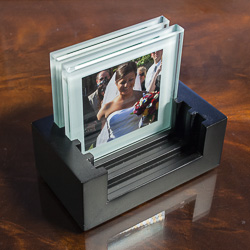
Holder. With two of the coasters.
Like any self-respecting American male, we have a workbench in the basement, which we refer to as a shop. It houses (permanently) numerous cans and bottles of evaporated paints, varnishes and glues. Plus spackle, caulk and even some grout.
Cleaning the white muck, however, did not require chemistry but a single-edge razor blade. We picked one with less rust than the others and shaved most of the stuff off the sides of the glass coaster.
To repair the black holder, whose knicks seemed reveal something like white plaster underneath, we resorted to a black permanent Sharpie. If it's good enough to sign valuable autographs, it's good enough for craft retouching. A touch here and here and we had a holder that did not call attention to itself.
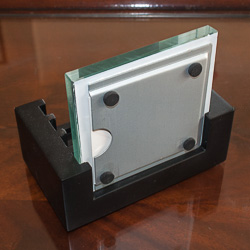
Bottoms Up. The metal base with little rubber feet under each glass coaster. Note the thumb cutout for sliding the photo out.
To repair the chips in the glass, we vowed to keep an eye on the first person who used one of the chipped coasters and point it out to them. "Harrumphf, is that a chip on that coaster?!"
Then in a moment of unforeseen generosity, we'd add, "Oh, forget it. It's just a coaster. Here, have another drink!"
Well, we didn't seriously entertain that idea. Very long.
COASTER PHOTOS
Our advice on printing photos for these things is simple. Measure. Sure, they look square. They aren't. Measure.
Measure the dummy photo that comes with the coaster. Just slip it out and subject it to a ruler.
Even worse, the coasters aren't quite square. The glass guy who cut the glass for them must have eyeballed them. They only go into the holder one way (well, two ways, technically, along the parallel sides). So if you want your photos to sit in the holder in the correct orientation, measure.
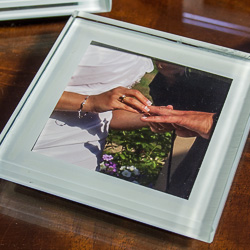
Photo. There's a mat around each image to hide the edges.
One other thing we'll pass along is that these are small photos, a couple of inches or so along each side. So instead of full body shots, we went macro and cropped for interesting detail you might not notice looking at the full image.
Like that shot of the exchange of rings.
We were able to print two images on a 4x6 sheet of photo paper. Which we trimmed out with that rusty razor blade. Scissors would work just as well, though, since the edges of the photo are nicely obscured by a white border on the glass coaster that serves as as mat or frame.
Mounting is simple. Just drop them in. The lead corners do tend to find the gap between the metal base and the glass, sticking on their way in. But you know what to do about that. Unstick and keep sliding them down into the holder.
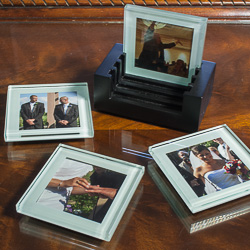
The Set. The finish set captured in the wild after heavy use.
SUCCESS
Being able to swap the photos out so easily is a tremendous advantage to this sort of thing. We immediately stocked the coasters with wedding shots from our guests' recent wedding before their arrival. They were charmed to see what an integral part of our daily life their event had become.
Of course we had planned to swap the photos out with four of our friends when next they visited. Or the niece with two dozen cats. Or that nephew with the three motorcycles. You get the idea.
Flattery in photos. That's the idea.
But we did such a nice job on the wedding photos that we don't have the heart to replace them. We've grown attached to them.
There's probably still a shelf full of things at the craft store anyway.
(Editor's Note: The photos, taken with a Cano Rebel XTi and 18-55mm kit lens, were lit with the Flashpoint 500 LED Light). They were processed in Lightroom 4 and resized on export.