Photo Corners headlinesarchivemikepasini.com
![]()
A S C R A P B O O K O F S O L U T I O N S F O R T H E P H O T O G R A P H E R
![]()
Reviews of photography products that enhance the enjoyment of taking pictures. Published frequently but irregularly.
Why The Cat Runs Away With The Bride


26 March 2013
The problem of exposing for a black cat is as old as the problem of exposing for the bride in white. An Auto setting of the Mode dial will, no matter how much you paid for your camera, turn that black cat gray faster than a three year old with new shoes. And it will turn that bridal gown as gray as Whistler's aunt, too.
But recently we bumped into a new solution for this age-old issue while we were taking some test shots to prove an old trick still works like magic. That makes three ways you can keep the cat from running away with the bride.
THE PROBLEM
The problem is metering. Even today's sophisticated evaluative (or matrix) metering options can't determine what the subject is. The metering system can tell there is a dark subject in the middle of the frame but it can't tell if it's a backlit shot of someone dear to you at sunset or a black cat.
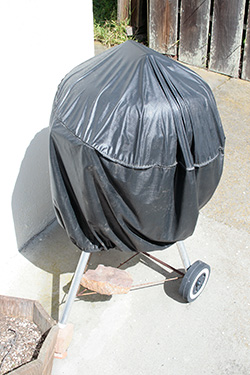
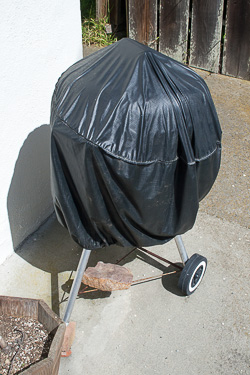
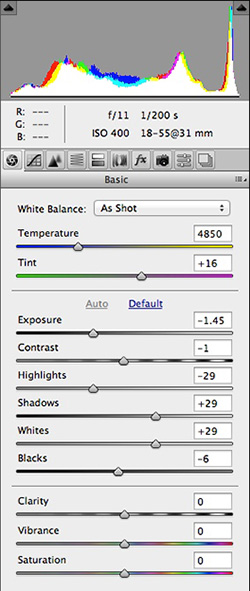
Auto. This is what you get shooting a JPEG on Auto mode without adjusting EV at f11, 1/200 second and ISO 400.
So exposure is calculated to render the scene in general as a middle gray. You or your camera set combinations of ISO (not likely), aperture (hmm) and shutter speed (most likely) to expose for that light level. And you get the gray cat, the gray gown.
Because, you know, the black cat has run away with the bride.
THE WORKAROUND
If you're shooting JPEGS in Auto mode, there's a simple workaround. You shift the EV setting.
For the black cat you underexpose. For the bride in white, you overexposure.
You take the meter's best guess (which you know will be gray) and push it in the right direction. Black cat? Cheat the exposure down a bit. Bride in white? Cheat the exposure up.
And if you're smart, you'll peek at the histogram to see just how far to push that EV.
It's temptying but don't rely on the LCD to judge the correction. It can't tell you the full story, being a bit less than 24-bit color.
This technique does work (and it's a good thing too, Martha, because on some little cameras it's all you've got to work with). But you know, it's a bit less precise (and more work) than we'd like.
THE OLD TRICK
The old trick is never fooled. It doesn't even consider the subject. It stares blankly at the light source and tells you how to expose for that. Cat or bride. Doesn't matter.
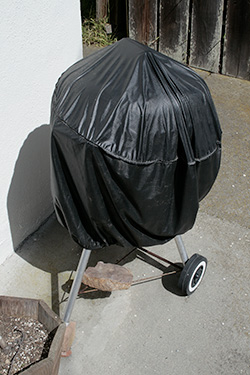
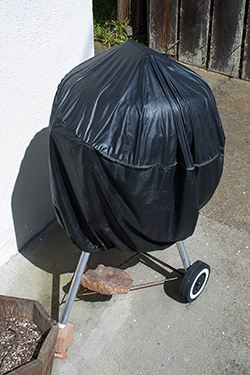
Incident Light Metering. Measuring the light falling on the subject rather than reflecting off it gets you a much better image at f16, 1/320 second and ISO 400.
And it really doesn't matter. The EV shift you were making by shifting EV was compensating for different meter readings. The light's the same. It was just reflected differently by the cat and the bride.
This trick is called incident light metering.
To measure incident light, you need a light meter like our venerable Gossen Luna Pro, which has a built-in diffuser dome.
The dome gathers light evenly from everywhere in front of the meter cell. And when you tell it which ISO you want to use, the meter shows you what the aperture and shutter speed combinations are that will properly expose for that level of illumination.
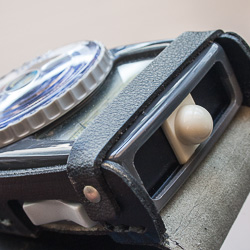
Diffuser. The white dome diffuser measures the light falling on it.
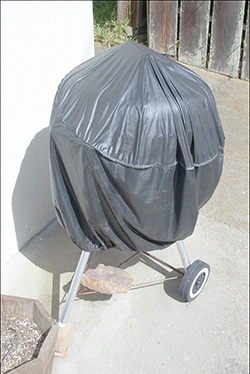
To illustrate this we shot a cooperative Weber grill under a black vinyl cover. That's as close as we like to get to black cats (or brides, for that matter).
The JPEG in Auto mode (the first image in this article) was overexposed, as we expected. You can see how shifting EV down -1.0 or so would have helped.
When we switched to Manual mode and set the ISO to match what the Auto JPEG had used and then picked an aperture/shutter speed combination that was in the range the Gossen suggested, we had a perfectly exposed JPEG of the vinyl cover.
A NEW SOLUTION
We had quite a surprise, though, when we imported the images into Lightroom. In Library mode we couldn't tell them apart.
Auto JPEG. Lightroom's auto ACR.
Incident Light. The same.
How come is that?
Well, we had not just shot JPEGs. We had shot JPEG+Raw. So we had the JPEG processed in the camera and the Raw file, which Lightroom adjusted to create a preview. And it had automatically corrected the poorly-exposed first image using the Raw data.
We're just showing you the automatic correction from Adobe Camera Raw. That would be just a starting place. We'd warm it up a bit, for example, and recover the highlights. And expect to improve on the incident light shot.
What this suggests, though, is that if you haven't got a light meter, shoot Raw and you'll have enough leeway to recover your shadows or highlights in post processing. That's the new solution.
BUT THE BEST APPROACH
So which approach is the best?
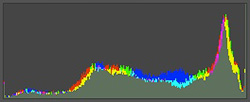
It may be a bit hard to see in a browser but the incident light capture rendered the best JPEG image, accurately reflecting the scene. The blacks are indeed black but still have detail. And the wall is not blown out.
Incident Light Metering
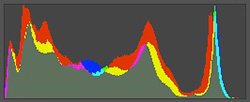
Auto ACR
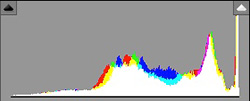
The JPEG automatically rendered from the Raw image, however, shows a strikingly similar histogram that's just a bit brighter, clipping some highlight detail in favor of shadow detail. That's a choice you can adjust sitting at the keyboard.
Auto JPEG. Dark tones moved toward the middle.
Incident Light. An even distribution.
Auto ACR. Highlight clipped with shadows slightly brighter but not as much as the Auto JPEG.
Clearly, the best thing to do in the field is use incident light metering. And that may be all you have to do. No need to fiddle around with EV on the camera or mouse around with Levels, Curves or the ACR adjustments.
But even with an incident light metered exposure, don't rely on a JPEG-only capture. Use JPEG+Raw so you can shift the tonal values around later, optimizing the image.
And if you can't get an incident light reading to begin with, you can still shoot JPEG+Raw to keep the black cat from running off with the bride. It just takes a little more work in the Raw processor of your choice.
But the hazards of shooting a JPEG in Auto mode only -- especially if you don't remember to fiddle with the EV and check the histogram -- should be obvious.
ANOTHER MYSTERY REVEALED
Happily, you can find a used Gossen Luna Pro cheap (even if no camera can do what it can do).
Unhappily, the problem is that the 1.35 volt batteries it uses are no longer available. They were mercury and about as ungreen as you can get (that would be red, according to our color chart). You can't safely dispose of mercury so there are no mercury batteries any more.
What to do, what to do.
Alkalines are not a solution because they don't deliver a constant voltage through their lifespan, running heavy at first and petering out rather dramatically (like most of us, really). So don't bother.
Zinc-air hearing aid batteries might seem to fit the bill but they're short-lived, typically requiring replacement every six months. That's way too much maintenance for us.
Instead we've switched to 1.6 volt silver-oxide cells. They're too small to fit in the Gossen without an adapter but it just so happens that the adapter (if you can find one) includes a resistor to knock the voltage down to the equivalent of two 1.3 volt cells.
That's just what the doctor ordered, actually: take two silver-oxide cells and call me in a couple of years.
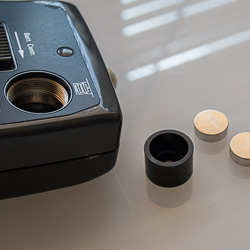
Batteries. The dark adapter with resister and two button batteries.
TIPS ON TAKING A READING
So just how do you take an incident light reading?
It's simple. Set the meter for the ISO your camera is using (which is the ISO you want it to use), walk over to the subject and look back at the camera. With the meter set for incident reading (using that diffuser), point it at the camera, make sure no shadow is falling on the diffuser dome and take a reading.
You now know the range of exposures for the amount of light falling on your subject.
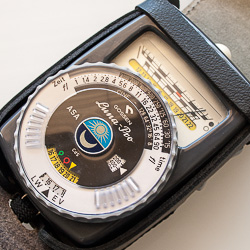
Readings. In the palm of your hand. Set the ISO in the little window right of the black inner dial, read the apertures on the silver scale just below the window for the shutter speeds on the outer rim of the dial.
That's a little different from getting the shutter speed for your preferred aperture or the aperture for your preferred shutter speed. At a glance, you can see the range of possible aperture/shutter settings for that ISO that will expose for the metered conditions.
If you can't stand next to your subject (because, say, they're in a cage with a couple of other hungry tigers), just stand to the side and point the meter not at the camera, but parallel to the line between the subject and the camera. Sometimes you can just turn around to perform this trick.
And if you want to cheat toward the highlights, aim the meter at the light source rather than the camera.
With older dial-based meters, you dial in the meter reading to see just what range of apertures and shutter speeds will make a usable exposure. With newer digital meters, you can tell the meter which f-stop or shutter speed you prefer and get the recommended shutter speed or aperture.
CONCLUSION
So retrofit that old light meter of yours with modern battery technology and take some incident light readings. Then use them.
Shoot JPEG+Raw to get the best JPEG out of the camera while providing Raw data for the most latitude to play with later.
If you can't set your camera and don't have a light meter that can do incident light readings, your best bet is to shift exposure with the EV setting and check the histogram to see just how much of a shift works.
That will keep the cat black and the bride in white.
Comments
Isn't the problem with your image one of dynamic range? In your first auto pic the highlights are blown and the shadows slightly lost; in the incident metered, lower exposure the highlights are in, but the shadows much more lost. With the Raw images, these can be recovered and, of course, the contrast is lower. I think the same results could be obtained if the camera JPEG processing just gave you lower contrast and so a higher dynamic range. Then you could sort out the toning with curves as usual.
That leaves the problem of how to control the in camera JPEG conversion, which is a bit of a mystery. For example, using Auto mode may give a different result than using a manually set exposure (as when you use an incident meter). I would want JPEG processing to detect the presence of extended high and low lights and increase dynamic range accordingly. But I guess that it is set up to deliver the image most usable without further processing, so blowing extremes is favoured over producing a low key result.
-- Steve Joseph
Dark tones? Shifted right. .
Low Contrast. The Auto exposure Raw with no adjustment except Contrast.
Great question, Steve. And an interesting solution, too.
The problem with this scene (rather than the image itself) really isn't that we've lost highlight detail (although we have). It's that our main subject is dark. And evaluative reflective metering normalizes that dark object into a big gray one, just as it would normalize a big white object into a gray one.
So range (how many tones we can display) isn't the issue, although if our camera had offered it we would have done better on those highlights enabling i-Contrast, D-Lighting or Dynamic Range Optimization. The real issue is placement of the dark values on the right part of the scale.
Which is exactly what happens with an incident light meter reading. The reading isn't affected by the brightness of the subject. So if it's a dark subject or a bright one, it gets the same exposure and the values fall where they may.
But let's try your suggestion. We opened the Raw capture of the Auto exposure with the default rendering (all sliders set to zero). Then we set Contrast to the maximum.
We do get a flat image, as expected. The highlights are partially recovered (more so than at other Contrast settings). But our blacks again shift right, resembling the Auto JPEG more than the other two renderings. Contrast doesn't put the darker tones where they should be.
The only way to do that with an Auto exposure is to change the EV setting. Underexpose in this case. -- Mike
Glad to find your new site, interesting stuff as always.
One thing I was taught "in the old days," if you were unsure of the exposure for a tricky subject, was to point the camera at some grass -- assuming there was some around -- and take the exposure from that. The idea was that grass was pretty close to a standard gray in the amount of light it reflects. Basically a poor man's way of getting an incident light reading. Whilst it may not have been spot on it stopped one going too far wrong and wasting a precious frame of film!
In those days with basic cameras the procedure was simply setting the speed/aperture from the camera's light meter whilst aiming at the grass, recompose and take the shot. Nowadays a quick thumb on the AEL button does the job.
Keep up the good work.
-- Richard Simister
Oh dear, I feel another article coming on -- something about alternative metering methods. You're right that metering grass is one of them.
The idea, especially in the film era when your camera might not have a meter at all, was to find something in the scene approaching middle gray (18 percent). Although different types of grass reflect more or less light, grass was pretty reliable.
But if there was no grass, what could you do? Well, you could just stick out your hand as if bidding someone go in front of you, palm facing about 45 degrees up and meter that. Your palm reflects about a stop more light than an 18 percent gray card, so -1.0 EV would do it.
These days you might have the solution sitting right in your camera bag. A lot of photographic microfiber lens cleaning cloths (we never leave the bunker without one) are, in fact middle gray. -- Mike