Photo Corners headlinesarchivemikepasini.com
![]()
A S C R A P B O O K O F S O L U T I O N S F O R T H E P H O T O G R A P H E R
![]()
Reviews of photography products that enhance the enjoyment of taking pictures. Published frequently but irregularly.
An Old $8 Rexatar Zoom Survives Into The Digital Age


1 May 2013
Over 30 years ago we snagged a 28-50mm lens from our mentor, a photojournalist who found its range a little confining. He was more the 43-86mm type of guy. And he knew we didn't have anything wider than 35mm at the time.
"It's sharp," he promised, so we bit and became the owner of a Rexatar 28-50mm f3.5-4.5 zoom.
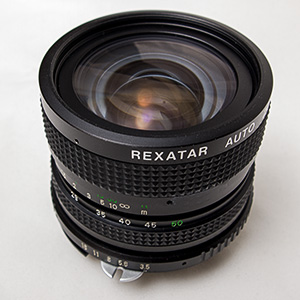
Eight Bucks. The Rexatar 28-50mm f3.5-4.5 zoom.
Rexatar?
Yep, Rexatar. We actually did find one for an Olympus mount on eBay. But it has already sold for $7.97. The postage was more than that.
THAT WAS THEN
We had put that Rexatar to good use on our Nikon FM and FE. It is sharp. But we never really fell in love with it the way we did with our 35mm f2.8 Nikkor.
So for years it's been imitating a body cap on our Nikon FE (which itself was imitating a paperweight).
But the other day, we had a thought, which happens with some regularity. That 28-55mm range might just be the ticket on a DX-format dSLR, we thought. On a subframe Nikon that translates to a crop factor of 42-82.5mm -- about the same as that 43-86mm Nikkor, in fact.
It's not a big lens, either. On a dSLR, it's a handholdable street shooting setup.
Tempting, tempting, but one question kept us at bay. Would it capture the scene with the same image quality we'd grown to expect from our DX Nikkors?
The only way to answer that question was to put it on a camera body and take a few shots.
QUIRKS
The old Rexatar does have its quirks.
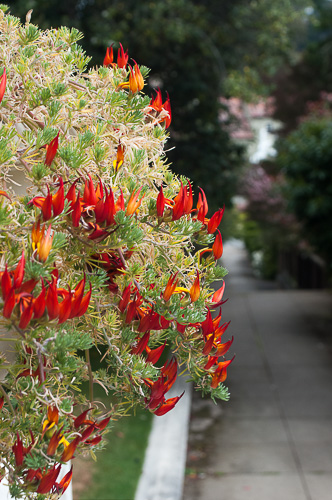
On Fire. At f8 and 1/250 second.
Unlike almost anything (but not everything) you might buy today, it's manual focus. But we actually enjoy that for more deliberate outings like our photo walks.
Push it to 50mm, though, and the maximum aperture drops to f4.5. Pretty darn slow by any standard. But that's not really a problem either with a manual focus lens. If it were a fast lens we wouldn't be able to focus it except in Live View. (Ask if you don't know why.)
Then (for us anyway) there's that 55mm filter size, which doesn't work with our mainly 52mm stuff. But when we bought the thing it came with a 55-52mm step ring, so we could use all our 52mm filters on it. Nope, no vignetting at 28 even with a 55mm sky filter, the step ring and a 52mm polarizer stuck on the end.
And you hardly have to focus at 28mm and f8 where 0.7 feet and out is sharp. Street shooting indeed.
Oh, and we should point out that it doesn't communicate the focal length to the camera, so our Exif data was incomplete.

Greens. At f11 and 1/30 second.
TEST DRIVE
So we the quirks didn't bother us. But could it actually capture the images we thought we'd shot?
Over the course of a few days we took it on a couple of our urban jaunts and shot some macro with it. The eBay listing claimed it's a macro lens but it isn't. We shot macro thanks to that step ring, which accommodated our reversing ring. Turn the lens around, mount it on the body and you've got a macro.
On our first walk (a four-hour hike, actually) we traversed a few neighborhoods and Golden Gate Park on an overcast day. We had nothing but the Rexatar on our dSLR to see how it would do. The zoom range was just right for a lot of things, although focusing close required the widest angle position.
We shot everything in Aperture Priority mode, shifting the aperture to include all of a subject or exclude some distraction. And as we changed aperture, we made full use of the Depth-of-Field Preview button alongside the lens.
Trumpets. At f8 and 1/500 second (top) compared to JPEG capture (Neutral Color Control). See why we like to work on the Raw files?
When you hold down the Depth-of-Field Preview button, the aperture stops down to where it will be for the exposure. Before you press the Shutton button, the aperture is actually wide open so you can see the scene as brightly as possible for composition and focus. But by looking at the scene through the actual shooting aperture, you get to see just what's in focus and what isn't (at least on a bright day).
That was really the only way to tell if we were going to capture what we wanted with the aperture we'd chosen. We'd go to f3.5 for a shallow depth of field or back out to f11 to keep the full field in view. But sometimes there was an exposure issue with that. Too slow a shutter speed, for example. So we'd crank back off the extreme aperture and check focus with the Depth-of Field Preview button to see if what we wanted in focus was still acceptably in focus.
We didn't have to, but we could also have fiddled with ISO. Always something to keep in mind.
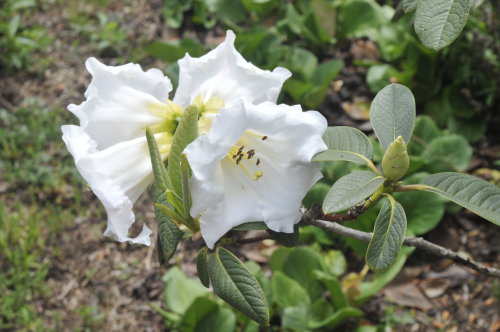
Early rains this year have things blossoming early and a few flowers are in full bloom. We wandered from flower to flower like a bee (except for the sneezing), composing and capturing before flying off to the next one.
For a few shots we did adjust our EV setting but most were at EV 0.
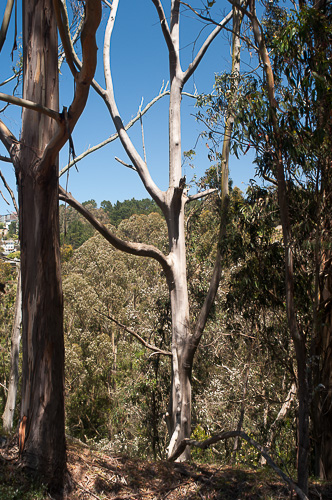
Eucalyptus. At f8 and 1/125 second with polarizer.
SECOND TEST DRIVE
Our second walk was on a very sunny day. So sunny, we put a circular polarizer on the Rexatar and took a few landscape shots of Glen Canyon Park.
We also tried out a few different Picture Controls with these shots.
We'd seen (and enhanced) our Golden Gate Park images already, so we thought we'd move off Neutral to Vivid. But we also tried Standard because we had no idea what the difference between Neutral and Standard might be.
We shot Raw+JPEG, which we normally do for images we expect to play with a bit. And that, it turns out, is what Neutral is for. Minimal JPEG processing for more work later (although the work gets done on the Raw file not the JPEG).
Nikon recommends Standard for the best JPEGs. Vivid is for saturated primary colors. It pretty much ruined our skies, so we're keeping clear of it from now on.
Our Standard JPEGs were just fine, in fact. They stood on their own.
MACRO
On another sunny day, we reversed the lens and shot macro. Just a few to see what we'd get. With a prime lens, you have one magnification to work with. But with a zoom, you have a range of magnifications to play with.
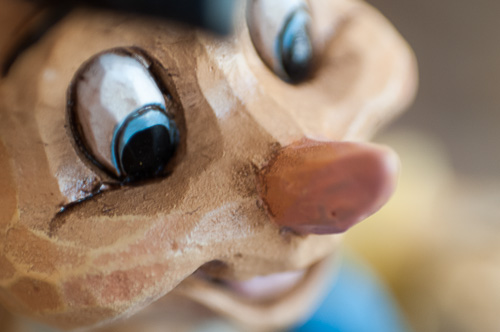
Macro. At f3.5 and 1/8 second handheld. Pinocchio's ose was growing too fast to keep it in focus.
We couldn't divorce our step ring from the Sky 1A filter attached to it, so we had the equivalent of an extension tube going on, too. Crazy.
We just took a few handheld shots. Too windy outside but our indoor shots were fun.
RAW
The plan all along was to treat these images like any others we shoot on these photo safaris around town. We shoot Raw+JPEG and work on the Raw in Adobe Camera Raw. Photoshop or Lightroom. Unless we're reviewing another product.
Because we were working with about 18 images from our first shoot, we used Lightroom 5 with Adobe Camera Raw 7.4. It's an efficient way to apply global changes to more than a few images at a time, pick our favorites and export them.
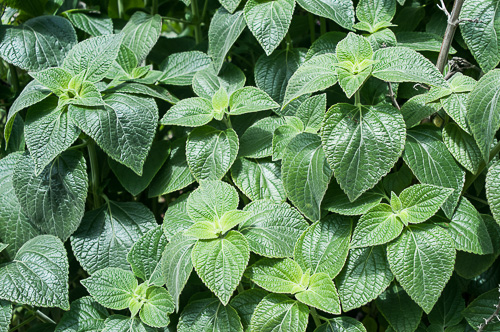
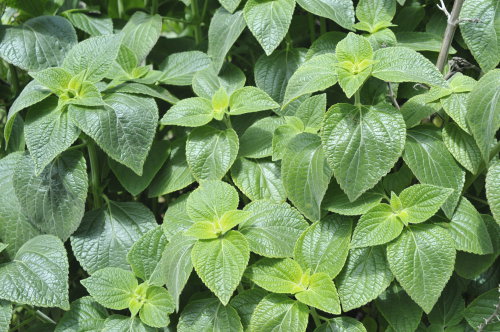
Leaves. At f8 and 1/250 second (top) compared to JPEG capture (Neutral Picture Control).
We argued with Lightroom about the Exposure change (it makes some dramatic decisions) and fine-tuned the Highlight and Shadow, White and Black sliders quite a bit. Then we finished off with the Vibrance and Clarity sliders.
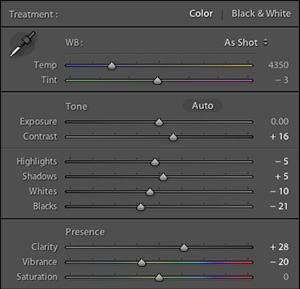
Lightroom Adjustments. Typical edits for an image like the leaves.
That's all business as usual.
We weren't pushing these images very far, though. We were looking for a little more dimensionality, let's say. A deeper shadow, a recovered highlight. Working against the flat light as much as any shortcoming of the lens.
Small improvements, not artistic statements.
The changes we made to the green leaves image above, for example, are shown in the screenshot to the right. We left White Balance alone, returned Exposure to zero, increased Contrast, reduced Highlights, Shadows, Blacks slightly and made a rather large adjustment to Whites, bringing them back down from the Auto adjustment we started with.
Clarity made a big difference in the image's apparent sharpness but we had to knock the Vibrance down to get a more realistic green. Those two adjustments made the most impact. And if we could have mimicked them in the camera, the JPEGs might have been much more convincing.
For the Glen Canyon Park images, we hardly made any adjustments. So we converted one to black and white. Same for the macro images. The default Raw conversion worked very well.
But working on our favorite captures a while, we completely forgot we'd shot these images with a no-name brand lens worth $8 on eBay.
CONCLUSION
We're keeping the Rexatar on our dSLR for a while. We like the zoom range and neither the manual focus or slow speed hinder us from taking the kind of images we like to shoot.
And, as these shots show, the result aren't too shabby either.