Photo Corners headlinesarchivemikepasini.com
![]()
A S C R A P B O O K O F S O L U T I O N S F O R T H E P H O T O G R A P H E R
![]()
Reviews of photography products that enhance the enjoyment of taking pictures. Published frequently but irregularly.
FilmPack 4 Takes Effects Beyond Emulsion Emulation


5 June 2013
What's the road map for a mature application designed to mimic film emulsions? It's not as if there are more and more emulsions to emulate every year. And it's not as if there are more and more photographers suddenly enamored of the "film look." Film isn't a growth industry.
But instantly applying a "look" with no more than the click of a mouse or the tap of a finger is pretty popular. And using a preset to do it, rather than building your own is the preferred approach despite an enthusiastic interest in emulating various retro or vintage presets in Photoshop, not so much to have control over them but just to have them.
So why not evolve FilmPack into the Preset game? It's already got the retro film emulsion emulation. All you need to add is....
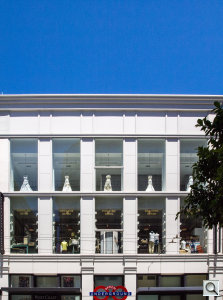
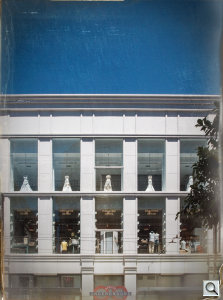
Our Original. After perspective correction in ViewPoint 4.
The kitchen sink, it would appear, from our experience testing FilmPack 4. We used both the Essentials and Expert versions but this review will focus on the more fully-featured Expert version (because it's more fun and on sale until the end of the month).
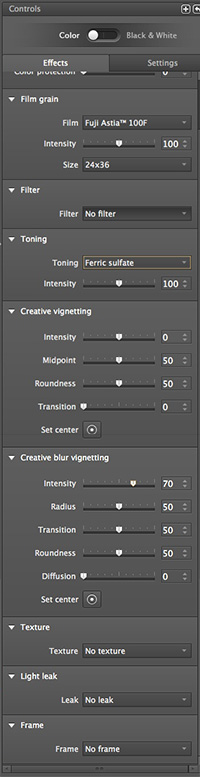
In fact, you're well advised to think of FilmPack's film renderings as just one of the effects in FilmPack 4, although it sits above them as Controls. The Effects tab itself includes: Film grain, Filter, Toning, Creative vignetting, Creative blur vignetting, Texture, Light leak and Frame. A Settings tab includes Basic settings of Contrast, Saturation and Exposure, Advanced settings of Vibrancy and Micro-contrast.
In contrast, FilmPack 3 offers the film rendering, Basic settings (Contrast, Saturation, Exposure), Hue/Saturation/Lightness, Noise Removal, Film Grain and Creative Vignetting. FilmPack 4 adds some intriguing special effects, combinations of which can be saved as presets, and searchable presets to get you started.
BEHIND THE WHEEL | Back to Contents
We shot downtown this weekend, grabbing a square image of a row of wedding dresses on the top floor of one building. We were pointing up, so our verticals were converging pretty severely. But that didn't stop us.
We opened the Raw image in Adobe Camera Raw running in Photoshop CS6 and made our color and tonal tweaks. Then we filtered the image through DxO's ViewPoint to square it up. One click later, it looked as if we were hovering over the street, directly across from the window. Very nice.
You could do the same in the version of Optics Pro released today, which also includes FilmPack plug-in compatibility.
With an image that had been tuned for color, tone and optical distortion, we were ready to play with it. You might think the Settings tab in FilmPack is therefore not much use, but as we applied effects, we were glad to have them.
INTERFACE | Back to Contents
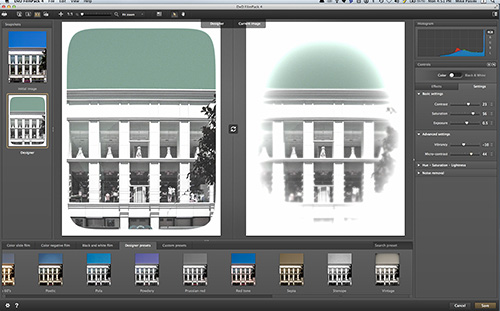
Let's tour the revamped interface.
When first launched, you see:
- A black toolbar running across the top of the window with a Print button; Single image, split image, double image previews and create snapshot button; a set of zoom tools; a Navigator; Before/After tool, Move tool; and a Hide Controls button. The standalone version adds an Open and Save button to the left of the Print button and Crop, Rotate Counterclockwise and Rotate Clockwise buttons to the right of the Move button.

Application Toolbar. A few extras.

Plug-in Toolbar. No file management.
- A gray bar at the bottom of the window hosting the Preferences, Help, Cancel and Save buttons (it would be nice if clicking a second time on the Preferences button dismissed it, ahem)
- A screen-deep column of collapsible option palettes along the right side of the window
- A large preview pane to display your image alone or alongside a previous version
- A film strip of film emulations and presets under the preview pane with a Search field for presets
Controls Palettes
Not immediately visible is a column on the left devoted to each snapshot of the image you take.
A dark gray color scheme with bronze highlights and white sans-serif text is used throughout. We found it very attractive and easy on the eyes.
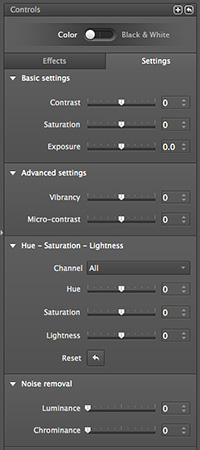
Settings Palettes
Thumbnails in the filmstrip window indicate the effect each option will have on the actual image. And snapshot thumbnails represent the edited image as well.
At the top of the palette column, there's a color-coded histogram which can display each color channel, luminosity or a composite. It stands apart from the palettes, sort of like your speedometer.
The Controls begin with a slider to select either Color or Black & White processing. The palettes under that are divided into two tabs: Effects and Settings.
You can run FilmPack 4 as a standalone application or as a plug-in. As a plug-in a dialog box remains over your image editing application reminding you that you've gone to FilmPack until you either Cancel or Save the image in FilmPack. In addition to the added buttons in the toolbar, the standalone version adds a Batch command to the File menu.
ROUTINE | Back to Contents
To use FilmPack 4, you typically pick a film rendering or preset from the filmstrip and make any adjustments you'd like to make from the Controls palettes. There is a film renderings effect in the Controls palette from which you can select As Shot in addition to the Color and Black and White emulsions but it doesn't include Presets because those are made from the subsequent options below.

Single View. No distractions.
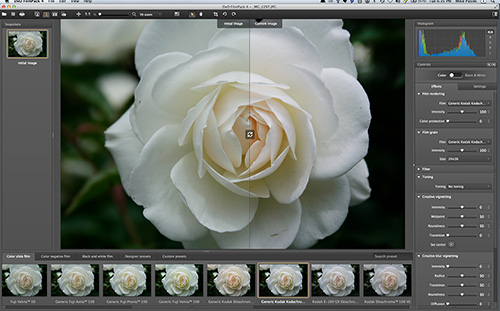
Split View. You can drag the splitter.
Side-by-Side View. Before and After (note the Snapshots in the left column).
So the filmstrip is a shortcut to automatically set all the effects as well as a preview of the emulsion effects. And the Controls panel is the manual mode approach of setting every option individually.
With our straightened building displayed before us, we tried each effect in order: Film rendering, Film grain, Filter, Toning, Creative vignetting, Creative blue vignetting, Texture, Light Leak and Framing. The further we went down the list, the more fun we had.
Just a few notes on the various effects:
Black & White. With Texture and a Frame.
Color. With Texture like paper and a Light Leak.
- We were impressed by the fidelity of the film renderings in FilmPack 3 and so was the Kodak emulsion expert we showed them to. We're not going over that ground here, but they're still impressive. If you miss a film look in your digital world, FilmPack will bring it back.
- The Film Grain options lets you select any film's grain pattern to apply to your image, regardless of which Film Rendering you've selected. Think of it as custom grain. And when you've selected one, you can change its intensity and size (for film format or on a scale of 1.0 to 10.0), too.
- Filters, we should explain, are not the digital variety but those old screw one things you used to put on a lens. Orange, Yellow, etc.
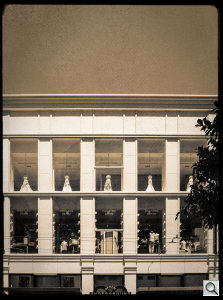
- Toning options include Ferric Suflate, Gold, Selenium, Sepia, Sepia Terra and Sepia Gold, all with an Intensity slider.
- The vignetting options gave us complete control over the vignette, including where to center it.
- Texture refers to the paper texture itself and includes Paper Grain 1, Paper Grain 2, Creased Paper, Scratches, Stains 1, Stains 2 and Stains 3. An Intensity slider and a Randomize button are available for each.
- Light Leak, too, includes an Intensity slider and Randomize button for its options, which include Color Leak 1 through 8 and White Leak 1 though 6.
- Frame has a Rotate button for its options, which are White, Black, Black on White, White on Black, White Line, Black Line, Passe-partout, Darkroom 1 and 2, Slide 1, Slide 1 B&W, Slide 2, Slide 2 B&W, Instant, Instant B&W, Film, Glass, Glas B&W, Old Paper 1 and Old Paper 2.
Texture, Light Leak and Frame may seem a bit over the top, but they were among the most enjoyable effects we applied. Why a simulated light leak would appeal to us, we have no idea, but it did. And framing the image with the edge of old photo paper (not just a geometric frame) really added a nice touch.
SNAPSHOTS | Back to Contents
Snapshots simply save the state of your image at any point you like. To create one, you click on the camera icon in the toolbar, which prompts for a name. After you name the snapshot, it shows up in the Snapshots column and becomes your Before image. You can retrieve it just by clicking on it.
PRESETS | Back to Contents
Once you've gotten a look you like, you can save it as your own preset, which you can also share with other FilmPack 4 users, no matter which edition of the software they have.
The Custom Presets tab on the filmstrip has a special button titled Add To Custom Presets. When you click it, you'll be prompted for a Preset name (just like a Snapshot) and when you enter one, you're preset will show up in the filmstrip with any other Custom presets.
To share a preset, you Export it by right-clicking on it for the menu. That saves an XML text file like this one, containing all the settings of the preset.
ESSENTIALS V. EXPERT | Back to Contents
FilmPack 4 is available in two editions, a full-featured Expert version and a more modestly-priced Essentials version.
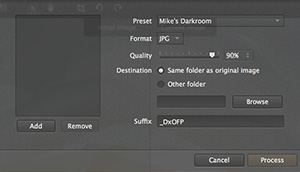
Batch Processing. Apply a Preset to a set of images.
The Expert version includes twice as many black-and-white film renderings, 16 more color films, 33 designer presets (v. 10), custom presets, snapshots of work in progress, vibrance control, denoising, HSL by channel, a channel mixer, creative blur vignetting, textures, edge effects, framing and batch processing (available in the standalone version). ~Our review~ (dxo-filmpack-4-review/index.htm) applies these more advanced features on a test image.
If an effect is used in a preset shared from Expert, Essentials will correctly render it, but it won't be editable.
SYSTEM REQUIREMENTS | Back to Contents
A minimum of 2-GB of RAM and 400-MB available disk space plus:
- Windows Vista, Windows 7, Windows 8 and Intel Pentium 4 processor or AMD equivalent.
- Mac OS X 10.6 Snow Leopard, Mac OS X 10.7 Lion, Mac OS X 10.8 Mountain Lion and Mac Intel processor.
AVAILABILITY, PRICE | Back to Contents
DxO FilmPack 4 is available in the DxO Labs online store and at photo resellers at the following prices:
USD (Not taxed):
- Essential Edition: $49 instead of $79
- Expert Edition: $99 instead of $129
EUR (Suggested retail price, tax included):
- Essential Edition: €49 instead of €79
- Expert Edition: €99 instead of €129
GBP (Suggested retail prices, including VAT):
- Essential Edition : £39 instead of £59
- Expert Edition: £79 instead of £99
Photographers who purchased a DxO FilmPack 3 license on or after March 1 are entitled to a free upgrade to version 4. Other customers are entitled to a special discount on their upgrade directly from their client account, through June 30.
A fully-functional trial version of DxO FilmPack 4, good for one month, is available on the DxO Labs Web site.
CONCLUSION | Back to Contents
Accurate film emulations are where FilmPack 4 starts but it lets you into the toolbox of emulsion emulation so you can invent your own film look.
You don't have to be that ambitious to enjoy using it, though.
With its Designer Presets you can quickly convert an ordinary image into something with style. And with a little imagination, make that style something of your own, tweaking the options and saving the result as a Custom preset.
There's no learning curve and the attractive interface makes it easy to try things. With its Texture, Light Leak and Frames options, we found it more fun that ever. And it always was a lot of fun to play with.