Photo Corners headlinesarchivemikepasini.com
![]()
A S C R A P B O O K O F S O L U T I O N S F O R T H E P H O T O G R A P H E R
![]()
Enhancing the enjoyment of taking pictures with news that matters, features that entertain and images that delight. Published frequently.
A View Of The Bridge


27 October 2014
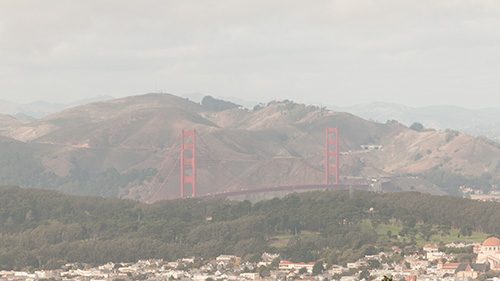
A week ago we were on Twin Peaks looking north on a hazy afternoon. The Golden Gate Bridge was smiling back at us, begging to have its picture taken. So we obliged.
This morning we revisited the capture. We'd shot it as a Raw file (which matters for solutions like this) with a polarizer, converted it to DNG and opened it in Photoshop CC 2014.2. As you can see, it was pretty terrible -- but let's blame the conditions, not the photographer. That haze ruined everything.
But there was something about the composition that appealed to us. So we took it as a challenge to see just what we could pull out of the Raw DNG file.
Photography has always been about making the best of the situation. You never can capture all the tones of a sunlit scene or show very many colors at once even on a computer monitor (compared to what you find in nature).
A Raw file gives you more data to work with (more than you can see at once, in fact), so it's important to have a Raw capture.
We took three approaches.
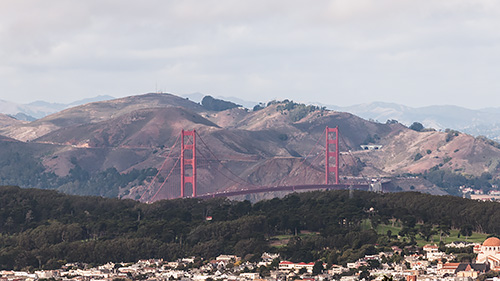
First (see the Interp button above), we brought out the big guns, using Adobe Camera Raw to punch up the Clarity and Saturation almost off the end of their sliders. Then we dropped the image into Unified Color's 32 Float v3 plug-in to apply the Optimal preset (and adjust the Gamma a bit. Next we did a little Saturation tweaking and Smart Sharpening. We wanted to liven up the sky a bit, so we selected just the sky and used Curves to get a little more drama.
Obviously we'd had too much coffee.
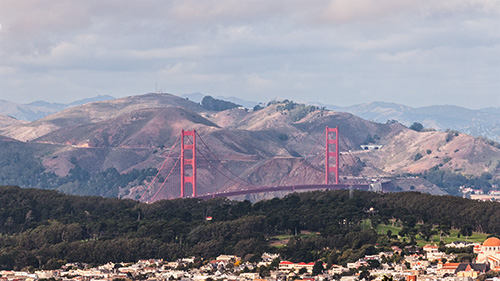
We were pretty sure we could economize on our edits, so we opened the image again in Camera Raw, reset the sliders to their defaults and tried it again. This time (HDR above) we just went with Unified Color, using the Grunge preset and making a few adjustments until we liked what we saw.
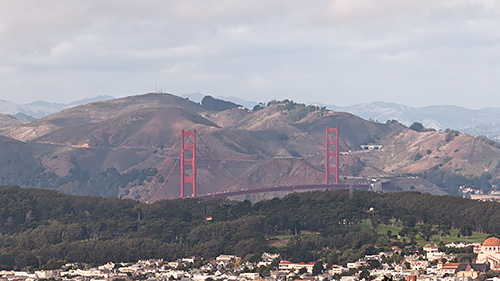
But how close, we wondered, could we get to that result with just Camera Raw?
We gave it one more shot (ACR above) using just Camera Raw's sliders (and the Curves tool) and ... well, you be the judge.
The last two images are naturalistic but the camera image is probably closer to what we were seeing that day. The first image is a good deal more interpretive than any of the others.
Guess which one we like.
This is another example of what you can do in post processing with what can only in kindness be called a subpar capture. A lot.
You do have to shoot Raw (or Raw+JPEG if you want the best of both worlds) to tap into this kind of latitude. Shooting just JPEG is for those times when you don't want to do post processing. But that would have left us with what you see as that Camera shot above. Not too inspiring.
While we hope you find these walk-through comparisons inspiring, we realize a bit more guidance would be welcome. So we're working on a post-processing checklist to help you step through your own edits. When to do what, whichever image editing software you're using.
Because, you know, post processing is half the fun of the photography game. Why deny yourself the pleasure?