Photo Corners headlinesarchivemikepasini.com
![]()
A S C R A P B O O K O F S O L U T I O N S F O R T H E P H O T O G R A P H E R
![]()
Enhancing the enjoyment of taking pictures with news that matters, features that entertain and images that delight. Published frequently.
Mike's Free Photo Calendar Kit


3 December 2014
We don't like Thursdaying on Wednesday or Christmas before Thanksgiving but we do think this is a good time to be thinking about 2015 calendars. And there are plenty of online photofinishers who will be happy to print a calendar from your photos to prove it. But that seems to us like way too much work.
Who wants to put together 12 collages, one for each month, and mark the birthdays, anniversaries and upcoming events like graduations and weddings? Sure, it's a great idea -- until you actually sit down to do it. Then that idea turns into (seven-second audio delay beep) labor.
No, we prefer a simple (one might say "elegant") one-page calendar with one (one might say "stunning") image. Instead of work, that can actually be fun.
THE KIT | Back to Contents
Picking the photo, anyway, can be fun. The calendar part can get tricky. So we've put together a free Photo Calendar Kit you can download and slip your own photo into.
It's a Photoshop PSD file with a layer for your image and another with 2015 on it. You can place your image on the bottom layer (or just paste it into a new layer and move it under the calendar layer) and be done with it.
Or you can rotate the image, resize the calendar and play with it until 2016 rolls around. That's why it's a kit: to make it simple and fun to use.
To make it even more useful, we'll explain how it works. You can easily modify it to your own requirements if you understand it.
GENERATING THE CALENDAR | Back to Contents
The first problem is getting the calendar data for any particular year (like the ones to come). For that, you just have to find a calendar generator.
There are plenty of online calendar generators but we prefer David Seah's compact version for our one-page calendar. There are a few alternatives linked at the bottom of his page, all of which save the calendars as a PDF, which is what you want. Some of them include holidays, too.
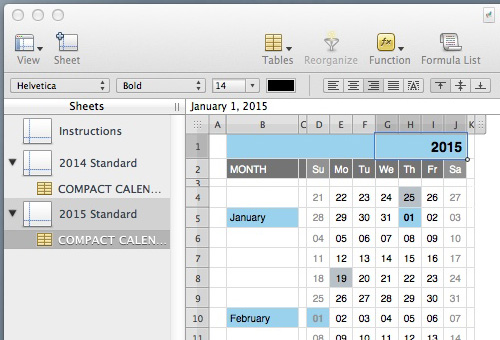
2015. The year in a Numbers spreadsheet. Format to your heart's delight.
If you know your way around a spreadsheet, you can download a template and roll your own, too. If you want special formatting (beyond the options those online tools provide) or to add your own special dates, this is the way to go.
Seah's compact online calendar is available on his site in an Excel version or you can grab a Numbers template that closely resembles his compact (and attractive) format. Instructions are on the first page of the spreadsheet.
PLACING THE CALENDAR | Back to Contents
However you generate the calendar, if you create or export a PDF you can open it as a layer and scale it to fit over (or next to) your image (without reducing its quality) in your image editing software.
We used Photoshop CC 2014.2 to do ours this year. But we also opened the PSD file in Photoshop CS5 to check for compatibility. Which means it should work in other image editing software that supports the PSD file format.
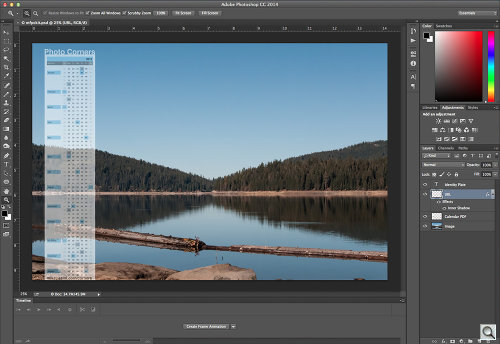
Layers. We put our name and URL on separate layers to show how you can brand the calendar for your business.
A letter-sized sheet is about the minimum for this job. We've tried 4x6 and 5x7 prints but the calendar text is just too small to be useful.
The calendar layout covers about a third of a letter-size page in portrait mode. In landscape format it takes about a fifth of the page, although the text is necessarily smaller.
We selected a landscape image just to show off our photo. But we also tried a portrait. You can't really lose, but you should consider the aspect ratio. Either crop the image to the aspect ratio of your sheet or you'll have to trim your sheet to the aspect ratio of your image.
Then import the calendar PDF to a layer of its own.
Our PDF came in with a white background. If yours is transparent, you'll want to create a background for it so it remains readable over your image. Just create another layer between the PDF and your image and draw a background for the PDF that you can fill with white. Merge the PDF onto that white background.
You can resize the PDF but make sure you don't distort it.
ABOUT THE IMAGE | Back to Contents
The image we used in the kit is our 2009 photograph of Bucks Lake in Plumas County near Quincy, Calif. If was a chilly but beautifully still morning.
You can simply print the file to get a calendar from us <g>. We hope you agree our peaceful image makes a nice gift all by itself. And as a kit, it's even better.
Our image dimensions are 43268 x 2845 pixels. They're really the only fixed dimensions of the kit (not counting the URL layer, which is derived from the image and can be dispensed with or recreated to meet your own needs).
So if your image is larger or smaller, you'll only have to resize the calendar to fit. The important thing as far as size goes is to make sure your image is large enough to supply the printer at least 150 pixels per inch.
BLENDING THE IMAGE WITH THE CALENDAR | Back to Contents
In the kit version, the calendar layer's opacity has been reduced to let the image show through. Very chic, no?
Calendar Kit. It's a layered Photoshop document.
At 100 percent opacity, you have an opaque white (or any color of your choosing) background. Adjust the opacity to best show off your image while maintaining the readability of the calendar.
If you keep the calendar to the side, apart from the photo, 100 percent opacity is just fine, of course. You can gain nothing by making it transparent.
THE LAYERS | Back to Contents
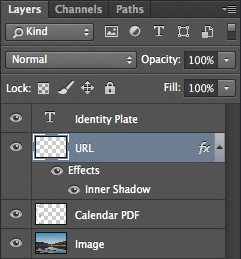
The kit has four layers. The important layers are the bottom two: Calendar PDF and Image. That's all you really need.
But you might want to display your company name and Web site URL, as we did. So we added two more layers.
- Identity Plate: This layer contains company name in the same color as the PDF import's background so it seems to extend from the background. We just used the type tool to add it.
- URL: For the Web site address, we got a little fancy, using a technique to make it look like you are seeing through the calendar layer. It's actually an image layer selection overlaid on the calendar. We added an inner shadow to make it stand out a little more, too. But black type works perfectly well, too.
You can, of couse, just turn off those two layers before you print, if you prefer an unbranded calendar. Flexibility is one of the virtues of layers, after all.
GETTING THE KIT | Back to Contents
Now that you know how to turn an image into a calendar, you can launch your image editor and do it from scratch. Or you save yourself a little time and just download Mike's Free Photo Calendar Kit, a 54.2-MB download.
It may be pushing things to wish you a Happy New Year, but according to our calendar, it's not too early to wish you Happy Holidays!