Photo Corners headlinesarchivemikepasini.com
![]()
A S C R A P B O O K O F S O L U T I O N S F O R T H E P H O T O G R A P H E R
![]()
Enhancing the enjoyment of taking pictures with news that matters, features that entertain and images that delight. Published frequently.
An Island In the Middle Of The City


2 January 2017
We'd hiked up Twin Peaks last week lugging our Nikon D300 and 18-200mm Nikkor along just to burn off a few more holiday calories. But as we circled the crowded overlook and turned for home, we hadn't taken a single shot.
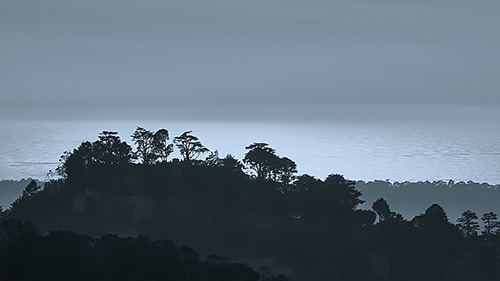
City Island. Rising out of the mist, a sight we hadn't seen before.
But there just beyond our grasp was a charming landscape we'd never seen before. The glare of the Pacific Ocean was the backdrop, the coast in haze stood before it with some battered trees on a small hill standing in silhouette before another hill in the foreground.
We pulled out the camera and took the shot at f16, 1/1000 second and ISO 400 with a 170mm focal length and a polarizing filter.
It was a Raw capture so we didn't give any thought to rendering it in color or grayscale. But we felt like the real story of this image was its tonality. It would be tricky to keep some hint of the ocean waves in the highlights while holding onto the trees in the dark foreground.
We took a closer look at the file this morning but decided to shake things up a bit by opening it in Capture One Pro 10. We worked with Capture One Pro 9 last year but have just been getting our feet wet with the new version.
Once we had the image open, we optimized it as a color image. We didn't like the warm tint, though. And rather than fiddle with the color balance (which is easy enough to do in Capture One Pro), we decided to go monochrome.
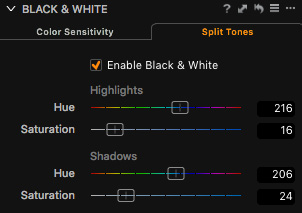
Split Tone. Blue highlights, green shadows.
The Black and White panel has two tabs: Color Sensitivity and Split Tone. We're big fans of adjusting Color Sensitivity because you can lighten or darken the tones of an image by their hues.
For this image we darkened Cyan and Blue and lightened Yellow. That made the sky a bit darker while adding some detail to the shadows.
We liked that but we thought we'd try Split Tone to make the image a bit richer. We knew we wanted the highlights to be blue and the shadows to be green so they'd reflect the natural coloring of the sky and the trees. We set the Hue sliders for Highlights and Shadows using the color hints of the slider.
But we also wanted the effect to be subtle. That's what the Saturation slider is all about. In fact, when you set the Hue with no Saturation, you don't see any change in the image. You have to enable Saturation to see the color you're working with.
So we oversaturated to pick the Hue and then tamped down the Saturation until we liked the effect.
We weren't done, though. We had some Clarity to add and a few other little tweaks before we exported the full resolution image.
Which is not what you see here. We resized the image and created our tile crop for the image carousel in Photoshop CC to finish the job.