Photo Corners headlinesarchivemikepasini.com
![]()
A S C R A P B O O K O F S O L U T I O N S F O R T H E P H O T O G R A P H E R
![]()
Enhancing the enjoyment of taking pictures with news that matters, features that entertain and images that delight. Published frequently.
Leaves


31 August 2017
We take a walk around the neighborhood every day, bringing one or another camera (sometimes just the one in the phone) along for the ride. There are several routes we follow but the other day we made a slight adjustment.
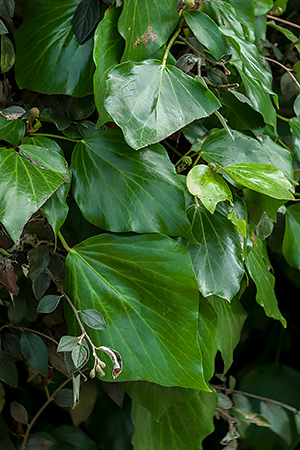
Leaves. Holding the highlights was the trick.
We walked on the opposite side of the street from the side we usually walk down.
And where we tended to walk on either side, we used a different street. We have a smorgasbord of streets here, one right next to the other, so no extra effort was involved.
The benefit of this approach was a whole new set of views. Similar but different enough that we were looking from the other side of the street or the other side of the fence.
The familiar was fresh.
We'd passed this vine-covered fence on the sidewalk it borders too many times to audit. But a view of a house perched precariously on top of a small hill led us to the other side of the fence.
We were trying to get a shot of the hill, the house and the blue sky unobscured by the power lines in front of us. And we did.
Then we turned around and saw the full, lovely leaves of the fence. So we snapped a shot.
There was something about the light and the luscious greens that struck us as particularly lovely.
There was something about the light and the luscious greens that struck us as particularly lovely.
But it was devilishly elusive to draw out in post processing.
When we opened it in Adobe Camera Raw we knew right away we'd have to choose between the detail in the shadows behind the big leaves and the leaf on top catching the light.
The Raw file had detail in both and we could have preserved it, but when we tried that, the image lost what appealed to us. And, clearly, the subject wasn't the little leaves in the shadows.
But even when we dropped the tones in the big leaves that draw your attention, that bright leaf was too bright. There wasn't a slider in the world that would pull it back.
So we resorted to an old trick. We used a highlight mask to manipulate just the bright spots on a layer all its own set to Multiply. And to vary the effect until it was just right, we changed the mask's Opacity.
Here are the details, from an article we wrote about it in 2003:
With your image open, select the highlights of your image with the keyboard command Command-Option-~ [M] or Control-Option-~ [W]. Whites and lighter tones are selected, while darker tones are masked.
If the problem is muddy shadows, invert the selection with Shift-Command-I [M] or Shift-Control-I [W]. That selects the shadows of the image. Blacks and darker grays are selected, while lighter tones are masked.
The next step is to move that selection to a layer of its own where you can use it like a mask to alter just the selected tonal values of the original image.
So create a new layer consisting solely of the selection by pressing Command-J [M] or Control-J [W].
Now we want to blend the mask with the original image. The blending mode we need depends on whether we want to burn in the highlights or dodge the shadows.
If you're working on the shadows, change the selection layer's blending mode to Screen to lighten the darkest parts of your image. If you are working on the highlights, change it Multiply to burn in the lightest parts of your image.
Finally, the mask itself can be modified to accommodate more difficult subjects, either by changing its opacity, drawing directly on it or using Levels or Curves to modify the tones it affects. Keep both layers visible as you modify the selection layer to see the effect of your changes in real time.
It struck us that what we learned by walking a slightly different route applied to our editing of this image, too. We used the modern sliders of Camera Raw but it didn't hurt to run the image through an old technique to finish it off.
In the end, it isn't so much about the route you take so much as it is about taking the walk in the first place.