Photo Corners headlinesarchivemikepasini.com
![]()
A S C R A P B O O K O F S O L U T I O N S F O R T H E P H O T O G R A P H E R
![]()
Enhancing the enjoyment of taking pictures with news that matters, features that entertain and images that delight. Published frequently.
Secrets of a Master Framer


3 November 2022
Yesterday our brother-in-law George Bailey, who was a master picture framer, passed away at the age of 88. One of the highlights of our frequent trips to Rochester, N.Y., was always a visit to George's framing shop. And after one such visit in 2001, we wrote up a few things we'd learned over the years by watching the master at work.

George Framed. Our favorite photo.
Many things have changed in this business since we wrote that piece, but the framing advice still stands.
In tribute to George, we reprise that June 15, 2001 piece here.

Secrets of a Master Framer
Rochester, N.Y. is the Lourdes of imaging, the Plymouth Rock of photography, the Cooperstown of snapshots. From Kodak's headquarters to the $300 million Infotonics Center of Excellence for optics research (which is just on the drawing board), it's a Disneyland for any imaging enthusiast.
When we're in town, our first stop (we'll report on a few others in upcoming issues) is always George F. Bailey's framing shop, now located (although somewhat obscurely) at 565 Blossom Road. George always has a pot of coffee on and a few people slaving away at the framing table as one or another artist or photographer calculates exactly how long they might have to hang around until George orders a pizza.
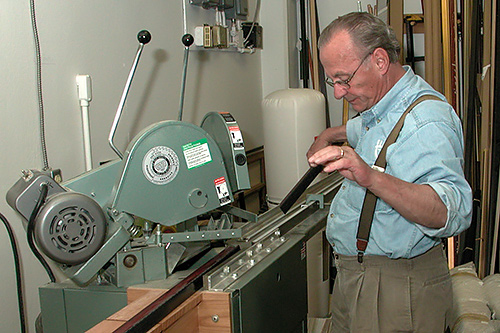
George at Work. Inspecting a mitre cut.
Over the years we've learned a bit about custom framing by watching the pros at George's place. And we've adapted what we've learned to our workbench at home to enjoy a little higher standard of framing than we might otherwise.
A GOOD FRAME
A good frame does two things:
It marks off a spot of reality as something special. This square foot of space, it says, is sacred. Observe!
It protects what it frames from flying spills, insipid humidity, eternal dust and even stray sunlight.
Sometimes (as George would tell you) you need a professional framer.
A good framer knows his stock. The hand-rubbed gilded laminates, the painted plaster, the carved moldings, the modular metal frames.
They know what accent color to put in the fillet of a double mat. They use archival materials to protect your originals (and, as one look at old George would confirm, they're experts in preservation).
They mount your work so it stays flat before matting it. They build a perfectly-mitered frame then seal the back from dust, attach rubber bumpers to protect your walls and screw in hook eyes and wire so you can hang your masterpiece. Then they label the piece with whatever identification it has.
But beyond this craftsmanship a master framer also has an eye for design. George's eye for color is unfailing. We would have to wrestle with invisible demons to make such an elegantly complementary choice of frame and mats. But don't ask him how he does it. It's a little like asking a magician to reveal his secrets.
Unfortunately the pro isn't cheap. Which is where we come in.
FRAMING SUPPLIES
Unlike the pro, the home framer can't stock yards of uncut frames and walls of uncut mats. Nor does the home framer enjoy the pro's specialty tools like oval mat cutters and mitre saws powered by compressed air.
We keep an eye out for inexpensive but attractive and well-joined frames whenever we're foraging the malls. We often find discounts and close-outs anywhere from the local drugstore to the local superstore. And we're also fortunate enough to have a great discount frame shop in our area (Cheap Pete's).
Don't be too concerned about damage to the frame (frames with cosmetic damage can be real bargains). No one actually looks at a frame, after all and they're easy to touch up with no more than a dark felt tip pen. George keeps a selection of colored felt pens just for that.
Look for a frame with glass (plastic doesn't break but it does scratch) whether it's made of wood, plastic, metal or plaster. Never a buy a frame whose corners you can't inspect. Glass clip frames (like Pico) and those very small, inexpensive, black plastic frames (like MCS Industries' Format series) are great for less formal display.
Don't be shy about buying sizes larger than your prints. All they need is a mat and a mat keeps the surface of your print from sticking to the glass, which can ruin it.
MATS
Some frames larger than 4x6 inches include mats. But they are often cut a little small for photos (sacrificing nearly half an inch in each direction) and often not very well cut.
While you can buy precut mats, they only come in standard sizes. Again they may be a little tight.
But cutting your own mats just takes a little practice. And you can decide whether to invest in acid-free archival mats or less expensive ones.
TOOLS
George has more power tools than Norm Abrams in his New Yankee Workshop. After all, as he likes to say, "I've got a corporation to run." But he prefers a silver, handheld Dexter mat cutter to cut everything but ovals. A sharp blade is essential and keeping the blade sharp by cutting the new mat over an old mat is smart. A self-healing cutting mat is an inexpensive ($12) luxury.
You do need a straightedge to guide the Dexter. We like our hefty old aluminum T-square. No straightedge is quite hefty enough, though. You'll want a coffee can half full (or so) of pennies to weigh down the far end.
A metal ruler (for precise measurements) is a good idea, too and a couple of triangles help make guide lines perpendicular to the straightedge. All of which would be useless without a mechanical pencil (whose point never broadens and whose sleeve can ride cleanly along the straightedge as you draw your guidelines).
The only other tool you need, really, is a paper cutter that can slice through mat boards.
Among our favorite supplies are double-sided tape, single-edge razor blades, self-stick bumpers and hanging hardware.
CUTTING THE MAT
Measure the crop you want and scribe guidelines on the back of the mat to those final dimensions. Extend the lines well past the corners because the cutter guide is well ahead of the blade.
Line up your straightedge about 1/4-inch outside one guideline (exactly how far depends on your particular mat cutter) and put the penny can at the far end so the straightedge is anchored.
How far to start before the corner and how far to go beyond the far corner requires a simple calculation. Just add 1/16-inch to the width of the beveled edge your cutter will cut and start that far in front and go that far beyond each intersection.
Cut (with firm pressure) until you are past the opposite corner. Repeat for the other three sides.
The inside should fall out easily, but you aren't done yet. Flip the mat over and "burnish with a bone" by taking a hard piece of plastic and rubbing the corner cuts back into the surface so they are invisible. Invisible corners are the mark of a master mat cutter.
We rarely cut a second mat but, if you want to double mat, select a light color for the outside mat and a highlight color for the inside or fillet mat. Let the inside mat show just 1/8 inch all around. If it's doing its job it will be the color of some small detail in the image, pulling you into the picture.
MOUNTING
Mounting helps keep the print flat. Let as little material as possible contact the print, though.
George likes to use a dry mounter that melts a plastic adhesive to the back of the original so it can be fixed to a hard board. Well, he does if the original can take the 150-180 degrees needed to melt the plastic (and inkjet prints on plain paper don't, although photo glossy paper survives well). The danger is that the image will transfer to the release sheet that sits between the image and the press.
To mount an image, we simply use paper tape, archival tape or pocket corners on all four corners to attach the print to either the cut mat or a backing board. This lets the paper expand and contract naturally with the weather.
ASSEMBLY
Now it's time to clean and assemble. Use a glass cleaner on both sides of the glass. A can of compressed air is handy for removing anything on the surface of the image but a big drafting brush is forever. Then just drop the matt/image/backing assembly onto the glass in the frame.
Take a peek to make sure everything is clean and correctly lined up. And if your image is in contact with the glass, check for Newton rings (those circular rainbows) that occur when the print presses too tightly against the glass.
To eliminate Newton rings reduce the pressure. If that doesn't work try squeezing a bottle of talcum powder so it puffs out a cloud of powder and then running the print quickly through the nearly invisible cloud. Enough powder will stick to the print to separate it from the glass without actually being visible. You have to be subtle (don't dust the print) but a little goes a long way. Krylon matte spray works, too. The glass will restore the glossy finish.
And that's important because a matte finish or non-glare glass reduces light transmission up to 20 percent, dramatically diminishing the density range of your image. The best way to avoid glare, according to George's chief technologist Tom Abbott, is to just "move your head."
It's far preferable to avoid contact between the glass and any print you can't easily reprint, though. Moisture can make the print stick to the glass. And removing a stuck print almost always damages it.
Fix the assembly in the frame with whatever device (staples, brads, springs) is included with the frame.
To cover the back (protecting your work from dust), use plain brown paper. Nothing fancy. Run double-sided tape along the back of the frame as close to the edges as you can and then lay the paper on top, stretching it tightly across the back as you put it down. Use a razor blade along the outside edge to trim off the excess.
Attach a self-stick bumper to each bottom corner to avoid marring your walls.
Measure down a quarter (portrait) to a third (landscape) of the length of the frame from the top for the hook eyes. Start them with a small hole made with a nail, twist them in until they sit up straight, then lace them with a brush handle or screwdriver and spin them in.
If you have a label for the image, use double-sided tape to attach it to the back and you're done.
HANGING
Except for hanging.
Molding hooks, if you have them, are a fine idea. They let you vary the display every now and then without repainting. Instead of heavy wire, monofilament fishing line is fine (and rated for weight).
Height matters. Eye-level is the ideal (we are all different heights, but your height is ideal for this provided your feet reach the ground).
If your frame hangs unevenly just use two hooks, but the bumpers cure this, too.
When you're done, step back and admire your work. And then start thinking about all the fancy effects (double and triple images) you can now indulge in.
DON'T GO
George is an inspiration there, too. He's such an incorrigible framer, he miters two-by-fours into packing crates for the frames he ships. And if, like Theodore Roosevelt, you happen to write the shop a thank you note, he'll even frame that.
After a while, we take our leave of George so he can get back to work. "Leaving already?" he frowns. "Don't go!" But we do. Because if we didn't, we'd never get to visit again.