Photo Corners headlinesarchivemikepasini.com
![]()
A S C R A P B O O K O F S O L U T I O N S F O R T H E P H O T O G R A P H E R
![]()
Enhancing the enjoyment of taking pictures with news that matters, features that entertain and images that delight. Published frequently.
That Iris Again


15 July 2024
We thought we'd try a little experiment and as fodder we grabbed that image of an iris we were working on recently.

Iris. This time edited on an iMac.
The experiment was to edit the original file (converted to a DNG from the camera NEF) on a 2017 iMac with a Retina display.
Since we acquired the 16-inch M2 PowerBook over a year ago, we've been doing all our image editing on that Retina display. But previously (for years previously) we'd been editing images on a 17-inch 2010 MacBook Pro -- and that had remained our backup over the past year.
Even someone has obtuse as your editor, however, realizes a 2017 machine is likely to have some advantages over a 2010 machine. A lot happens to computer technology in seven years.
But the 2010 PowerBook has an SSD while the 2017 iMac is a HDD. And the 2010 PowerBook actually has a faster processor and two GPUs. But we were able to bump the 2017 iMac from 8-GB RAM to 24-GB while the PowerBook is frozen at 8-GB. Then, too, the 2010 PowerBook is running Monterey only thanks to OpenCore Legacy patches whereas the 2017 iMac can run it natively.
Monterey is too old for Photoshop, Adobe reminds us, although even the Camera Raw filter runs fine on the iMac (not the PowerBook, though, where we have to reinstall an older version now and then). Which is why we moved to an M2 a year ago. But OpenCore Legacy can patch the iMac to run something more modern, if we decided to work on the iMac.
So we thought we'd try running Lightroom and Photoshop on the iMac. That, incidentally, required us to run InDesign on the M2 because our Creative Cloud license permits us to run the suite on two, not three, machines. Fortunately, it's pretty easy to enable and disable which machines are active but we wanted to avoid that if possible.
So this image was edited on the 27-inch iMac screen. And, we have to say, it was fun. We didn't have all our customizations in place yet so it was a basic edit without automations but that only slowed us down a bit.
We did things a little differently on the iMac.
After optimizing the exposure the way we normally do, we used the new masking tools to Select the Subject and immediately inverted it. We wanted to work on the background.
To invert the selection, you hover over the mask layer until a three-dot menu appears. Invert is on that menu. It is amazing how easy it is to get lost (and therefore frustrated) looking for things you know are somewhere. Not just with Lightroom. We have had similar issues with every tool we use.
The masking adjustments in Lightroom are extensive, mirroring all the panels usually available. So we were able to darken the background, give it a red tint and adjust the luminance using the Point Color tool.
That's why we had to select the subject and invert it, in fact. We wanted to protect the similar colors (that yellow on the petal) in the flower from changes we were making to the background.
We had never particularly liked the way the iMac rendered images when it was at Mom's house. Everything seemed too dark. We did eventually calibrate it but we didn't trust it to match what we were doing on the calibrated M2.

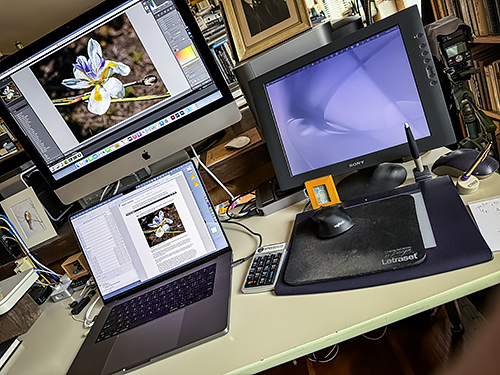
Three Monitors. You'd think we were trading stocks.
The iMac should be recalibrated now that it's here. But the previous calibration done with a Datacolor SpyderX did a good job, we were surprised to see.
We're not sure if we're going to commit to this arrangement. And by the time we decide, we may just have transitioned to a 27-inch M9 iMac.
But meanwhile, it is nice to work on a large Retina screen.