Case Study: OS X Contextual Menu Servicemikepasini.com
For years we relied on PhotoToolCM to read the Exif header of our image files. This handy contextual menu told us (with nothing more than a right click) the image size and a few other important details we wouldn't know without opening the image in Photoshop. Unfortunately this indispensable tool was never updated for Snow Leopard. Here's how we rolled our own.
Strategy
We wanted the same quick, right-click function to get at the Exif header of our image files as PhotoToolCM had provided. No compromises.
The simplest way to mimic that behavior is to build an OS X Service using Automator. Services appear when you right-click on an item.
Of course, you still have to mine the data. To do the heavy lifting, we planned to rely on Phil Harvey's ExifTool.
We could run ExifTool in a shell script inside an AppleScript in the Automator Service. The results of the shell script could be saved to a variable that would be displayed by the simple display dialog AppleScript command.
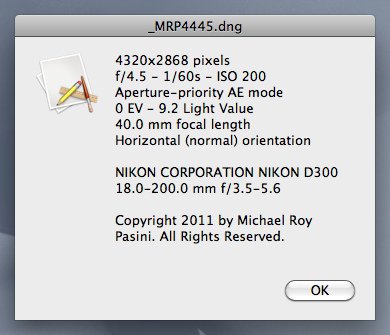
The dialog version in action.
ExifTool
There are two parts to ExifTool. One is the Perl library and the other is the command line application. For this project, we use the command-line application installed at the same time as the Perl library.
ExifTool's job is "reading, writing and editing meta information in a wide variety of files. ExifTool supports many different metadata formats including EXIF, GPS, IPTC, XMP, JFIF, GeoTIFF, ICC Profile, Photoshop IRB, FlashPix, AFCP and ID3, as well as the maker notes of many digital cameras by Canon, Casio, FujiFilm, GE, HP, JVC/Victor, Kodak, Leaf, Minolta/Konica-Minolta, Nikon, Olympus/Epson, Panasonic/Leica, Pentax/Asahi, Reconyx, Ricoh, Samsung, Sanyo, Sigma/Foveon and Sony."
And it does it very well. Over the years, we've relied on it to unearth all sorts of data about our images. And it has kept pace with the rapid development of digital imaging -- including the trend to hide important data in the black box of MakerNotes in the Exif header.
It also has a number of interesting command line switches. Two are important for this project. The -fast switch skips reading to the end of the JPEG file for a quicker run. The -m switch ignores minor errors and warnings, which in this case means not getting flustered if the LensModel isn't reported (often the case).
To test our ExifTool commands, we simply opened Terminal and keyed them in. Here are the two we ended up with:
exiftool -fast -m -p '$ImageSize
  pixels$/f/$Aperture -
  ${ShutterSpeed}s -
  'ISO $EXIF:ISO$/
  $ExposureProgram mode$/
  $ExposureCompensation EV -
  $LightValue Light Value$/
  $FocalLength focal length$/
  $Orientation orientation$/$/
  $Make $Model$/$LensModel$/$/
  $Copyright$/' [filename]
and
exiftool -S -fast [filename]
When we got what we wanted, we were ready for Automator.

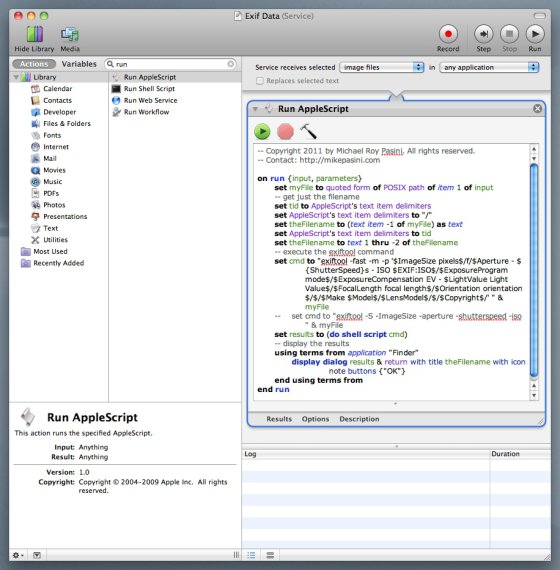
Here's what the ExifTool command for the complete report looks like in Automator.
Automator
After launching Automator, we selected the Service template and configured the Service to receive selected "image files" in "any application." That sets the context for this tool. It will only appear when you right click on an image file.
Next we drag the Run Applescript action into the workflow pane. It's the only action we need.
Between the "on run {input, parameters}" and the "end run" lines we do all our work. And that's just three things. We massage the file name passed to the AppleScript, we set up and execute an ExifTool command and, finally, we display the results in a dialog.
Massaging the filename is a two-step dance. The first part is to turn what Snow Leopard passes to the AppleScript into something that works with ExifTool in a Unix shell script. That's easily done:
set myFile to quoted form of
  POSIX path of item 1 of input
Then we want to snag just the filename from that string:
set tid to AppleScript's
  text item delimiters
set AppleScript's text item
  delimiters to "/"
set theFilename to (text item -1
  of myFile) as text
set AppleScript's text item
  delimiters to tid
set theFilename to text 1 thru
  -2 of theFilename
That's a bit of work. We break the string on the path symbol, a forward slash, and get the last word, which is the filename. Then we trim off the last character, which is always a single quote. We also have a couple of lines in there to save the current text item delimiters and restore them after we've changed them to the forward slash.
Now the fun stuff. At first, we decided to list the image size on one line, then the three main exposure settings (aperture, shutter speed and ISO) on a line of their own followed by any copyright information in the Exif data. But as we used the new tool, we decided to report a few more settings. And why not?
To do that, we simply built a little string to pass along to ExifTool using its -p switch. The string often includes a label so we know what we're looking at. And it contains a return character to end the line (which in ExifTool turns out to be "$/"). Of course, we need the tag, too. With a dollar sign in front of it.
So if you dissect our ExifTool command line, you should be able to figure out what our display will look like:
set cmd to "exiftool -fast -m
-p '$ImageSize pixels$/
f/$Aperture- ${ShutterSpeed}s
  - ISO $EXIF:ISO$/
$ExposureProgram mode$/
$ExposureCompensation EV
  - $LightValue Light Value$/
$FocalLength focal length$/
$Orientation orientation$/$/
$Make $Model$/
$LensModel$/$/
$Copyright$/' " & myFile
Alternately, you might want to see everything:
set cmd to "exiftool -S -fast " & myFile
But this requires sending the output to a document window because it's too much for a dialog box to handle, as we'll explain.
Next we run the shell script:
set results to (do shell script cmd)
And finally, we display the results:
using terms from application "Finder"
  tell application "SystemUIServer"
   activate
   display dialog results & return
     with title theFilename
     with icon note buttons {"OK"}
  end tell
end using terms from
That's a little trickier than it has to be. There's more than one kind of dialog and we want the more elaborate one the Finder uses. That lets us set the dialog's title bar to the filename, show an icon and just one button.
If you elected to see everything using the alternate ExifTool command line above, you'll want to send the output to a new text file. TextEdit is installed by default on every Mac, but we prefer TextWrangler:
tell application "TextWrangler"
  activate
  set myTitle to "Exif Data for "
   & theFilename
  make new text document
   with properties
   {name:myTitle, text:results}
end tell
That opens a new scrollable window in TextWrangler with the data.
The final step is to name our Service by saving it.
We called the dialog version Exif Data. For the full listing (why not have both, after all?) we named it Exif Data - all. They both appear when we right click on an image and slide down to the Services menu.
Here's what the ExifTool command for the small dialog looks like in Automator.
Conclusion
Services are stored in System/Library Services and /Users/[yourname]/Library/Services.
You can download ExifData.zip, which contains three Services. In addition to the dialog version which reports selected tags, there is a TextEdit and TextWrangler version of the complete report.
After you download it, uncompress it and pop them into your Services folder to try them out. You can also open them in Automator to make any changes you want, too.
Turns out there are a couple of advantages to using this Service over the old PhotoToolCM. The first is that the dialog or text window stays up after the right click has been lifted. You can even move them around.
The second is, well, ExifTool. To update these Services to handle the latest and greatest cameras, all you have to do is download and install the latest and greatest ExifTool.
That's pretty nice.
Addendum
After a few system updates, we discovered this AppleScript fails with the error message, "The action 'Run AppleScript' encountered an error." Automator isn't very helpful in revealing the error.
You have to make one change to the code in all of these actions. Simply add the path to the exiftool command. So where you see exiftool you should expand it to:
/usr/local/bin/exiftool
We've updated ExifData.zip with the changes for you.
You may wonder why it took us so long to discover this no longer works.
The answer is that we found a better way of doing things, as we explained in June Archived from 2016. We moved the AppleScript to Keyboard Maestro which, unlike Automator, has no trouble running it (and running it more quickly too).