Photo Corners headlinesarchivemikepasini.com
![]()
A S C R A P B O O K O F S O L U T I O N S F O R T H E P H O T O G R A P H E R
![]()
Reviews of photography products that enhance the enjoyment of taking pictures. Published frequently but irregularly.
Mastering Image Development With Jardine


20 May 2013
Ansel Adams opened his multi-volume technical series on photography with a chapter titled Visualization, which "refers to the entire emotional-mental process of creating a photograph," as he put it. He continued:
It includes the ability to anticipate a finished image before making the exposure, so that the procedures employed will contribute to achieving the desired result. This much of the creative process can be practiced and learned; beyond lies the domain of personal vision and insight, the creative "eye" of the individual, which cannot be taught, only recognized and encouraged.
Adams was writing in an age that wasn't entirely convinced of the legitimacy of photography as an art. So the concept of "visualization" argued that the photographer, not the technology, was in charge. And his claim that personal vision and insight are not teachable set the velvet rope up between viewer and artist.
These days it's self evident to anyone with a Web browser that photography is quite amenable to personal vision -- and that hardly anybody knows what they're doing.
A few do, though. And George Jardine is one of them.
He's just released The Image Correction Master Class, a set of 21 new videos spanning five hours of instruction on image correction in Lightroom and Photoshop.
DON'T BLINK
In no small way it is the descendant of Adams' series. But it has the advantage of discussing the subject in an era in which you can examine your exposure in the camera and reexpose your image on your computer.
You might think that makes visualization as obsolete as a film data sheet.
But, as Jardine elegantly demonstrates with both his own captivating images and brilliantly clear charts and graphs, the game hasn't changed a lot. You still have to select a subset of observable values to fit the narrower range the technology can capture.
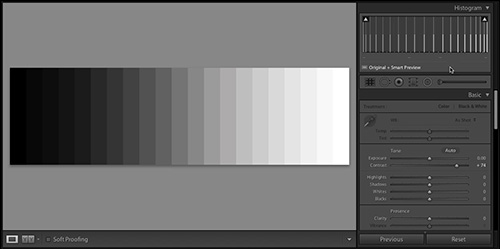
Contrast Simplified. Just one example of how Jardine demonstrates just what a slider does. The scale is manipulated by the Contrast control, the change reflected in the histogram.
Personal vision and insight?
They aren't obsolete either. But they take an interesting route in the new landscape. A less exclusive path that almost anyone can manage.
As Jardine puts it, the trick is to develop your eye. And as you watch him turn a Raw capture into an image, you see what he is looking for and learn how he gets there.
That approach may spoil the party for the Instagrammer and even the Lightroom fan who has collected so many presets they don't know what to do with them. But it's an approach that relies on two indispensable tools: your educated eye and the sophisticated image engineering behind the tools in Adobe Camera Raw.
IMAGE CORRECTION
If we have one grumble about the series it's that Jardine refers to this as image correction. That may give you the idea that this ia all about turning lousy captures into decent shots. Saving an underexposed portrait, say. Fixing things, that is.
But that's not what he's up to.
Instead, it's an image development class. You've captured a scene as a Raw file and have to develop the file into something beyond the data into an image. So it isn't so much correction as it is development.
And you get that perspective from the introductory video. Tone and color correction are indeed what we call these skills but its' really about correcting minor technical flaws but it's "an incredibly subjective process." It's a process of "interpretation," Jardine argues, aimed at getting an emotional response from the viewer that inspired the capture in the first place.
Consequently the master class isn't a description of a bunch of rules. It's a demonstration of what the tools can do so you can use them "to make your pictures look the way you want them to look."
THE BASICS
Of course to know how you want them to look, you have to develop your eye. And developing your eye is perhaps the biggest benefit of a Jardine series, more useful than learning how the sliders work.
Jardine uses the tools and explains what he's doing but he also tells you what he's after, what he doesn't like about the image and what he'd like to see. And even after improving the image, there may be a tweak or two left that take it even further.
It's visualization in the modern era. Done at the keyboard.
And by watching him work, you learn what to look for in your own images and, indeed, from behind your own lenses.
You don't have to wait longer than the second video for a good example of that.

Starting Point. The default Raw conversion.
Raw files promise better image quality than a JPEG but, right out of the camera, they're just data, only a subset of which is rendered into an image preview by your Raw processing software.
What's really in there?
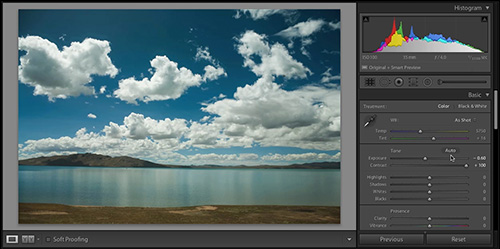
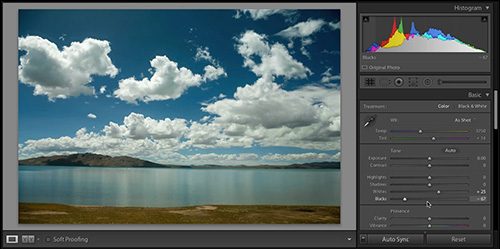
Different approaches. The original image improved with an Exposure/Contrast correction (top) and a Blacks/Whites correction.
You have to play with the Camera Raw controls to find out, using the histogram to find out where to look. Jardine starts there but goes on to show you what looks like an identical rendering made from 1) the Contrast control and 2) the Black and White sliders.
But it isn't really identical. And he shows you just how it differs. Which is no small feat considering you're looking a compressed video and not a Lightroom pane.
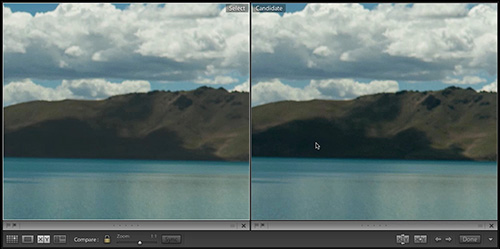
The Difference. A comparison of the techniques reveals subtle differences.
Seeing that small difference in the image educates your eye. And knowing which tools produced it teaches you Lightroom.
AND BEYOND
After one of the best demonstrations of tonal correction we've ever seen, Jardine explains color correction in one video devoted to White Balance. Sure, he takes you through how to use a Color Checker to create a lighting profile you can apply to a set of images. And yes he shows you how to read and use the White Balance tool. But as with everything else, he comes back around to the subjective nature of the task and shows you how to use the Temperature and Tint sliders to get the look you want.
Other segments give you a thorough workout on cropping, straightening and perspective correction, so it isn't all tone and color correction. But even in these often routine repairs, Jardine shows you more than one way to do things.
The Lens Corrections module is a good example. Here Jardine uses the new Upright Tool in Lightroom 5 Beta, showing you the addition controls it provides over Lightroom 4's perspective control. But you get to see how he handled the correction in Lightroom 4, too.
Cropping Exercises examines 10 images. Jardine improves each one by reframing what the camera caught. He shows you when to apply rotation and how to focus the viewer's attention on the important elements in the image, noting that editing is really the number one skill a photographer has to have.
The Wedding Portrait video demonstrates a number of techniques used in professional portrait retouching. Among them, you'll learn how to use the new spot healing tool in Lightoom 5 to reduce wrinkles and the Liquify tool in Photoshop to smooth contours. But there's a lot more going on in this video, from subtle improvements like bringing out eye color to dramatic treatments like high key vignettes.
Portrait retouching is taken to another level, though, in the bonus segment on using frequency separation to smooth skin.
LIGHTROOM
You might wonder if any of Jardine's Lightroom and Photoshop methods translate to other software. And you might guess that we think they do. Other software will certainly present different controls and it will wring the data out differently. That's what software does, after all.
But by focusing your attention on the histogram for analysis and image detail for evaluation, Jardine shows you what to look for and how to judge it. And you can do that in any Raw processing program.
PRICE, AVAILABILITY
To sample Jardine's tutorial experience (otherwise known as shoulder surfing), he's posted A Few Thoughts on Exposure & Tone Mapping, a free video "to help demystify the relationship between exposure values that are captured by your camera, and the brightness values they are mapped to during raw processing." It's one of the key segments of the master class, in fact.
The $29.95 Image Correction Master Class features 21 videos that included a discussion of five new Lightroom 5 features in the over five-hours of instruction.
The full list of titles along with their durations include:
- Introduction To The Series: 6:06
- Exposure & Contrast Basics: 14:21
- More On Exposure & Contrast: 21:18
- Contrast & The Tone Curve: 18:07
- White Balance: 23:16
- Working With Extreme Contrast: 20:40
- Pushing Contrast: 17:07
- The Drama Of Twilight 1: 17:04
- The Drama Of Twilight 2: 19:38
- The Travel Detail Shot 1: 11:27
- The Travel Detail Shot 2: 10:09
- The Travel Detail Shot 3: 6:10
- The Creative Landscape: 13:37
- The Travel Portrait: 13:26
- The Informal Portrait: 18:07
- The Wedding Portrait: 21:57
- Lens Corrections: 20:51
- Cropping Exercises: 12:12
- Correcting Film Scans: 13:06
- Correcting Film Scans: B&W: 17:34
- Bonus Bideo: Frequency Separation: 19:12
CONCLUSION
Jardine covers a lot of ground in this series. But it's artfully conceived, each lesson building on what you learned in the last. And you're constantly working on real world examples.
Video tutorials, like cooking shows, can end up being great demonstrations of stuff too hard to do in your own kitchen. But not Jardine's.
He does indeed explain how the controls work but he goes beyond which slider to use for what. He tells you what it is about each image that he thinks could be improved and how he plans to address the problem. Where more than one approach works, he illustrates it, but leaves no doubt about the subtle benefits of one over the other.
In the course of which you derive the real value of his approach: you educate your eye. You suddenly see the color shift or tone compression he wants to address. And when he does address it, he points out that this is the change he likes. You may prefer to do something else entirely.
By emphasizing the subjective nature of these "corrections," he leaves the real fun to you. And fun is the word. Once you understand what you can do with an image, you enjoy the satisfaction of having taken it somewhere you wanted it to go.
Let's call that visualization for the digital age.
Comments
I am a seriously challenged "part-time" enthusiast-learner of Lightroom and all things Photography. But George just seems the best place to spend my time learning. His instruction is so engaging, insightful and entertaining.
Appreciated your review Mike. Will get the videos, try to find time to ingest 'em and have no doubts will feel like its been a worthwhile investment and exercise.
-- Larry King
Couldn't agree more, Larry. A Jardine video is "shoulder surfing" at its finest! The Imaging Correction Master Class bucks the fashion (applying presets) but reveals how the newest technology addresses the perennial concerns of photographers -- pro or amateur. And it's a great way to learn just why those concerns still matter. -- Mike