Photo Corners headlinesarchivemikepasini.com
![]()
A S C R A P B O O K O F S O L U T I O N S F O R T H E P H O T O G R A P H E R
![]()
Enhancing the enjoyment of taking pictures with news that matters, features that entertain and images that delight. Published frequently.
A Follow-Up: Two 'Secrets'


24 March 2014
The reaction to our Bouquets to Art slide show Friday from people who were there that night has been amusing. They can't believe we attended the same show.
How did you get those shots with all those people at the show? How come your shots are so clean?
One explanation for that would be our timing.
We employed a very judicious selection of which 1/30 of a second to fire the shutter. We used single shot release mode rather than continuous because we were timing our exposures in long and irregular intervals. Every shot was deliberate.
But timing isn't the whole story. And two other factors we relied on make a nice remind us of a conversation we had some months ago with a young photographer.
CROPPING
Our friend isn't new to photography, having shot with dSLRs a few years now. He likes the way shutter speed can alter motion and he's shot some nice night scenes and artfully composed landscapes. He even owns a tripod.
But like all of us, he has his sense of what's legal and what's cheating, what's real and what's artificial, what's organic and what's plastic.
For one thing, he told us, he never crops.
Cropping. The art of focusing attention.
We always feel a little sorry for anyone who says this. The very act of framing the image in the viewfinder is a crop. And if you are using a dSLR, you are probably artificially limited to a 3:2 aspect ratio as well.
With those two strikes against your conceit, you might as well look at strike three whizzing by when you don't crop in post production.
Most of the images in our slide show were cropped. Some a little bit (to straighten them, say), some severely (to isolate the art).
And we didn't feel at all obliged to honor any of the standard aspect ratios either. There are some uncommonly narrow images in both orientations and some almost square ones.
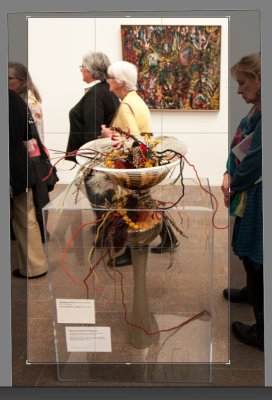
Not all of this was about crowds, but the crowds made it necessary. Half a profile at the edge of the frame may sometimes make an intriguing crop but often it's just disturbing, like that illusion of sawing an assistant in half.
And yet, once we isolated the art from the people, there were still walls and ceilings and floors to whisk away.
We were working very fast at the exhibit, after all, sometimes firing the shutter as we walked by merely because we saw some air in front of us.
So crop. It's legal. And it's fun. No one ever complained about what they didn't know they were missing.
RAW
Our friend's interest in photography started with a digicam. He made his way around the Mode dial, experimenting with different effects.
But he's never shot Raw.
We convinced him it was worth exploring in about five minutes, opening an image in ACDSee Pro of a hazy landscape and showing him the information the Raw file contained that the JPEG preview did not even hint was there.
In just a few seconds, we took that image from reject to wow. We conjured a more dramatic sky with sharp detail on the ground, a completely different, more interesting view than the flat failure of the JPEG.
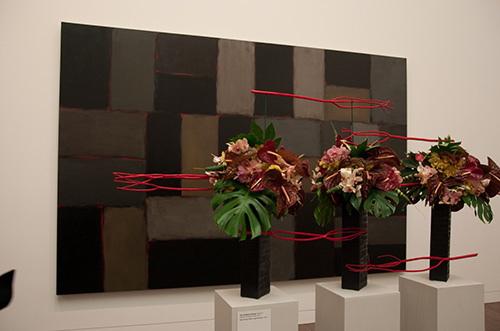
Raw Rendering. Out of the camera, default Raw rendering in Lightroom.
We had almost the opposite problem at the exhibit. The narrowly-aimed spotlights burned hot spots in the floral displays that we had to recover in post. We knew that would be the case going in.
In fact, we'd normally capture an event as JPEGs to get the dozens of images in circulation as soon as possible. Shooting in Raw, we obliged ourselves to a few hours of image editing before anyone saw anything. The lighting made Raw our only option for this event.
But we had more fun with our Raw files than just recovering the highlights.
We've joked about using the Clarity slider to excess but adjusting micro contrast is one of the most important edits you can make to an image. It dramatically changed the rendering all by itself to the extent it was often the second thing we did after highlight recovery in tone and color editing.
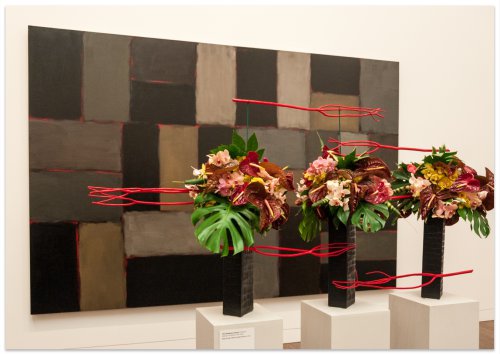
Final. Corrected, cropped, tone and color adjusted.
Of course the first thing we did was, as we noted, to make lens corrections. We were surprised how often we used the auto distortion correction to straighten out the frames in the background. A year or so ago, we couldn't have done that.
The mind can accommodate optical distortions but minimizing them opens up new options with the crop tool. In our case, with so many rectangular objects, it was almost always worth exploring.
Those are three things you can do when you indulge in post processing. A Raw file gives you more data to work with but even a JPEG can be nudged into a better light. Hence the Camera Raw filter in Photoshop CC.
Oddly enough we didn't batch process our images, working on each individually. Because it was a lot of fun.
ADVANTAGE
The smartphone shooters (generally speaking) don't indulge in post processing (other than apply preset styles to their images). They live with the supersaturated reds, the 16:9 aspect ratio, the wide angle view. They snap, they share.
So you will distinguish your work from theirs with a little post processing, especially on Raw captures. Those are two secrets we did not reveal to the woman stuck in the crowd behind us who complimented us on our real camera ... and nice lens.
That's really only half the story. But let's keep that our little secret.