Photo Corners headlinesarchivemikepasini.com
![]()
A S C R A P B O O K O F S O L U T I O N S F O R T H E P H O T O G R A P H E R
![]()
Enhancing the enjoyment of taking pictures with news that matters, features that entertain and images that delight. Published frequently.
How To Make An HTML Email Holiday Card


20 December 2016
Crunch time (and we're not talking snow). If you haven't sent your holiday greeting cards yet, you must be expecting a miracle. Unless, that is, you've decided to spare some trees and petroleum by sending email greetings.

HTML Email Card. The image is embedded in the email.
And if so, you may have wondered about sending an HTML greeting like all those fancy ones you've been getting from your preferred vendors.
It may look mysterious but we've boiled it down to a few simple steps for you. And we've even included a template (gnome-card.html).
THE HTML
The HTML lets you send what looks like a Web page as an email. So we can use fancy type and add a photo, just like our sample to the right shows.
It can also reconfigure itself for the device it is being viewed on. We call that being "responsive" in Web designer land.
If you view the file in your Web browser it will look one way but it will look just as good if you view it on your phone or tablet.
We found a fairly simple, free and responsive template that we adapted to our project. Download the template by clicking on that link. It should open in your browser. Just
Save As...to write a copy of the file to your hard drive.You'll want to make some edits.
SOME EDITS
We titled the card Holiday Greeting Card but you might want to retitle it with your own name, as in Mike's Holiday Greeting Card. Open the
gnome-card.htmlfile (or whatever name you gave it when you saved it) in any text editor and search for<title>. Leave that tag alone but edit the text that follows it.Simple, right?
We've also used the font
Philosopherfrom Google's free font collection. If you see something you prefer, just search forPhilosopherand change the font name to something else.We do supply some alternate fonts in case Google's font server takes a holiday but you almost certainly won't see them.
You'll certainly want to change the signature from
Anonymousto your own name. Just searchAnonymousto get to the right place to make your edit.Right above that, of course, is the little greeting, which is also editable. As is the headline, for that matter.
Refresh your Web browser display of the file when you make a change to see what it looks like.
THE IMAGE
We're generously supplying the image used in the card from our recent Not Your Ordinary Garden Gnome story. But we won't be offended in the least if you prefer to use one of your own images.
That's most of the fun, after all.
You should first resize your image so it isn't more than 600 pixels wide. That's enforced by the CSS in the HTML header so you might as well not waste bandwidth by delivering anything bigger.
Save your edited file and then visit Antonin Foller's Motobit Software Base64 Online encoder.
When you get there, point it to your file using the
Choose Filebutton. Then click theConver the Source Databutton. It will take a minute but you'll soon see a lot of gobbly-gook in the text window above the buttons.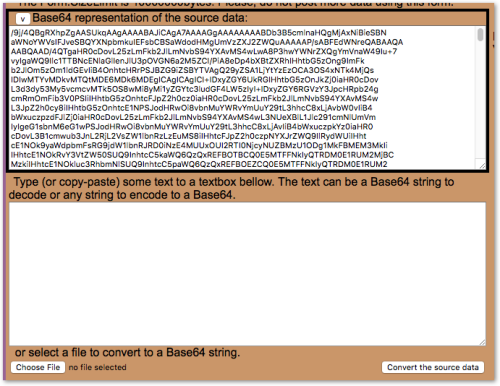
Base64 Online. Converts your image into data.
That's your image encoded as Base 64. Copy it by using your
Select Allcommand from theEditmenu.Then go back to the HTML file we're editing and look for
alt="Gnome". That will get you to the image area of the file.Here's the tricky part.
You want to keep
alt="Gnome" src="data:image/jpeg;base64,and after all the Gnome gobbly-gook, you want to keep the" />. But all the gobby-gook gets replaced.We prefer to select the old gobbly-gook and then just paste the Motobit Base64 encoding over it. But you do it however you like. Delete the gnome's data and then paste your image's data in, whatever.
Just make sure you have it surrounded by the code above.
Test it by refreshing your browser's display.
The reason we jumped through the Base64 hoop is so the image could be embedded simply in the HTML file. You don't need to serve the image file from your own server or some public server. It's in the email now.
SENDING
Once you've edited our template, you're ready to try sending the HTML file as an email.
Your email software may have a special mode for composing an HTML email instead of plain text email. Use that mode.
Then paste the contents of the file into your HTML email. Send one to yourself to test it. Then you can send batches out with your recipients in the BCC field.
CONCLUSION
Could not be simpler. And you even have a few days to get to it. Even if you've sent cards through the mail, you might want to cobble one of these together in case you get a last-minute card from someone not on your list and want to pretend you are sending all yours by email this year.
So get to work. And enjoy the rest of your holidays!