C O N T E N T S
•
Photo Corners headlinesarchivemikepasini.com
![]()
A S C R A P B O O K O F S O L U T I O N S F O R T H E P H O T O G R A P H E R
![]()
Enhancing the enjoyment of taking pictures with news that matters, features that entertain and images that delight. Published frequently.
Archive Your Photos With a Script


7 June 2019
If you read our piece on Mounting an External Drive, you may have been waiting for the other shoe to drop. What, after all, do you do with your mounted external drive. Well, you copy (er, archive) your photos to it.
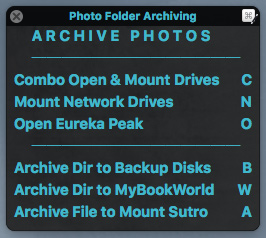
Archive Photos Palette. Just a keystroke away. And one more copies our new images to three drives.
And just as we did with mounting an external drive, we're going to automate that copy. Because mousing around to drag and drop is not only surprisingly error-prone (with ever smaller targets on ever higher resolution monitors) but it's a nuisance, too.
We'll show you how to do this for free on macOS but we take it a step further by using Keyboard Maestro for the user interface and to run the shell scripts that do all the work. You could do the whole thing in AppleScript, relying on
do shell scriptfor the heavy lifting but we used a mix of AppleScript and Perl with Keyboard Maestro orchestrating the whole thing.Windows users might be able to use some of that but the Unix underpinnings of macOS really come in handy here. And there's nothing like Keyboard Maestro on Windows.
FILES VS. FOLDERS
It's a lot more complicated to copy folders than it is to copy files.
That's because on a Unix system, ironically, directories are, in fact, files themselves. So you have to build a file list, copying each file in the source directory to the target disk.
And along the way, you have to identify any new directories.
NETWORK VS. ATTACHED DISKS
And just to make it a little more fun, you copy to a network disk a little differently than you copy to an external drive connected to your (or someone's on the network) computer via USB.
The difference is that the network drive requires a user name and password.
But both methods provide more error-checking than a simple Finder copy, which never looks back at what it's done. A scary thought all by itself.
TWO TOOLS
Besides Perl, we'll tap into two utilities that also are part of the standard macOS installation.
The first, rsync, handles remote file copies, synchronizing file trees, to those external drives connected by USB to computers on your network.
You may not realize they are accessible when you turn on File Sharing for a computer with an external drive attached, but there you go. Just mount it and copy.
The same goes for external drives connected to the USB port of your own computer, of course.
While you could use rsync to automatically log into a password-protected network drive, we'll show you a second way to do it just for fun.
The second utility we use, curl can also log into a network drive with a user name and password to copy files using FTP (file transfer protocol).
Curl makes the login part easy but needs a little more help building the file list than rsync but the find command is up to the task. That, too, is included in macOS.
So to sum it up, you can do all this with rsync but we'll show you how to do it with curl, too.
SCRIPTING LANGUAGE
The palette you see at the top of this story is a Keyboard Maestro macro. We press
Control-Option-F3to bring it up. If we need to mount our drives, we typeCto open the local external drive, the remote drive and the network drive.Otherwise we just press
Bto backup up our new directory to all three drives.The simplicity and efficiency of that interface is a feature of Keyboard Maestro. We can use its built-in actions to prompt us to pick a folder, notify us that the backup has begun and execute the script that will actually do the backup.
Being able to execute a script in a variety of languages including AppleScript, JavaScript and anything you can run in the shell, including Perl and Python, is another blessing of Keyboard Maestro and why we keep recommending it so highly.
So it really doesn't much matter which scripting language you use within Keyboard Maestro. And, as we've said, you can just run the script in whatever language you prefer, although it won't be run as efficiently without the interface Keyboard Maestro provides.
We find Perl both eloquent and efficient for tasks like this, so that's what we used. We did start the ball rolling with an AppleScript that will point the open folder dialog to a default folder to save a lot of clicking around. But that feature will be in the upcoming release 9 of Keyboard Maestro and we could have tapped into CocoaDialog for it in our Perl script as well but we'd have had to load that executable.
THE TASK
The task varies for everyone. And the idiosyncracies of one's setup must be observed. So here's how we handle ours.
In our case, we want to copy a new folder of images (named, for example,
2019.06.06 Testsaved in our Pictures directory when we ingest our images) to the external drive attached to our computer, to another external drive attached to another computer on our network and, finally, to a network drive.Once we've mounted all the disks we want to use, opening them so we can confirm the copies afterward, we're ready to perform the copy.
To do that, we need to:
- Go to our Pictures directory to select the new folder of files
- Notify us that the folder is being copied
- Store the current year in a variable
- Store the name of the new directory in a variable
- Run rsync to copy the new folder to the external drive attached to our computer.
- Run rsync to copy the new folder to the external drive attached to the networked computer.
- Run find to supply curl with a list of new files to copy to the networked drive.
- Use a voice command to let us know the copies have been completed.
We archive in a folder named for the year. So
2019.06.06 Testwould be written to2019on our external and network drives. That's why we need the year in a variable.THE CODE
Here's the initial AppleScript in an Execute AppleScript action. It prompts you to select a folder from the default
Picturesdirectory and changes the path's delimiters from what Apple uses to what Unix expects, saving it as a Keyboard Maestro variable we can pick up in Perl: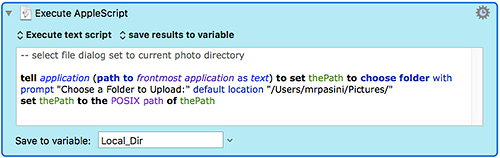
You'd just have to change the default location of
"/Users/mrpasini/Pictures/"to your username or preferred location.That's followed by a Keyboard Maestro action to notify us that we're backing up the directory we selected, saved as
Local_Dir.And that backup is done with a Perl script. Here's the entire Perl script with changes you should make to reflect your system in green:
#!/usr/bin/perl

use File::Basename;
use POSIX;

		# set current destination directory
	my $y = strftime("%Y", localtime time);

		# set source as full local path/filename
	my $selectedDir = $ENVKMVAR_Local_Dir;
	if (substr($selectedDir, -1) ne "/")
		$selectedDir .= "/";<

		# set target as local path
	my($filename, $directory, $extension) = fileparse( '$selectedDir', '\..*');
	$directory =~ s/\/$//;
	$directory =~ s|.+Pictures/?(.+?$|$1|;

	$selectedDir =~ s|/$||;

		# copy directory
	`rsync -a '$selectedDir' '/Volumes/Eureka Peak/Photo Collection/$y/'`;
	`say -v Federica "Primo!"`;

	`rsync -a '$selectedDir' '/Volumes/Mount Sutro/Photo Collection/$y/'`;
	`say -v Federica "Secondo!"`;<

	`cd '/Users/mrpasini/Pictures' && find $directory -type f ! -name ".*" -exec curl -u [username:password] --ftp-create-dirs -T 'ftp://192.xxx.x.xxx/mrpasini/my_photos/$y/' \\;`; `say -v Federica "Anche terzo!"`

		# feedback
	`say -v Federica "Tutto fatto!"`;
It sets the variable
$yto the current year (2019, at the moment) and gets the directory selected in the AppleScript above, making sure it ends in a forward slash so thefileparsefunction can find the directory name.The directory name is read for any directory after
Pictures, which in our case would be2019.06.06 Test. And the trailing slash is stripped from that for rsync.The two
rsynccommands use the -a flag to copy the files in the directory set in the variable$selectedDirto the directory/Volumes/Eureka Peak/Photo Collection/2019/. You'd want to change that target to suit your situation.The
curlcommand is a bit more convoluted, to put it mildly.We move to the default directory with the
cdcommand before we list thefilesin it with the find command (but we exclude the dot files). Then we tellcurlto log into our network drive with FTP and transfer our file list, creating any directories on the target that it needs. The syntax is tricky but it works.The
saycommand simply uses speech to let us know what's happened.CONCLUSION
There's a couple of things we really like about this approach.
The first is that we can do it all from the keyboard on whichever screen we're working on. No need to go to an empty screen, mount and open the drives, align the windows so we can drag and drop the source to the three targets, wait for each target to successfully complete the copy and close everything up.
Instead, we just press one key to mount and open the drives. Then another to bring up the directory selection dialog to point to the new directory and copy it to three drives.
The second thing we like about it is we don't have to monitor the copy. The audio feedback lets us know when each copy completes. So we can keep working.
It's like having an assistant do your archiving for you. One you can trust to never make a mistake.