C O N T E N T S
•
Photo Corners headlinesarchivemikepasini.com
![]()
A S C R A P B O O K O F S O L U T I O N S F O R T H E P H O T O G R A P H E R
![]()
Enhancing the enjoyment of taking pictures with news that matters, features that entertain and images that delight. Published frequently.
Test Drive: Adobe Elements 2020


3 October 2019

The annual update of Adobe's Photoshop Elements and Premiere Elements continues another tradition this year. It again profits from the company's continual investment in Adobe Sensei artificial intelligence to automate some compelling new effects.
We have always called the bundle Adobe Elements because we think of it as one package that handles both your stills and videos with equal aplomb. And the family memory maker it's designed to appeal to certainly does both with their smartphone or camera.
You don't have to be a memory maker to profit from Elements, though. You just have to want to learn how to edit stills and video. It remains unparalleled as a guide to the finer points of editing.
OVERVIEW
At a briefing last month, the company said this release focused on three things:
- Expanded automation powered by Adobe Sensei AI technology to make it easier for newbies to get started while offering flexible creative options for Elements veterans.
- Five new Guided Edits to help you discover easy ways to make impressive creations and effects that you can even customize to look the way you want.
- Enhanced capabilities for memory keepers of all skill levels to create and share memes, collages, and animated GIFs or create projects that can leap off the screen as photo prints, gifts and gear with the new Fujifilm Prints & Gifts service (U.S only).
For the full list of improvements, see Photoshop Elements and Premiere Elements.
We've had a chance to work with Elements 2020 for several days now. Our test drive follows the highlights of the new release.
SYSTEM REQUIREMENTS
We can now confess that our upgrade to High Sierra (despite our better judgement) was forced by the new system requirements for Elements 2020. As the products get more sophisticated, they are built on more current technology which leaves older hardware and software behind.
We don't think that's a great strategy for the home environment where we rarely see cutting edge gear. But High Sierra has been out for a while and runs even on old boxes, so it may not be quite as limiting as we feel it is. And if it lets Adobe Sensei tech run, it's worth it.
In fact, we asked Adobe where Sensei does its work. We wondered if the heavy duty processing had to take place in the cloud rather than on the local machine. The company told us Sensei-enabled features work without an Internet connection. Another reason, no doubt, for the system requirements.
System requirements common to both Mac and Windows installations are:
- 4-GB of RAM (8-GB recommended)
- 1280x800 display resolution (at 100 percent scale factor)
- DVD-ROM drive (for installation from DVD)
- Internet connection for product activation and content download
Macintosh system requirements include:
- 64-bit multicore Intel processor
- macOS v10.13 through v10.15
- 6.5-GB/8-GB (Photoshop/Premiere) of available hard-disk space to install applications; additional 2.5-GB/10-GB to download all optional content (cannot install on a volume that uses a case-sensitive file system or on removable flash storage devices)
Windows system requirements include:
- 2GHz or faster processor with SSE2 support
- Microsoft Windows 10 (recommended versions 1809, 1903) or Windows 8.1 (Windows 7 not supported); 64-bit versions only (32-bit not supported)
- 5.2-GB/6.1-GB (Photoshop/Premiere) of available hard-disk space to install applications; additional 2.4-GB/10-GB to download all optional content (cannot install on a volume that uses a case-sensitive file system or on removable flash storage devices)
- Microsoft DirectX 9 or 10 compatible display driver
PHOTOSHOP ELEMENTS FEATURES
Adobe listed the new features and benefits of Photoshop Elements 2020 as:
- Automatically colorize your photos. Change up the colors in your photos or give black-and-whites new life with automatic colorization. Powered by Adobe Sensei.
- One-click subject selection. Select the subject of your photo with a single click. Then easily apply an effect or cut out your subject and add it to another photo. Powered by Adobe Sensei.
- Smooth skin automatically. Make people look their best with skin smoothing. Powered by Adobe Sensei.
- Enjoy new Auto Creations. B&W Selection, Pattern Brush, Painterly and Depth of Field effects are automatically applied to your photos and delivered to you in the home screen and there's always room to add your personal touch. Powered by Adobe Sensei.
- Order photo prints, gifts and gear (U.S. only). It only takes a few clicks to create and order prints, wall art, mugs, phone accessories, office gear and more with the new Fujifilm Prints & Gifts service right inside Photoshop Elements. Choose from over 140 options.
- Faster performance and expanded HEIF and HEVC support. Experience speedier performance for everyday tasks. Also, import and edit HEIF photo files and HEVC video files on Windows as well as macOS.
- Guided Edits for next-level results. Discover easy ways to make incredible creations and effects that you can customize to look exactly the way you want. Get step-by-step help with 55 Guided Edits, including 2 all-new options:
- Make unwanted photo objects vanish. Put the focus on your subject by removing power lines, pedestrians and other distractions.
- Add creative sparkle with photo patterns. Give any photo a little something extra by adding a fun pattern. Brush on hearts, stars and more to create a photo that looks amazing on printed cards, wall art or social media.
PHOTOSHOP PREMIERE FEATURES
Adobe listed the new features and benefits of Photoshop Premiere 2020 as:
- Find videos faster with Smart Tags. Your videos are auto-tagged based on subjects like sunsets, birthdays, dogs, cats and more. Powered by Adobe Sensei.
- Find by faces. The faces in your videos are automatically recognized during import and then the videos are stacked by person so it's easy to tag and find them later. Powered by Adobe Sensei.
- Improve grainy videos. Shot your video in low light? Make it look more crisp with a simple drag and drop of the Reduce Noise effect.
- Better performance. Experience faster installation as well as faster performance throughout common tasks.
- HEIF and HEVC support. Import and edit HEIF photo files and HEVC video files on Windows as well as macOS.
- Guided Edits for next-level results. Discover easy ways to make impressive creations and effects that you can customize to look exactly the way you want. Get step-by-step help with 23 Guided Edits, including three new options:
- Create dynamic time-lapse videos. Turn a series of photos or videos into a time-lapse that speeds up the action.
- Animate skies in your photos. Replace static skies with moving ones to create an eye-catching effect.
- Fill the frame to match your video. Bring a vertical clip or photo into a horizontal video (or vice versa) so it looks seamless. No more black bars. This Guided Edit makes it easy to fill them in to match the look of your video.
TEST DRIVE PSE
There are a number of new tricks in this release of Photoshop Elements that grabbed our attention.
With all that artificial intelligence going around the Web, you'll think someone would apply it to colorizing black-and-white photos. You know, analyze the photo for figures, identify areas of skin, lips, eyes, shoes, grass, trees, sky -- and apply some color.
Of course it's harder than that makes it sound. And Adobe hedges its bets two ways with the new Colorize option. The automatic method provides four treatments to choose form. And there's a fallback manual method, too.
We asked Adobe what the difference was between the four presets in the auto method. We could tell two were warm and two cool but that was about it. They responded:
Each preset is a combination of multiple corrections/enhancements to make it unique for different types of photos. For example, in preset 2, we first colorize the black-and-white photo and then we do multiple corrections such as color balance, curve adjustments, changing vibrance etc. In preset 3, in addition to colorizing and correcting color balance, levels etc., we are selectively accentuating blue color in the photo. In preset 4, we are accentuating green color after making some of the previously stated corrections.
We tried half a dozen images before concluding that you really can't beat human intelligence for this task. But it was fun trying.
The Colorize Photo option is in the
Enhancemenu up top. Make sure you have a black-and-white image open first.It takes a minute to run through the Auto process before you're presented with the four options.
We tried a simple black-and-white landscape of a roadway between two hills with blue sky above. Auto failed pretty badly at colorizing it, as you can see. The sky itself remained two toned and the hills looked more sepia than earth colors.

Auto Colorize. Meh.
So we gave the Manual option a try. It's a three step process: select an area to colorize, mark the select with a droplet, pick a color for the area marked with the droplet. There's both a color palette and a scrollable list of all available colors to choose from.
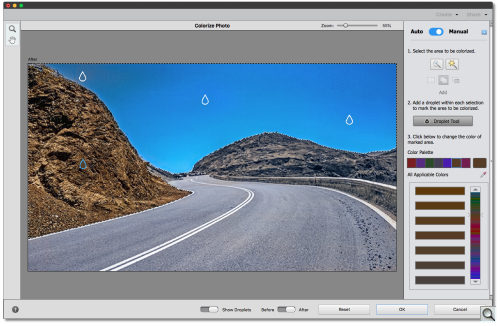
Manual Colorize. A three-step process.
We picked from the palette and our colors turned out to be too saturated. But we got the idea. Despite the saturation, Manual did a more credible job in this case. So it's nice to have the option.
But we weren't done. Clearly the more interesting use of this tool would be to colorize photos of people. We happened to have just such a specimen. Three guys in front of a brick wall. No blindfolds.
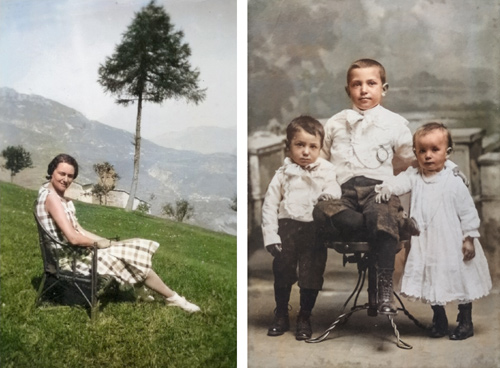
This time Auto did a very credible job. Both the first and third renderings were acceptable. We preferred the third, which kept the faces warm but not the bricks (which resolutely refused to turn red).
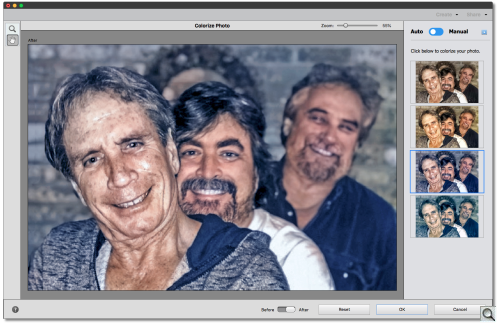
Colorize. A better job when faces are in the photo.
We were puzzled. How could our results have been so different from what we saw in the demo?
We had a screen shot of the demo monochrome image so we ran that through the colorize option and it did convert it just as well as the demo (if not a bit better).
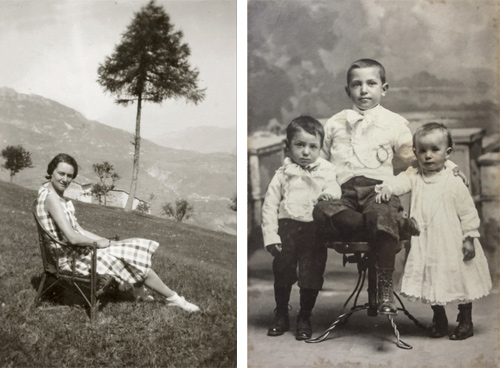
So we have to conclude that an awful lot depends on the image. Recognizable scenes seem to do a lot better than still lifes, for example. And, in fact, our best result came from a black-and-white studio portrait of three children from 100 years ago.
One nice thing about Elements, though, is that if you throw a grayscale image at the colorize option, it will ask you if you want to convert the image to RGB mode so it can colorize it.
And conversely if you have an RGB image (like a duotone) you want to colorize, all you have to do is convert it to grayscale first to activate the colorize option in the
Enhancemenu. Elements is smart about that sort of thing.Smoothing the skin on portraits is a new blessing bestowed by Photoshop Elements. Smooth Skin too is on the
Enhancemenu.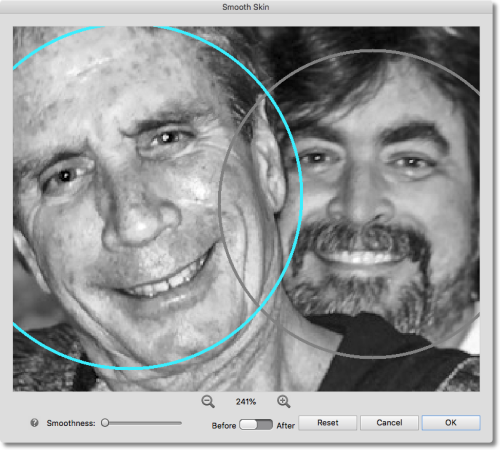
When called, it presents a dialog box with faces selected. You can work on each one individually, adjusting a Smoothness slider to make the skin more uniform.
We thought we might fool this Adobe Sensei feature by using a black-and-white image, but even without the green channel to help, it did fine.
The new Pattern Brush is a Guided Edit. It will spray a pattern of stars or hearts or some other graphic over your image.
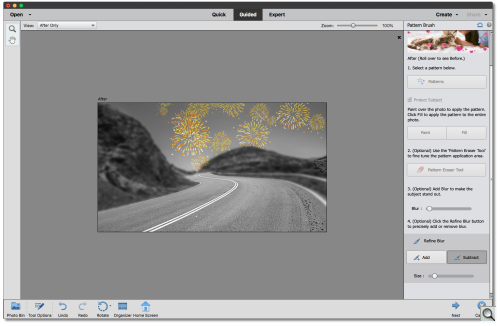
Pattern Brush. We had fun adding the fireworks.
Four steps, three of which are necessary: select a pattern, paint over the photo with the pattern brush, use the erase tool to tidy up (optional but we found it necessary) and optionally blur the photo (and refine the blur).
We added some fireworks to our landscape of the roadway and had fun blurring and refining the blur.
We wondered if we weren't just a little too old for this sort of edit. But then we realized what a gas it would be for things like birthday cards and get well cards, which (you know) are appropriate at any age.
The other new Guided Edit in this release is Object Removal. One of the banes of urban photography is all the visual garbage that gets into your frame. Utility poles, street signs, wires, you name it.
We thought we'd give this Guided Edit an impossible task. Remove a utility pole from in front of a building. Real Estate Photography 101.
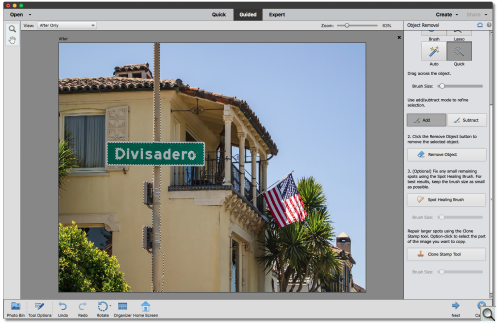
Object Removal. Original image with utility pole selected.
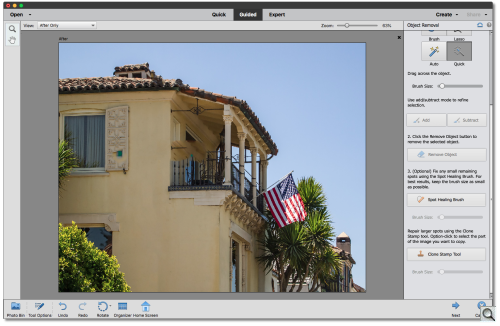
Object Removal. Look, Ma, no utility pole.
There are just three steps: use one of the four selection tools to point out the object you want to remove, click the Remove Object button and fix any artifacts with the Spot Healing Brush. There are options and refinements for each of those steps.
We used the Quick selection tool and, by habit, added to and removed from the selection with the Shift and Option keys. But there are Add and Subtract buttons to make it easy if you don't know the key modifiers.
We got a fairly good if not perfect selection, as you can see in the screen shot.
But we were astonished when we clicked on the Remove Object button. The utility pole disappeared. Completely.
TEST DRIVE PRE
We took a look at several of the new features that most impressed us about the new Premiere Elements. While we can't show you video here, you've no doubt seen the effects. The real question is how difficult is it for your average reviewer to make the magic happen.
The first thing we tried in the new version of Premiere Elements was to Fill the Frame of a portrait oriented video clip. You've seen this on the news, no doubt, where an amateur video has its black margins filled with an enlarged and blurred version of the clip.
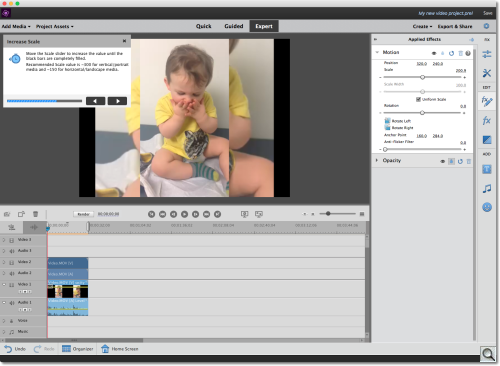
Fill Frame. Enlarging the background image to fill the black borders.
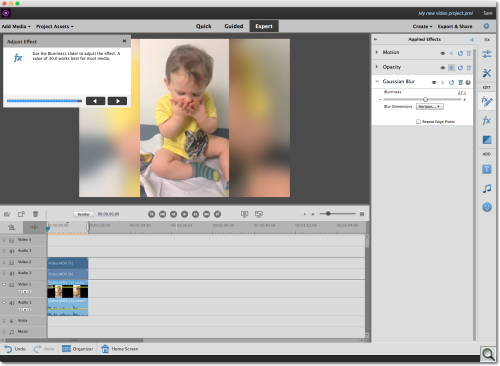
Fill Frame. Adding a blur to the background image.
We're not fans of that technique, but the Guided Edit that walked us through the process showed us we weren't limited to duplicating the main video as the blurred background.
We were, in a word, getting an education.
The Guided Edit does step you through the process starting with Adding Media. You do have to read the instructions carefully (we slipped up there the first time through) but you won't be hunting for menu items or tools. They're all nicely highlighted when necessary.
The second thing we tried was Reduce Noise. We had a grainy (we thought) clip shot in low light. We saved a before frame and an after frame, and frankly, we couldn't tell the difference. Probably the fault of the specimen.

Or not. We tried rendering the clip to see if that made a difference. Nope. In fact, many of the edits appeared instantly. Like Temperature & Tint, Gamma Correction and Color adjustments, all of which we applied to the clip to make it as grainy as possible.
But it could be it just wasn't really grainy. Because, you know, we buy the best smartphones with the finest computational photography available. And, in fact, we've never suffered noise in low light like the example Adobe provided:

But Elements makes quite an improvement on that. You may miss some detail in the final rendering but, frankly, we don't see it in the original capture.
We didn't have much luck with the Animated Sky Fun Edit either. It's a complicated Edit but we stepped through it fairly easily.

Animated Sky. Same image as above but with a new sky (nicely masked) which, as a video, moves to the left.
Our image was probably not ideal. A 1500x2258-pixel portrait-oriented image. It didn't match up well with the landscape-oriented animated sky clip and while you are instructed to stretch the edges until they match, that didn't quite work with the content we had.
We did see a glimpse of sky moving when we finished the Guided Edit but it was clearly not a success. Playback pixelated the main image dramatically. Which, we suppose, you could blame on our computer.
But wait. Surely we have some other image we could try. And indeed we did. This time we used a 1500x1216-pixel landscape-oriented image with the same stock sky clip and when we clicked to replace the real sky with the clip's sky, it masked perfectly (despite a tricky balustrade) and the sky moved credibly beyond the building.
PRICE, AVAILABILITY
One thing that never seems to change about Elements is the price, we seem to write every year. And it's still true.
Photoshop or Premiere Elements 2020 is available for $99.99 from the usual sources. Upgrade pricing is also available for $79.99.
The Photoshop Elements & Premiere Elements 2020 bundle is available for $149.99 with upgrade pricing of $119.99.
We'd appreciate purchasing through our affiliate links:
- Photoshop Elements 2020 at B&H
- Premiere Elements 2020 at B&H
- Bundled Photoshop & Premiere Elements 2020 at B&H
CONCLUSION
The Elements bundle is unique in offering tiers of assistance to create images that go well beyond what your camera can capture. And it deserves sanding outright applause for putting such a helpful front end on Adobe's image processing engine.
Not buts about it.
Adobe markets Elements to the memory keeper in the house. According to the company's research, that's a female in her forties who prides herself on recording family memories and milestones and sharing them with friends and family. She uses the same device to capture photos and videos (which would be her smartphone).
Intriguingly enough, over 80 percent of them edit their photos and about half of them make selections or remove objects. Adobe knows this because Elements phones home. The goal tends to be physical creations (like prints, posters, cards, mugs, etc.).
And while she values software that's easy to use, she wants to learn more.
We've always championed Elements as a great learning tool. For anybody. Memory maker or not. Everybody has to start somewhere and Elements is a great way to get your feet wet in still and video editing.
We had our issues with this release, as you can see, but that won't prevent us from awarding all four corners to the bundle. There's nothing like it.
Comments
Yeah, I like the fact that it's not by subscription like CC and LR are, but I would never use those gimmicky features. Granted, I am not the target market. Maybe much younger people appreciate the new features.
-- Peter Burian
We thought that, too, but then we have some birthday cards to print and we think it would be funny to gimmick them up a bit
. And the target market is not so much younger, Peter. Women in their forties. Beyond the shoot-and-share stage and trying to take the picture just a little further by, um, editing it (imagine!). -- Mike) Nice to know that people are still interested in imaging in general.
-- Peter Burian