C O N T E N T S
•
Photo Corners headlinesarchivemikepasini.com
![]()
A S C R A P B O O K O F S O L U T I O N S F O R T H E P H O T O G R A P H E R
![]()
Enhancing the enjoyment of taking pictures with news that matters, features that entertain and images that delight. Published frequently.
Test Drive: The Capture One 20 Update


18 May 2020
After weeks of beta testing, Phase One has released an update to Capture One 20, its Raw processing and image editing application. The new version 13.1.0 features new Heal and Clone tools, a Before/After feature, an improved user interface and more.
New Logo. Color coded for the various dedicated versions.
HIGHLIGHTS
New features and improvements in the new release, which are accompanied by a new logo, include:
- New Heal and Clone tools
- Before/After feature
- New activation and onboarding flow
- Improved Lightroom importer
- Nikon Profiles
General User Experience Improvements and tweaks
- New logo
- Splash screen
- Re-designed brushes
- Workspace changes
See the full release notes for more details. We'll take a close look at those after reviewing the system requirements.
SYSTEM REQUIREMENTS
System requirements remain modest for both macOS and Windows. Both systems require:
- 10-GB free hard disk space
- 8-GB System RAM
In addition, macOS requires:
- macOS 10.13, 10.14 or 10.15
- An Intel CPU with two cores
Windows, in comparison, requires:
- Windows 8 SP1 64-bit, Window 8.1 64-bit
- Intel or AMD CPU with two cores
HEAL & CLONE
The new Heal and Clone tools create an adjustment layer when you first click on the image after selecting the tool in the toolbar. If the layer doesn't exist, it will be created. If it does, it will be selected.
That introduces a slight delay on first click, which we quickly got used to but was not natural.
Healing will automatically select a source but Cloning requires you to select a source area of the image. Which is just how it should work.
We used the Healing tool to erase some flowers in the corner of our test image. In a new Heal layer we enlarged the brush size and painted over the blossoms. Capture One picked an appropriate background area to clone but the edited area included other flowers.
Of course, you can move the source area simply by mousing over to it and dragging it to another area when the cursor shape changes from a brush. But even then, the replacement was much too light.
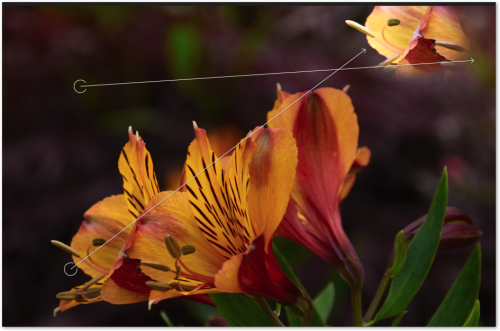
Healing. Too large a brush.
The solution was to make the brush smaller and use more strokes to replace the area. And that worked.
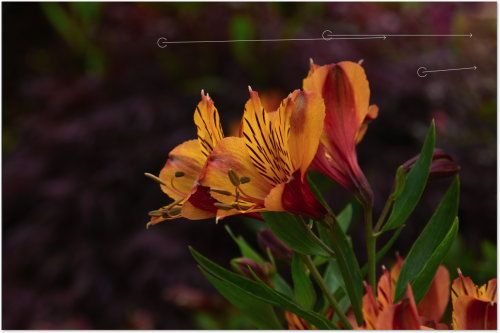
Healing. With smaller brushes.
You can edit these masks two ways:
- Extend an existing mask by clicking its source point to select the arrow which will become orange. Masking while a source point is selected will use that source point, making it possible to extend areas. Click the source point again to deselect it.
- Deleting a healed area can be done in two ways. Select the source point and hit [Backspace/Delete] to remove the source point and the attached masked area. Or erase the masked area completely with the Eraser tool, which will also remove the source point.
We really did like extending areas by selecting them and brushing.
Both Heal and Clone layers can be toned down using the layer's Opacity slider. Brush settings like Flow and Opacity can also be used.
Files that are offline cannot be Healed or Cloned. The full resolution image must be available.
BEFORE/AFTER
Available from the Toolbar or by using the keyboard shortcut [Y], the new Before/After feature provides a way to compare your original photo with your adjusted photo.
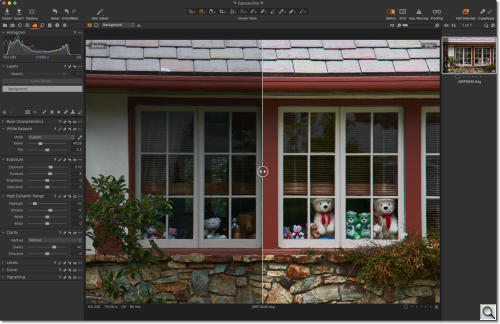
Before/After. A familiar image comparison slider.
You can compare the two versions with either in either Full View or Split View modes:
- Full View shows the image in its Before state. To see your edits in the AFter state, simply click the Before/After icon in the toolbar.
- Split view provides a familiar draggable slider in the middle of the shared image space with the Before image on the left and After on the right.
You can easily switch between modes by long-pressing the icon in the toolbar and selecting the mode from the drop-down menu or by using the keyboard shortcut [Shift + Y].
Editing behaves differently in the two modes:
- In Full View any movement of a slider or any other adjustment tool automatically turns the feature off.
- In Split View most adjustments can be performed and will be updated in real- time in the After state of the photo. But compositional changes like Crop, Rotate and Distortion will turn the feature off.
You can no longer use the keyboard shortcut [Alt + Reset] to temporarily see the Before state.
We found both modes well implemented and very useful tools. One useful enhancement, however, would be an option to make the slider in Split View configurable between the left-right option and an up-down option, more useful for images that read vertically.
LIGHTROOM IMPORTER
The Lightroom importer now makes it clearer what will happen and what you can expect when importing a Lightroom catalog into Capture One.
You can import offline images as Smart Previews in Lightroom for automatic syncing when the original files come online again, as when an external drive containing the originals is mounted.
Unsupported files are compiled into a list to be reviewed after the import is complete. The list includes files from unsupported cameras or file formats that are not supported in Capture One and were thus not imported.
NIKON PROFILES
Profiles available in Nikon Picture Controls are now available within Capture One for some Nikon camera models. The profiles, on the ICC Profile menu within Base Characteristics, provide the same tone curve and color corrections as the built-in Nikon JPEG files as a starting point for a Raw file edit.
Camera models that currently support Nikon profiles include: D6, D5, D850, D810/D810A, D800, D780, D750, D610, D500, D7500, D5600, D5500, D3500, D3400, D3300 plus the Z 7, Z 6 and Z 50.
We couldn't test these without one of those models, of course. But we can confirm that our usual generic profiles remained accessible.
TWEAKS
The more noticeable tweaks to the user interface include the new logo, which extends throughout the application and serves as the application icon and file icon, too.
While loading a document, Capture One will display a Splash Screen.
Brush have been redesigned for "a cleaner and more modern look." Each kind of brush has its own circular design using different dash patterns on the inner circle to identify it. Small sizes remain circular instead of switching to crosshairs.
The default workspace displays collapsed tools, giving a better overview to new users. The three Simplified workspaces have been merged into one and the Black & White editing workspace has been removed but can be obtained by contacting the support department.
CONCLUSION
With the exception our experience with the Heal tool, we found the improvements very helpful. And even that quibble can be worked around so we can't penalize Phase One for that.