Photo Corners headlinesarchivemikepasini.com
![]()
A S C R A P B O O K O F S O L U T I O N S F O R T H E P H O T O G R A P H E R
![]()
Enhancing the enjoyment of taking pictures with news that matters, features that entertain and images that delight. Published frequently.
'Discovering' New Tools


8 September 2020
We've visited the Lightroom Discovery site a few times over the last few weeks, intrigued by the online image editing playback. The site presents a gallery of images, each of which you can open to see what edits were applied.
Those images are contributed by Adobe subscribes from Lightroom but not Lightroom Classic, whether on macOS, Windows, iOS, iPadsOS, Android or Chrome. The company introduced the sharing feature in this June's v3.3 desktop release v5.3 mobile release.
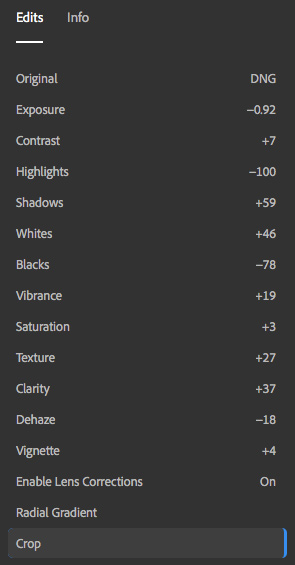
Lightroom Discovery. A list of edits that you can step through to see the effect.
DISCOVERING DISCOVER
We asked Adobe how the new feature works, exactly.
It's not a playback of the editing session, the company told us. The edits are all presented "in a generally accepted order of operation, starting from global to granular," Adobe said.
But they are stepped through one at a time. So you can see the changes in the image from the original to the finished edit.
Because it doesn't recreate the actual editing session, we find the playback less than helpful. Adobe said the JavaScript app reads the final values recorded by Lightroom in your catalog and, working from the original data, applies them one at a time.
That same data exists in the Exif header of JPEGs and the XMP sidecar file of Raw files.
That's far different than what happens in an editing session. We do have a starting point that has evolved over the years into presets for particular cameras. But where we go from there is not in any fixed order.
So in the site playback you get ridiculous tweaks like +1 in Saturation. Many of them are simply invisible to the naked eye.
WHAT YOU DO GET
But what you do get, especially after a major upgrade to a tool like Adobe Camera Raw, is a peek at some new tools or old tools in new clothing can do for an image.
You also see some dramatic uses of more illustration-like techniques like gradients.
TRYING IT AT HOME
Inspired by a session earlier this week, we grabbed a troublesome landscape photo and tried edits that were for us unconventional.
Understand that we're not unveiling a work of art here so much as exploring new techniques that one day may become just the ticket.
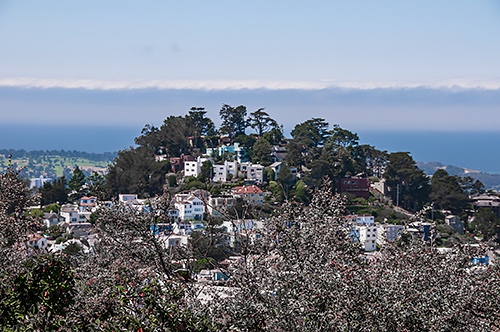
The two versions of our image above show the final Hue-shifted image compared to the in-camera JPEG. It's like going from winter to summer.
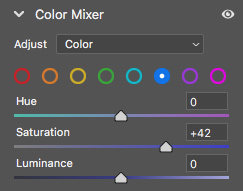
Our Hue Shift. Using the new Color Mixer in Camera Raw.
We don't usually make color shifts that dramatic, limiting ourselves to white balance corrections that compensate for our warm circular polarizer or different artificial light sources. We're always focused on achieving a credible color.
But this time, we decided to make a hue shift like the one we found on Lightroom Discover. And the results were dramatic.
It was a fun way to stretch our mind far enough to use a tool we were unfamiliar with.
And the Lightroom Discovery site is just full of them.
In fact, the images we took a look at all had very extensive edits, much like the list show above. So there's a lot to chew on and digest.
While only Lightroom subscribers can contribute, everyone can learn, even if you're just working with camera JPEGs. And no matter which image editor you use, almost all of these settings can be found.
Outright prolonged applause for another great learning resource!