Photo Corners headlinesarchivemikepasini.com
![]()
A S C R A P B O O K O F S O L U T I O N S F O R T H E P H O T O G R A P H E R
![]()
Enhancing the enjoyment of taking pictures with news that matters, features that entertain and images that delight. Published frequently.
Using ExifTool as an Image Organizer


19 April 2021
Phil Harvey's free ExifTool is an unusually excellent tool for reading and writing metadata in image files. We add copyright information to all of our images with it. And you can correct capture times if you forget to spring forward or fall back, as we point out now and then.
ExifTool at Work. We tested every command in this story multiple times (it was fun).
But lurking deep inside ExifTool is even more power.
You may know you can rename files based on Exif tags but you can also create directories and subdirectories based on tags, dates and time. And you can evaluate files on the fly to write them to various locations based on criteria you set.
All on one line.
To demonstrate a few of these features, create a folder of images copied from your archive called "Originals" on your Desktop. A mix of Raw files and JPEGs would be fine. Different cameras even better.
Then launch Terminal or iTerm and roll up your sleeves.
HELP
One liners are very cool but they're also little puzzles that can be difficult to discern. So before we wade in, let's point out the extensive help Harvey has provided for ExifTool users:
- First there's the ExifTool Application Documentation. In addition to a synopsis of the command, a fuller description and a catalog of its options, it provides examples of reading, writing, copying, renaming and geotagging.
- Second, there's the ExifTool Forum. It includes a Newbies section (which is helpful even to Old Salts) and a slightly more active section on using the application itself. Use the Search option to hone in on a solution. Harvey himself often responds to questions with one-liner solutions.
- Third, there's the FAQ, which you can ignore at your peril.
If you find the command line syntax mystifying, it may help to know it relies not only on the shell's syntax but also on Perl conventions, which is what ExifTool is written in.
And don't worry about case for Exif tags (we'll use camel case for readability here). But do mind your single and double quotes. On Windows turn the singles below into doubles.
And if you get warnings from ExifTool that distract you from the output (as we do for our Olympus E-PL1 images), just append the
-mswitch to these commands.WET FEET
Let's get our feet wet with some simple commands that illustrate the basics.
For any of these one-line commands, you should be able to select the line, copy it and paste it into your terminal application. We won't show you our results because they're based on our files so they won't match yours.
First, let's ask ExifTool to list the filenames and camera model for each image:
exiftool -filename -model -p '$filename is $model' ~/Desktop/Originals -fastLet's break that down:
- "-filename -model" tells ExifTool to grab those two tags only
- "-p '$filename is $model'" tells ExifTool to print the actual filename followed by "is" and the model name
- "~/Desktop/Originals" tells ExifTool where to look for the image files
- "-fast" tells ExifTool just to read the Exif header and quit reading when it hits the image data
Try any other tag or combinations of tags. For example, let's report the height and width:
exiftool -filename -ImageHeight -ImageWidth -p '$filename: height is $ImageHeight and width is $ImageWidth' ~/Desktop/Originals -fastDATES, TIMES
ExifTool can tell us the date and time the image was captured:
exiftool -filename -dateTimeOriginal -p '$filename shot on $dateTimeOriginal' ~/Desktop/OriginalsMaybe we'd like just the date and in a more readable format (like April 15, 2021). All we have to do is specify the data format:
exiftool -DateTimeOriginal -d "%B %e, %Y" -S -s -p '$filename shot on $dateTimeOriginal' ~/Desktop/OriginalsSo if you wanted to know the year each image was captured, you could write:
exiftool -DateTimeOriginal -d "%Y" -S -s -p '$filename shot in $dateTimeOriginal' ~/Desktop/OriginalsAnd that year information could be used in a directory name, which will get to in a bit.
COPYING
We don't change the root names of our files. We leave them the way the camera named them. We never worry about duplicates because we keep each shoot in its own directory and use unique directory names composed of the date and location.
So we might have a directory named "2021.03.12 Los Angeles" -- which ExifTool can construct for us with the filename appended:
exiftool -dateTimeOriginal -d '%Y.%m.%d' -filename -S -s -p '$dateTimeOriginal Los Angeles/$filename' ~/Desktop/Originals -fastTo actually write those files, we have to specify an output directory. In this example, we format the directory name with the capture date of the file and then tell ExifTool to use that with the filename. The
-oflag tells it to output to the directory we've specified as the complete filename and since we've specified that with-filenamewe just need a period after the-oswitch as a placeholder:exiftool -dateTimeOriginal -d '%Y.%m.%d' '-filename<Desktop/Target/$dateTimeOriginal Los Angeles/$filename' ~/Desktop/Originals -o . -fastIf your Originals has files shot on more than one date, you'll have them sorted into separate directories named with the date.
Now that's magic.
To create a hierarchical directory structure that had the year at the top, the month and day below that and the camera model under that, all we have to do is change the period after
%Yto a forward slash, like this:exiftool -dateTimeOriginal -d '%Y/%m.%d' '-filename<Desktop/Target/$dateTimeOriginal Los Angeles/$filename' ~/Desktop/Originals -o . -fastAnd if we wanted the top level directory to be the camera model:
exiftool -model -dateTimeOriginal -d '%Y/%m.%d' '-filename<Desktop/Target/$model/$dateTimeOriginal Los Angeles/$filename' ~/Desktop/Originals -o . -fastThe capture time and camera model are just a couple of Exif tags you can tap into for your directory structure.
See where this is going?
RENAMING
Of course, if you must rename your camera files, you can certainly do so and at the same time as you copy them. In this case, we'll copy the originals to a new directory, adding the dimensions to the filename:
exiftool -model -dateTimeOriginal -d '%Y/%m.%d' '-filename<Desktop/Target/$model/$dateTimeOriginal Los Angeles/%f_$imagesize.%e' ~/Desktop/Originals -o . -fastBTW, "-o" copies the files rather than move them. If we wanted to move them, we'd just omit that switch.
CONDITIONS
We can get a little more selective by imposing conditions on our copying. Let's say we just want to move the JPEGs to the target directory and add the image size to each JPEG's filename:
exiftool -model -dateTimeOriginal -d '%Y/%m.%d' -if3 '$filetype eq "JPEG"' '-filename<Desktop/Target/$model/$dateTimeOriginal Los Angeles/%f_$imagesize.%e' ~/Desktop/Originals -o .In this case, we don't need the
-fastswitch because-if3does the same job.How about handling multiple conditions? No problem:
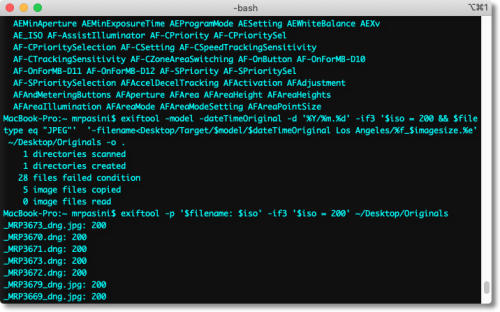
exiftool -model -dateTimeOriginal -d '%Y/%m.%d' -if3 '$iso = 200 && $filetype eq "JPEG"' '-filename<Desktop/Target/$model/$dateTimeOriginal Los Angeles/%f_$imagesize.%e' ~/Desktop/Originals -o .That copies any JPEGs whose ISO was 200.
CONCLUSION
We've built up ExifTool commands from simple reports to archiving images into hierarchical directory structures while renaming the image files. All with a one-line command.
That may seem like showing off but it's really only being efficient.
You might have three photographers using their smartphones and a dSLR to cover an event and want to organize their images by photographer and camera model (or camera model and photographer for that matter).
You could write some code to switch directories based on what tag values ExifTool returned and then call ExifTool to copy the images to the right directory. But you'd be loading ExifTool multiple times and that would bog down the show.
You can do all that in one line with ExifTool, loading once and just reading the Exif headers of the files to copy or move the images into the right directories named however you want to name them.
It may seem like magic, but it's no trick.