C O N T E N T S
•
•
•
Photo Corners headlinesarchivemikepasini.com
![]()
A S C R A P B O O K O F S O L U T I O N S F O R T H E P H O T O G R A P H E R
![]()
Enhancing the enjoyment of taking pictures with news that matters, features that entertain and images that delight. Published frequently.
Test Drive: Exposure X7


13 October 2021
We downloaded the new Exposure X7 from Exposure Software shortly after the announcement late last month touting three new features, among other enhancements.
But probably one of the most important features of the new release is something quite different. Its system requirements of macOS High Sierra and Windows 10 64-bit remain unusually modest for a high-end Raw image editing package.
At a time when other reliable workhorses (even, to our chagrin, Adobe Elements) have dropped support for Mojave, that's a refreshing dedication to the users of the software.
We suspect this has to do with Exposure Software's focus on editing functions themselves rather than the computational magic of artificial intelligence. It seems the minute your workhorse application dives into artificial intelligence, you have to buy new hardware to run it.
HIGHLIGHTS
Highlights of the new release, as we previously reported, include:
- New Masking Tool. Draw a rough border using any of several tools to mark a selection and Exposure X7 will create a more precise mask automatically whose precision you can adjust after the fact.
- Workspaces. You can now organizing Exposure X7's panels more efficiently for a particular task into workspaces. Layouts for culling, editing and retouching are included.
- Crop and Transform. These functions have been combined into a single panel with new composition guides for golden ratio, golden spiral, golden triangle and diagonal.
- Pixel Removal. Defective pixel removal, which can automatically detect and remove single-pixel artifacts caused by defects in a camera sensor, is now available for Raw files. You can adjust the removal strength as well.
Other enhancements include:
- More faithful color reproduction when using custom DCP color profiles
- Improved color fidelity with DNG files
- Fine texture noise can be added to recover detail with aggressive noise reduction.
SYSTEM REQUIREMENTS
Exposure X7 may be used as a standalone photo editor or as plug-ins to another program. When used as a plug-in, it requires one of the following host applications:
- Adobe Photoshop CS6 or Adobe Photoshop CC 2015 or newer
- Adobe Lightroom 6 or Adobe Lightroom Classic CC
Common Requirements
- Monitor with 1280x768 resolution or greater
- 8-GB RAM minimum, 16-GB recommended
macOS Requirements
- 10.13 High Sierra or newer
- Apple M1 or Intel Core 2 processor or newer
- For GPU support, a recent (2015 or later) Metal compatible GPU with 2-GB RAM is recommended
Windows Requirements
- Windows 10 64-bit or newer
- Intel Core 2 processor or newer
- For GPU support, a recent (2015 or later) OpenCL compatible GPU with 2-GB RAM is recommended
TEST DRIVE
We weren't able to test every improvement in this version of the software. Things like defective pixel removal require defective pixels, after all. But we were able to spend some time on some of the more intriguing new features.
We've noted before that Exposure X, in general, is one of the most polished software gems we use. We just don't bump our head up against bugs introduced by updates. It stands head and shoulders above everyone else in its field for that alone.
But we also want to point out that in an era when documentation is left to the YouTube influencers, the company continues to provide excellent support materials including video tutorials featuring Jimmy Beech with full transcripts and HTML documentation. And both are easily found in the application's men bar under Help, right where you'd expect to find them.
There really ought to be a law obliging everyone to do that.
But with our propensity to screw things up if at all possible, we had trouble right off the bat anyway. We launched the application by dragging an image to it in the macOS dock. And we discovered that whatever we did, we couldn't find any resizing controls in the new Crop and Transform panel.
src="images/th-ss-158.png" width=485 height=500 />External Editors Preferences. You can configure launch mode here.
As Exposure Software CEO Finley Lee explained to us, that launches Exposure X7 in the external editor mode, or plug-in mode. "In that situation we don't enable any resizing," he said.
When the application is launched from any application other than the Finder, he continued, "We assume that you're using some other image editor and that you want the Lightroom external editor behavior. If the app you're launching from is an app launcher rather than a photo editor, this produces the unexpected behavior you're observing. There is a preference that shows up in the General preference tab which allows you to configure the launch mode for the app."
Exposure X7's masking tools are both extensive and complex but they are also unique. So let's start with Jimmy Beech's excellent demo:
So how did they work for us on a real image?
For our first attempt, we used an Include Marker to roughly select a rose that was well delineated by its white color from the green background. We simply scribbled around the rose and let Exposure X7 render the mask.
We did adjust the Base Width and Border Width to fill out the selection to the center and edges of the rose. But that's all it took.
That mask included a few background areas where a leaf was just as sharp or the background not much different from the rose that we resorted to a couple of Exclude Markers. We simply dragged into the rose from the background and watched the mask correct itself.
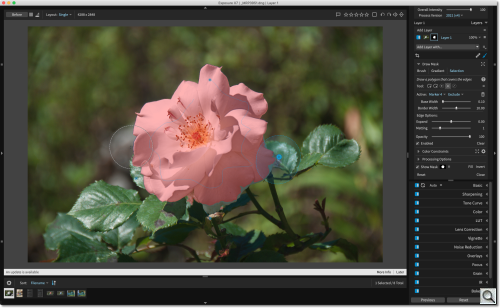
Using Markers. Most of the rose was selected by one Include Marker before we used Exclude Markers to clean up the bottom edges.
It took you longer to read that than it did for us to create a very precise mask which we then used to turn our white rose blue.
On our second attempt, we wanted to try the polygon drawing tools. We used the Include Polygon to click around the edge of a few leaves. We're used to using the Pen tool in Photoshop to make a selection, so this was nothing new.
But we really liked being able to extend the edges of the mask with the Expand Edge option. That's how we managed to include the razor sharp edges of the leaves.
That really worked well, too. In fact, we felt we had mastered the masking tools on our first try. Masking used to require painstaking expertise but with Exposure X7, it's child's play.
You can also elect to hide the mask, which is what we did when we edited the selection's hue so we could see the effect.
We rather like Exposure's approach to workspaces. That's because the interface, to start with, is well thought-out. And because it is well thought-out, you can actually load up the right-hand section (or dock) with every panel available.
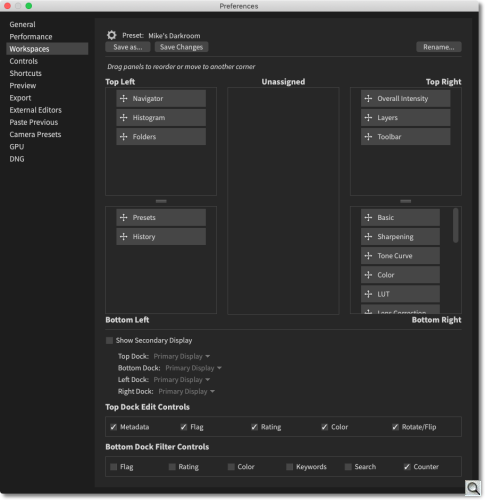
Workspaces Preferences. You can configure your own workspaces here.
So what good are workspaces if you can have everything available all the time?
The manual explains, "They help you focus your attention by showing only the controls needed to perform the task." So you can quickly configure the application to browse and select new images or set it up to quickly access all the editing tools you might need or limit it to just its retouching tools, for example.
The "limits" are not confining, we should add. They are focused. And that's helpful in an application that has some 15 complex panels available.
Any particular workspace determines which panels are visible but also in what order they appear and whether they are expanded or closed. Further, it remembers the position of the dock dividers and the scroll position of each panel. And it can store multiple monitor preferences as well.
When you think about how much clicking and dragging you have to do in other software to set up panels before you get to work, this is a real time saver.
It would be counterproductive if it weren't easy to switch workplaces, of course. And Exposure X7 addresses that problem with a handy Workspaces button in the bottom right corner that includes every possible workspace, commands for creating and editing workspaces and options to jump to Previous and Next workspaces.
If you get the feeling that the people who write this software actually use it, it's because they do.
So the question is just how do you configure these workspaces?
Nothing tricky about it at all. As we show in the screenshot above, all you have to do is pop into Preferences to the Workspaces panel to find a schematic for a generic workspace into which you can drag panels into each dock.
A checkbox enables any second display, letting you assign any of the four docks surrounding the image display area to that monitor. The top and bottom docks are also configurable. In the schematic, the central area is for unassigned panels.
It really couldn't be simpler or more clear.
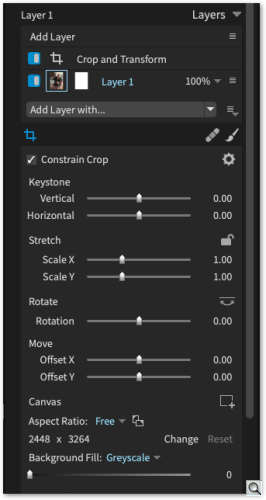
Crop and Transform. Everything you need in one panel.
To access the new Crop and Transform panel, you click on the crop icon in the editing tool bar. A Crop and Transform layer is added to the image as a guide is overlayed over the image.
You can make adjustments using either the sliders of numeral fields in the panel or directly on the image itself.
Under Display Options in the panel you can select a number of different grid overlays. Other options include:
- Constrain Crop: Fill the crop area with image pixels.
- Keystone: Adjust perspective by rotating around a vertical or horizontal axis through the center of the image.
- Stretch: Scale the image horizontally or vertically. A local control constrains the stretch.
- Rotate: Rotate the image around a center point or click the Level tool to and draw a line in the image to straighten the image.
- Move: Moves the crop rectangle horizontally or vertically.
- Aspect Ratio: Select a crop ratio, switch between portrait and landscape orientation, crop rectangle constrained by the selected aspect ratio.
- Background Fill: Sets the color used for background pixels. The background color will only be shown if Constrain Crop is disabled and the crop rectangle is not entirely filled with transformed pixels.
- Composition Guides: Select the guide shown in the crop rectangle.
- Alignment Guide: Select the creative guide or an alignment grid while rotating the image.
- Alignment Grid Size: Set the gridline spacing of the alignment grid.
PRICE, AVAILABILITY
Exposure X7 is available now directly from Exposure Software for $119. Upgrade pricing for owners of previous versions of Exposure is $89 and if you purchased Exposure X6 on or after July 15, the upgrade is free.
For $149, Exposure X7 is available in the ~Exposure X7 Bundle, which combines Exposure with Blow Up and Snap Art, adding high-quality upsizing and natural media special effects. If you own one or more of the current apps in the Exposure X7 Bundle, you can update for $99.
A 30-day fully-featured free trial of Exposure is also available.
CONCLUSION
Exposure Software describes X7 as "the image editor designed for the art of photography." It's a distinction that holds up to scrutiny.
When you get tired of applying the same preset everyone else can apply and want to take your image further than a popular style, Exposure X7 will be waiting for you.
You'll be able to do things to your images with X7 that go beyond optimizing the Raw data into a realm that allows you to speak through photography to anyone who sees your image. It is editing for artists.
We've given Exposure X7 all four photo corners but the company has once again exceeded our expectations.