C O N T E N T S
Photo Corners headlinesarchivemikepasini.com
![]()
A S C R A P B O O K O F S O L U T I O N S F O R T H E P H O T O G R A P H E R
![]()
Enhancing the enjoyment of taking pictures with news that matters, features that entertain and images that delight. Published frequently.
Photoshop Neural Filter: Colorize


11 October 2022
With Adobe MAX just around the corner, we're preparing for a few surprises. But in the meantime, we thought we'd take advantage of our operating system update to try out a few existing neural filters that we haven't had a chance to play with.
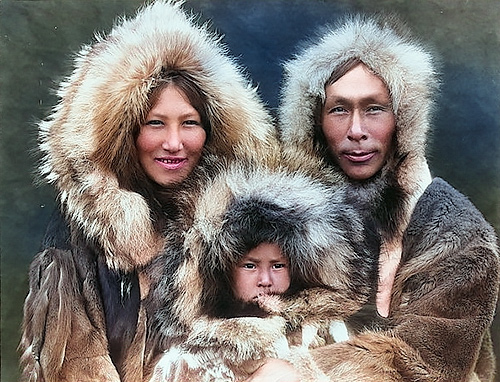
The first on our list, being a child of the last century, was Colorize, which uses artificial intelligence to apply color to a monochrome image. We opened the image by Edward Curtis we used for our Columbus Day story and gave it the treatment.
FIRST RUN
You do have to download the Colorize filter before you can run it, so we clicked on that option and waited for it to download.
But we were immediately dismayed to see it "temporarily disabled." Not to worry. A tool tip explained the file we had opened was Grayscale and would have to be converted to RGB. Of course.
Even then, though, the filter didn't apply color.
There was another good reason, though. To activate the filter, even with the
Auto color imagecheckbox enabled, you have to turn it on. This prevents accidentally running the filter when the neural filters load, which can take a while. In our case a few seconds.It took just a few seconds but we really liked what we saw.
Not only are the skin tones realistic but the fur is as well and the background is colored in a complementary fashion we find quite pleasing.
SETTINGS
Under the
Adjustmentsdrop down, there is a Profile popup menu with a few choices. We tried them and settled on one (Retro denim) we liked best, although we had no clue what they were doing.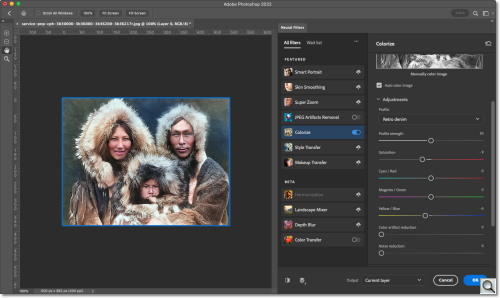
With the
Profile strengthslider you can tone down the effect a bit.And below that are several sliders we really did find essential. There are three to rebalance color shifts and above them is a Saturation slide we almost always used to bring the edit back to a more realistic look.
There's also a
Color artifact reductionslider and aNoise reductionslide, neither of which we required.Every time you make a change to a slider, the image is reprocessed, taking a few seconds on our system.
Finally you can select an output option that includes current layer, duplicate layer, duplicate layer masked, new layer and smart filter. A checkbox allows you output it as a new color layer.
OTHER OPTIONS
You can make manual adjustments by pinning an area of the image and selecting a color swatch to use.
We weren't at all successful at this for some reason. But it's there. And we'll keep trying.
SUBJECTS
We tested three types of subject: portraits, landscapes and still lifes.
Of the three types of images we tested, we were most impressed with portrait renderings.
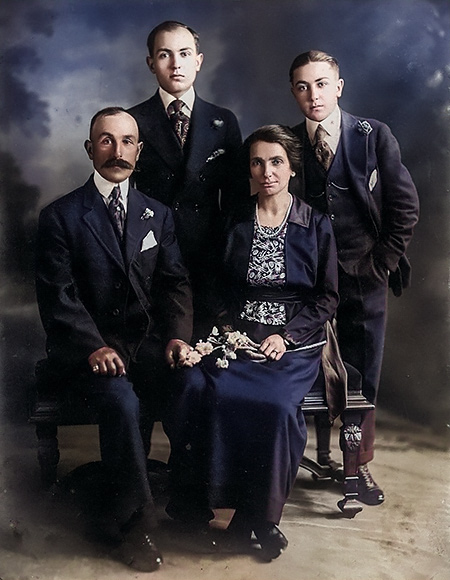
This one in particular impressed us. The formal attire was intelligently colored with slight variations from black to blue to gray among the men with a realistic rendering of the woman's matching attire. All of which seemed to be aware of the era as well.
The background of the studio portrait was pleasantly but unobtrusively colored. And the floor was left a warmish neutral, also not distracting. But notice how both the floor and background give a sense of an outdoor setting.
We thought it was quite intelligently colored. And credible. So credible we convinced ourselves it was, in fact, real.
The effect of bringing an image to life with color was addictive.
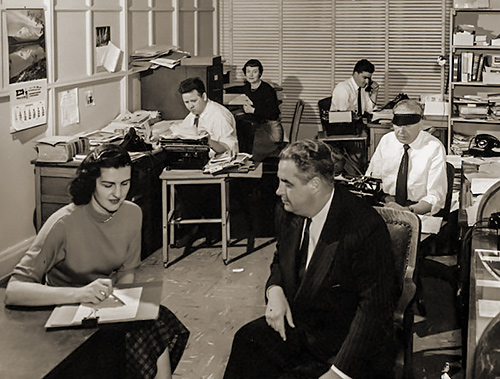
So we tried it on the image of the 1950s newspaper office we recently published. We had turned it into a duotone but we reverted to grayscale for this test.
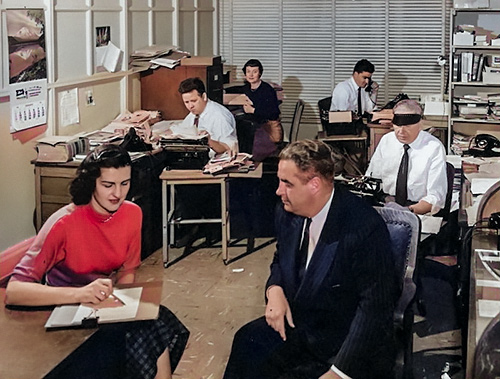
See the office image processed with Palette, the free AI colorizer, in our Oct. 13 Around The Horn.
We remember the room with its brown linoleum floor. And this rendering is more than credible.
One more anecdote on portraits before we move on. We had colorized an old faded color image of a daughter with her father, both of them in the Sunday best but Dad relaxing with a cigarette and a drink.
In the version we worked on, it took us hours before we recognized the drink in his hand and appropriately recolored it. But Photoshop got it immediately.
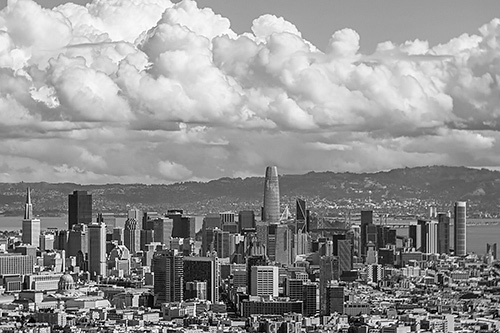
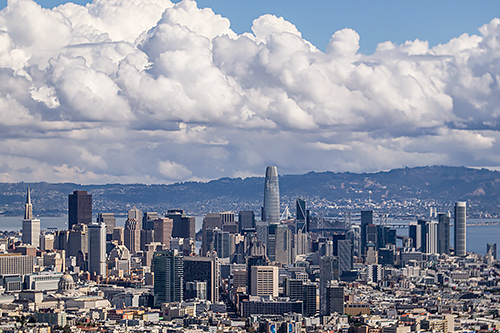
We used a recent cityscape under fluffy clouds on a sunny day to see how Photoshop would colorize it.
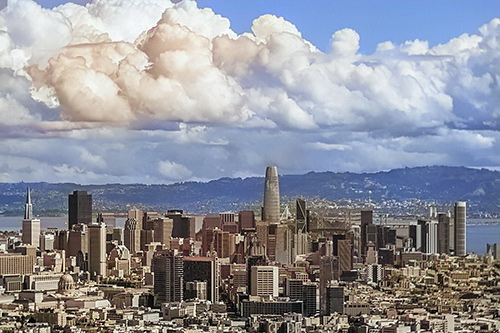
The original was a color image, of course. Again we converted it to Grayscale in Photoshop to discard color information and changed the mode right back to RGB so we could colorize the monotone version of the image.
A couple of problems immediately stood out.
The clouds were far too saturated in the shadows. But even worse, they ranged from quite warm shadows on the left to cold ones on the right.
Below them the city buildings themselves all had a warm cast.
We couldn't completely remove the problem in the clouds with the filter's sliders although we improved the city buildings a bit.
The distant hills did well but you can see the colorized rendering is not realistic compared to the original color image.
It's not a tricky landscape so we were disappointed with the results. There's a button for that in the filter, fortunately, to report disappointing results.
This is also a good example of how colorization can differ from an original color rendering.
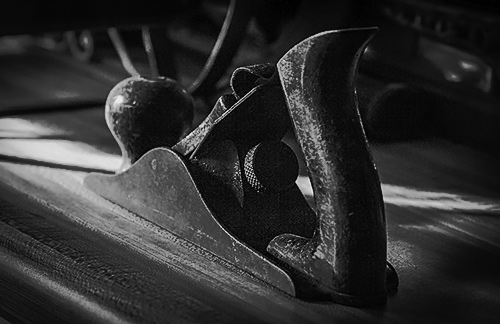
For our still life shot, we used an image of a hand plane.
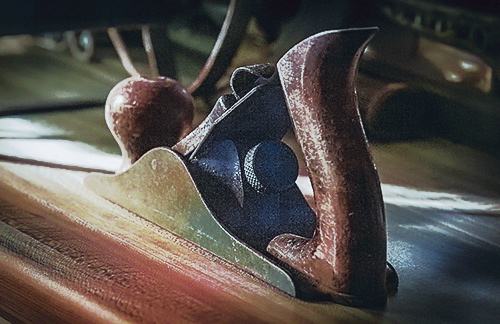
It's a tight crop, which doesn't help artificial intelligence identify it. But it seemed to do all right.
The problem was more the lighting, which was severe and from the left. That seemed to cause the render to be garrish.
We fooled around with the sliders hoping to improve it but weren't successful. It is the kind of thing further editing with Camera Raw would improve, though.
EVALUATION
Colorizing a monochrome image cries out for artificial intelligence and this implementation uses it quite well.
In the Curtis image, for example, not only are the skin tones realistic but the fur is as well and the background is colored in a complementary fashion we find quite pleasing.
Likewise on old family photos we colorized, the formal attire was intelligently colored with the dark suits of the men matched to the women's outfits. And it seemed to be aware of the era as well.
And the filter generally didn't force the issue on portraits, at least. Where the color was ambiugous, it was rendered in a subtle color or a harmless neutral.
CONCLUSION
While we were generally disappointed in colorized versions of landscapes and still lifes, we were more than impressed by the colorized portraits.
We've spent hours colorizing special photos for friends and family and it isn't a trival task. This neural filter does a great deal better on portraits in no time at all and lets you take it from there.
Time is the key factor here. By saving the colorized version on a layer, you can be more selective in what you want to retain and what you want to improve. But what we wanted to retain was often the trickier parts of an image.
So we got quite a head start on images that would would otherwise have taken us hours to work out, getting credible results in minutes that we sometimes continued to improve with traditional edits but often didn't need to.
That's saying something.