Photo Corners headlinesarchivemikepasini.com
![]()
A S C R A P B O O K O F S O L U T I O N S F O R T H E P H O T O G R A P H E R
![]()
Enhancing the enjoyment of taking pictures with news that matters, features that entertain and images that delight. Published frequently.
A Piccure+ Test Drive


14 October 2014
Built on software designed to eliminate camera shake, Piccure+ from Intelligent Imaging Solutions in Germany ambitiously claims it "is the beginning of a trend we consider to be one of the most important in photography: fully leveraging the possibilities of computational photography."
In a blog entry introducing the new tool, Allgemein explained that Piccure+ does not use lens profiles:
Piccure+ opens up a new path in this direction by leveraging intelligent, adaptive algorithms for image reconstruction. We do not know if this approach will prevail over the existing "measure a lens and then apply whatever you found to an image" solution or how this will increase competition in the lens market (e.g. Sigma and its 50mm lens). Yet, we do believe a new set of possibilities just opened up for photo enthusiasts.
One of those possibilities is the use of lens patents that have recently expired to develop "generic" lenses that computational photography can improve enough to match current designs.
We hope that generic lenses will allow for more affordable products thanks to cheaper materials, higher manufacturing tolerances and cheaper design processes. There is little need to design an optical flawless masterpiece, or even design a new lens altogether, if many optical imperfections can be improved in post-processing.
The quick take on Piccure+ is that it taps into the power of your computer in post processing to compensate for the inevitable compromises made in lens design. For more on those compromises, we refer you to our recent Saturday matinee in which Hubert Nasse discusses them.
We have several old lenses around here, so we thought we'd give Piccure+ a test drive. You can download the Mac or Windows version for a 14-day free trial.
SYSTEM REQUIREMENTS
As you might expect (or at least hope) from a solution that promises to improve the results of old optics, the system requirements are not very demanding.
- Windows XP or later, Mac OS X10.6 or later
- You can run the package standalone or as a plug-in for Adobe Photoshop CS4 or newer, Lightroom 3 or newer or Adobe Photoshop Elements 7 or newer.
- At least 2-GB of RAM and a 1.7-GHz dual core for Motion+ functionality. At least 4-GB RAM and a 2.4-GHz dual-core processor is recommended for Lens+ functionality.
In addition to the 14-day free trial, the company is also providing a limited-time 30 percent discount off the $99 list price:
You already own DxO Optics Pro or a TopazLabs product for image sharpening but still like Piccure+? Send your invoice (no older than two years) to offer@piccure.de and secure your 30 percent discount.
INSTALLATION
The 115.9-MB download includes an installer that advises the package will need 331-MB of disk space. The installer offers no options, not even asking if you use a separate plug-ins folder.
Our system logs weren't much help either, merely reporting that the package had been installed.
So we dug around and saw that a Piccure+ plug-in had been installed in all of our Photoshop plug-ins folders (we keep a few versions on life support) and the Elements plug-ins folder. But nothing had been installed in the Lightroom plug-ins folder.
The manual advises that the Lightroom installation can fail if a Presets option in Preferences is set to "Store Presets with Catalog." But that wasn't the problem in our case.
We did notice, however, that Piccure+ was treated as a preset not a plug-in. And further in the manual, Lightroom users are advises to use the Photo>Edit In>Piccure+ approach to activate the utility.
And indeed Picture+ was listed in the fly-out menu.
USAGE
A full manual is provided as a PDF. And the company also dispenses a few tips:
Sharpness and Artifacts: We recommend to shift the Sharpness slider 10 percent further to the left by default. Most users find this new setting "more natural" and get better results. We will change the default value going forward. Apologies for the inconvenience.
To get the very best quality for the correction of optical aberrations click on "Menu/Advanced Lens+". The quality setting "Quality+" will become visible. It gives you a finer and better rendering -- but takes longer. We recommend this setting if quality matters more than computation time.
Piccure+ works best on Raw images. JPGs are often "sharpened" by the camera and suffer from compression. In addition they only offer 8-bit per channel. You can take a look at the handbook here (Link)
The Raw requirement is interesting. Few digicams capture Raw and yet their optics might most enjoy the most dramatic improvement. And what goes for digicams goes for smartphones, too.
So we are really looking at old 35mm glass. Prior to computer design, perhaps, for the most significant improvement.
There are differences between the standalone and plug-in versions. We'll highlight them as we go along.
FIRST TEST
Our first test was simply to open a Raw image from our recent Playoffs slide show. These DNG images were shot with an 18-200mm Nikkor of recent vintage.
Piccure+. With Lens+.
Piccure+. With Advanced Lens+.
Piccure+ complained we had only 1-GB of free RAM. It was correct about that. So we closed our browser and, with over 2-GB free RAM, we tried it again from Lightroom. No problem.
We were happy to see it supported our DNG file and did not require the NEF. In Lightroom, the manual recommends saving a copy of the current image as a 16-bit TIFF with one of these profiles: sRGB, ProPhotoRGB or AdobeRGB.
In the standalone version, Piccure+ can import Raw files and convert them to TIFFs when processing using Dave Coffin's DCRAW processing engine. Both the bit depth and color space of the Raw is maintained in the TIFF.
Piccure+ operates in two modes: Lens+, the default, and Motion+, available from a popup menu. Motion+ is apparently the original Piccure camera shake utility, updated with Piccure+'s improvements. Lens+ actually has two modes of its own, including an Advanced Lens+ that adds a Speed/Quality slider.
A set of sliders is displayed for each as well as a Navigator and a Preview button. Double clicking on a slider does not return it to its default position.
We played around a bit before we realized we would have to click Preview to see the effect of any change. We also noticed that Piccure+ commanded our computer's complete attention, locking out any other process from responding to a command.
For example, when we saw it would take a minute or so for Preview to render (even though it is only rendering the visible section in the Navigator pane), we wanted to swipe over to another screen to add to this review. Nope. Please wait.
That was not the case running the plug-in in Photoshop, however. Piccure+ behaved nicely, letting us update this review as it processed a preview.
What we learned from our first attempt with Piccure+ was that we should have read the manual first. So we did.
ONE OPTIMIZATION
Unlike many other post processing edits, what Piccure+ does to an image depends on the lens. The focal length of a zoom lens will vary but for a prime, batch processing a correction over a set of images makes a lot of sense.
Piccure+ does support batch processing in the standalone version via its action script support in Photoshop.
TESTS
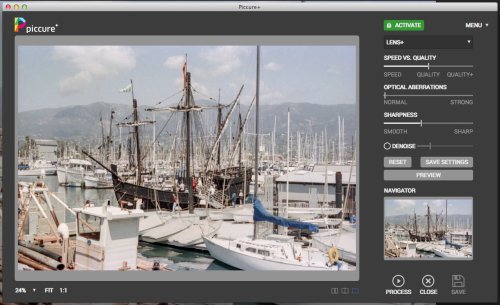
For our test drive, we selected three problematic images. The first was our scan of the Niña from yesterday taken, we believe, with a 43-86mm Nikkor from the 1970s.
We also set some ground rules. No lens corrections. And we did use Advanced Lens+ rather than Lens+ on all of these images. Our comparison illustrations here are all 100 percent crops.

Niña Detail. Optimized in Photoshop (left) and in Piccure+.
You can see the image is significantly sharper even in the middle of the shot. The scan was saved as a 16-bit Photoshop PSD file, not a Raw file.
Our next image was taken with a 28-50mm Rexatar designed in the early 1980s. As we reported last year, we had to shoot Raw and do a lot of work on the image to get a satisfactory rendering. The detail on the left is the result, with a good bit of Clarity helping the sharpen the image.
Unlike the image of the Niña above, we turned off Denoising on this image after trying it on the Preview. It did smooth the color fields as expected but we wanted to show all the detail in this one.
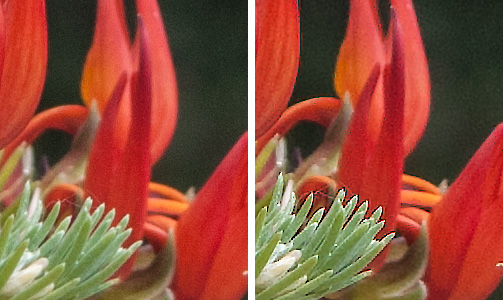
Rexatar Detail. Optimized Photoshop (left) and the Piccure+ rendering.
Again you can see the improvement in sharpness at the center of the frame. You can also see a bit more contrast and saturation in the color.
Our final test was the 18-55mm kit lens on the Rebel XTi. Again, this was a Raw image (converted to DNG) optimized in Photoshop via Adobe Camera Raw and then processed in Piccure+.
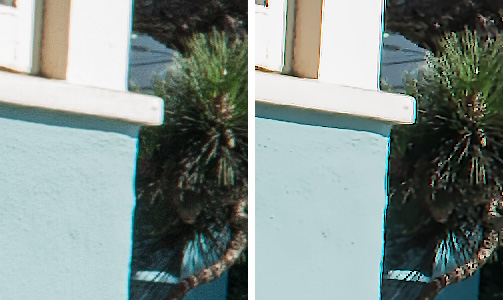
Canon Detail. Note the Piccure+ (right) rendering exacerbates the Canon flaws.
This time, we weren't happy with the Denoising and found little difference moving the slider left just a bit from the default. In fact, the Optical Aberrations slider seemed to have only two options: Normal and Strong. Nothing in between.
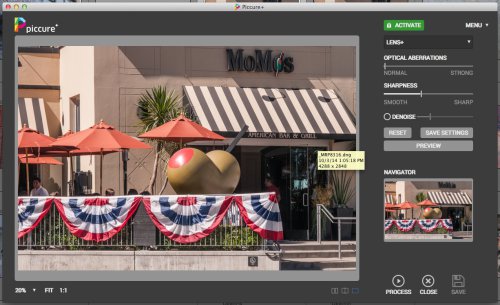
SMARTPHONE
We dug up an iPhone 5s image to try. This time we didn't make any Photoshop optimizations. We just ran it through Piccure+. Keep in mind this was just a JPEG, too, not a Raw file.
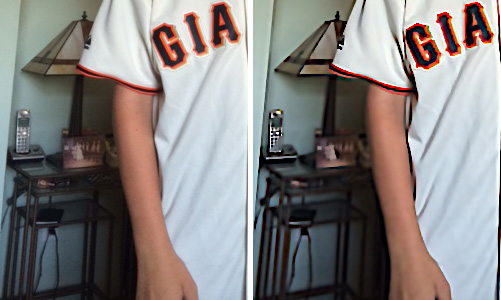
iPhone 5s. With quite a bit less sharpening on the Piccure+ (right) rendering than the other examples.
Again you can see an improvement in the contrast and saturation. But we felt the sharpening was a bit too much, yielding artifacts even at the lower settings. The phone in the background, for example, seems much too sharp, although we like how the lamp was rendered. The lettering on the jersey was a big problem, too.
We did notice a significant difference in processing time for the smartphone image, as well. It was much quicker with hardly any delay.
CONCLUSION
Certainly this short test drive isn't comprehensive.
We didn't apply any lens profiles to the Camera Raw processed images, for example. And we didn't run any tests against DxO Optics Pro, which takes hardware profiling to another level.
We also didn't evaluate any correction for optical distortions like those in Camera Raw's lens corrections. Piccure+ doesn't correct for diffraction. It does handle lens softness and chromatic aberration, however.
So it's a little premature to draw any conclusions. Instead, we'll leave you with a few observations.
We don't know if Piccure+ uses the GPU to do any processing but we hope that's an optimization planned for a subsequent release if only to make experimentation with the settings more feasible. There's room for improvement on this score.
We also felt that the sliders may not have been quite the right control for settings like Optical Aberrations, which seemed either enabled or disabled. But even the Denoising slider didn't seem to respond to subtle shifts.
But that's small potatoes compared to the "new possibilities" Piccure+ opens for our images. We focused on clearly flawed optics but any lens design employs compromises and a tool like Piccure+ that can address those shortcomings in post processing is a welcome tool indeed.
Piccure+ has been developed by Intelligent Imaging Solutions, a state-funded, technology-based research company founded in 2011 by professors and scientists.
Physics matters, as the old joke goes, but computational photography counts, too. We look forward to Piccure+'s continuing development.
Comments
A good summary which is pretty much in line with my own findings. I have looked at a couple of old M42 lenses on Micro 4/3 and also at budget zoom lenses at the long end, where optical defects are common and found real improvements over what I can manage with Lightroom sharpening and also some, but more subtle, improvements over what DxO's lens profiles provide (where they are available).
I would also say that I have had mixed results both within images and from image to image -- when Piccure it is good it is very good, but when it is bad it can be horrid -- some spectacular failures for no reason I can determine. And Piccure's noise reduction seems to me not ready for prime time -- much better results using DXO to do any necessary noise reduction. However, the positives do strongly outweigh the negatives, so I suspect it will prove a keeper at the end of the trial period.
-- Ken Cameron
Yes, it's hard (if not impossible) to beat DxO's PRIME noise reduction. And with a DxO lens profile, we've gotten closest to Piccure+'s lens corrections, which was closer than we got with Lightroom.
This would be a good place to point out we've done several follow-ups that might shed a little more light on Piccure+. A Discussion With Piccure+'s Lui expands on our Test Drive substantially. Autumn Leaves in OpticsPro 10, Piccure+ compares both approaches and tries to find a workflow using the strengths of both, too. And our Friday Slide Show: Street Signs was done in Lightroom from the Piccure+ TIFFs, a nice combination.
That's a variety of glass from old, marginal stuff to our best. The biggest concern is the horsepower Piccure+ requires (our fans ran full speed for a long time processing the slide show). But as you say, "the positives do strongly outweigh the negatives."
-- Mike