C O N T E N T S
•
Photo Corners headlinesarchivemikepasini.com
![]()
A S C R A P B O O K O F S O L U T I O N S F O R T H E P H O T O G R A P H E R
![]()
Enhancing the enjoyment of taking pictures with news that matters, features that entertain and images that delight. Published frequently.
Test Drive: Creative Cloud Photography Spring Release


21 April 2015
In a recent press briefing, Lightroom product manager Sharad Mangalick emphasized today's Creative Cloud Photography release was "a major, major update" to Lightroom. That didn't prevent him from revisiting "existing features," like Web View and the DNG format, that the company apparently feels have not gotten the attention they deserved.
Lightroom CC 2015 Release. But you can call it Lightroom 6 if you buy the box.
There are new features in Lightroom CC 2015, of course, including versions of the mobile app for Android phones and tablets. Photoshop, however, remains unchanged except for an update to Camera Raw to v9.0 to keep pace with Lightroom. Otherwise there aren't any other new features to the $9.99/month Photography Program that lost Behance and storage options when it became a permanent offering.
So this is a Lightroom update.
We've been able to run the new version for a few weeks now, during which we reported an issue we find significant enough to keep us on v5 until it's resolved. You can, fortunately, use both version 5 and 6 but with separate catalogs.
Update (21 April): Later in the day, after a number of CC updates, we launched Lightroom CC and created a new catalog, importing some working Collections from an older catalog. When we tried rotating a few images in the Develop module, we noticed performance was much smoother with GPU acceleration enabled. The Auto button and the Angle slider both performed adequately and even manual rotation was not quite the problem we had seen (unless we rotated a full crop very, very slowly). We'll keep an eye on it but we were not seeing the problem that had plagued us earlier.
Update (30 April): We did see the problem return, unfortunately. And return reliably. But it suddenly occurred to us that we'd been using an Intuos mouse and tablet to do the rotation and not the trackpad. When we tried the trackpad, we found rotation was smooth. So we suspect, as we explained in a subsequent story on the issue, it's the Intuos driver and not Lightroom's GPU code.
THE THREAT
When Lightroom was conceived, photographs were captured by cameras. But today photographs are captured by all sorts of apps running on phones and tablets. And cameras haven't gone away either.
Even more frightening, these captures are not staying put. They are migrating instantly to server farms where they can be accessed by even more devices.
How you keep them on your farm is the central question today for Adobe, Apple, Google and anyone else who wants to play the modern photo game.
The answer is to provide your customers with image editing apps they can use for their cloud-based images on any device they have. So Apple propagates Photos on its phones, tablets and computer operating system while Adobe remakes desktop Lightroom into mobile versions for iOS and Android and Google lays some cable with Snapseed.
The point is to keep you at home. If you wander, the game is over.
LIGHTROOM
So Adobe's first Android release for phones and tablets is as major as Mangalick claimed. It introduces DNG Raw file support for Android 5 Lollipop devices and provides access to microSD storage for photo editing.
And with this release sharing support has been extended from Lightroom to Adobe Voice and Adobe Slate.
Lightroom on iOS has been enhanced with a new segmented view, copy and paste adjustments, presentation mode and an improved crop. You can also sign up within the app now.
We didn't get a chance to try out the updated iOS version of Lightroom before launch but we did get to test drive the desktop version.
LIGHTROOM CC
The major new features are on the desktop version of Lightroom, including Camera Raw v9.0, which also migrates to Photoshop. Mangalick demoed all of them during the briefing.
But one he left out.
Usage Data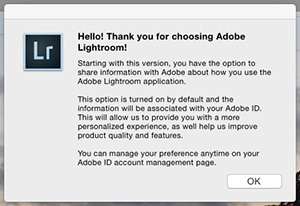
With this version of Lightroom, a dialog box informs you when you first launch Lightroom CC 2015 that "you have the option to share information with Adobe about how you use the Adobe Lightroom application."
The notice also points out that while this option is enabled by default, you can change the setting "on your Adobe ID account management page."
We don't much mind sharing that information with Adobe, but if you do, you know what to do.
Slide Shows
New Options. Music sync and Pan & Zoom slider.
Perhaps the least ambitious feature in this update is the improved slide show but it still isn't trivial. Adding slide shows to music can now also sync the slides to the music by detecting rhythm, pacing and beat to set transitions.
That would seem to make the music the primary focus of a slide show. You really can't script the images to accommodate the music. And the puzzling thing is that Premiere solved this problem a long, long time ago, letting you manually indicate transition points as you play the show.
There were other refinements we found more useful.
There is a slider for pan and zoom amounts now. And exports are not just PDFs. You can export in an H.256 format that has been optimized for your output device.
HDR MergeHDR Merge is one of two new features new only to Lightroom. Photoshop has had a Merge to HDR for a while now. And the same for the other feature, Panorama Merge. So, even though you can now do both within Lightroom, it's a little hard to get excited about either of these two.
But we'll try, we promise.
Mangalick suggested not bothering taking seven or nine bracketed images. You just need two, he said, a plus-one and a minus-one. That's what the demo used, in fact.
The Photo menu now includes Photo Merge to select the images to merge. Lightroom builds a preview with a set of controls on the right-hand side of the dialog box.
Options include Auto Align and Auto Tone. You can also set a Deghost Amount by clicking on either the None, Low, Medium or High button. If you do that, you will also have the option to show a deghost overlay.

HDR Merge. After Lightroom builds the preview, you have a few options.
The buttons seem like a little overkill, more in-your-face Elements GUI than Lightroom's more sophisticated approach. But what they lack in graphic appeal they make up for in useability.
When you like what the preview is showing you, you can click the Merge button to generate a DNG file added to your current Collection. If you are merging Raw files, you keep their headroom with the DNG file.
The process is pretty efficient. Select All, Merge, Click and there you go, an HDR Raw file you can fiddle with.
Just for fun, though, we processed the minus-one demo Raw file in the Develop module and got a frighteningly similar effect to the HDR Merge.

Develop v. HDR Merge. Our Develop version is on the left, a close match to the HDR merge.
Hmmm, maybe you need more than plus-one/minus-one.
Panorama MergeLike HDR Merge, Panorama Merge is not new technology. It's just making its first appearance in Lightroom. That saves you a trip to Photoshop.
It's a little easier to get excited about Panorama Merge.
For one thing, you don't have to preprocess the camera images, evening out exposure, say. Lightroom will do it for you.
And because you'll usually be working with more than just a couple of images, Lightroom presents a fast preview to give you an idea of what's going on before it rolls up its sleeves to do the processor-intensive work of stitching the images together.
That work is done with the GPU so you can continue using the CPU for other tasks.
Again, you have a few options.
You can selection a projection. There are three choices: spherical, cylindrical or perspective.
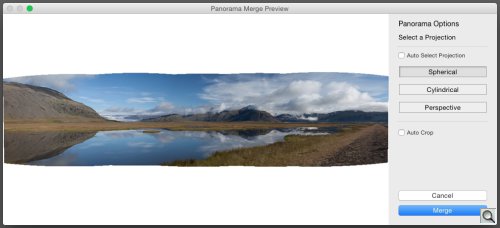
Spherical. Map the image to a sphere.
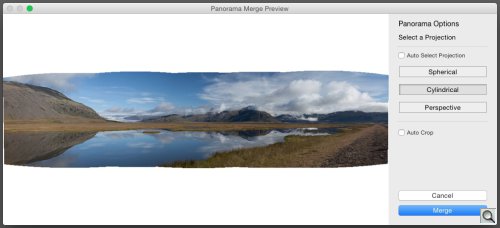
Cylindrical. Map the image to a cylinder.
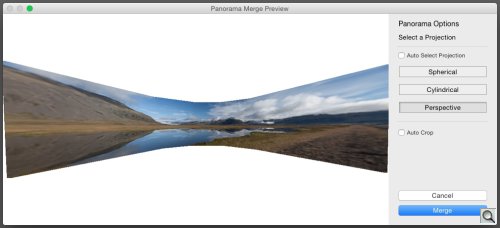
Perspective. Map the image to a perspective view.
Auto crop, which trims the image down so the edges are filled, is non-destructive, Mangalick said.

Auto. Projection and Crop can be calculated automatically.
And, just as with HDR Merge, once you have what you like, you click Merge and the GPU creates a DNG in your current Collection.
It took a while to build the DNG but we could do other things with the CPU because the GPU was doing the build. What we couldn't do, though, was an HDR merge because that too uses the GPU. And Lightroom didn't queue those two requests, dropping the second.
So a little rough around the edges there. And possibly related to the issue we next describe.
GPU ProcessingWe're big fans of GPU processing using OpenGL. You have more than one brain in your computing device but one of them is often sitting around with nothing to do. Offloading a bit of the computational workload to it just makes sense. And doing it with a standard library like OpenGL makes it feasible for the developer too.
Photoshop has long employed the GPU, back to CS4 in fact, but Lightroom is just now tapping into it. In Lightroom CC 2015, the entire Develop module has been rewritten to use OpenGL.
We had mixed results with it (although see our note above).
Our experience on a 17-inch MacBook Pro 6,1 and an nVidia GeForce 300 series GPU was a step backwards. Sliders were not as smooth as they had been in v5 although they were certainly usable.
But rotation was not usable. Small shifts of the image to align it precisely along the grid, for example, jumped back and forth, lagging behind the cursor and kicking the laptop's fans on immediately.
Turning GPU usage off in the Performance tab of Preferences didn't help either.
We've never experienced a GPU problem in Photoshop or Premiere, which also use OpenGL. Regarding Photoshop, Adobe does say::
AMD/ATI 1000, 2000, 3000, 4000 series, nVidia GeForce 7000, 8000, 9000, 100, 200, 300 series and Intel HD Graphics (First generation) cards/GPUs are no longer being tested and are not officially supported in Photoshop CC and CC 2014. Some GL functionality is available for these cards, but it's possible that newer features don't work.
Photoshop also offers significantly more sophisticated GPU options than Lightroom, including Basic, Normal and Advanced modes.
And Adobe's own troubleshooting advice suggests that if running without the GPU enabled still causes the problem then OpenGL is not the issue.
We had the problem with or without enabling the GPU. And that's unfortunate because one would expect no less than the prior version's behavior when the new feature has been disabled. We're not getting that.
We noted our experience was mixed because we also ran Lightroom CC 2015 on a 13-inch MacBook Pro 8,1 which uses an Intel HD Graphics 3000 GPU. And on that machine, which is just a year younger than the 17-inch MacBook Pro, rotation was pretty smooth.
Lightroom's system requirement for GPU processing is an OpenGL 3.3-capable graphics card. The nVidia GeForce 330M in our 17-inch MacBook Pro is OpenGL 3.3 capable from what we understand.
Facial RecognitionLightroom was always behind the curve on facial recognition, ignoring it while iPhotos and even Photos implemented useful versions of the feature. But no more.
The point of facial recognition as as feature is to be able to find photos by the people in them. To do that, Lightroom first has to find all the faces in your Catalog and you, then, have to identify them.
And that can take some time.
So Lightroom gives you the option of finding faces all at once or on an as-needed basis. We found it trucked along at about 1,000 faces an hour in our Catalog of over 54,000 images. Six hours later, though, we hadn't hit the quarter mark in our Catalog.
To access People view, just tap the 'O' key and tell Lightroom which method you prefer. There's also a (pretty cheesey) Face icon in the Library module's toolbar to access People view.
Not everything is a face (and sometimes we were very puzzled that Lightroom could imagine some things were faces) but it's striking to see row after row of faces appear on your screen, all about the same size no matter what size they were shot.
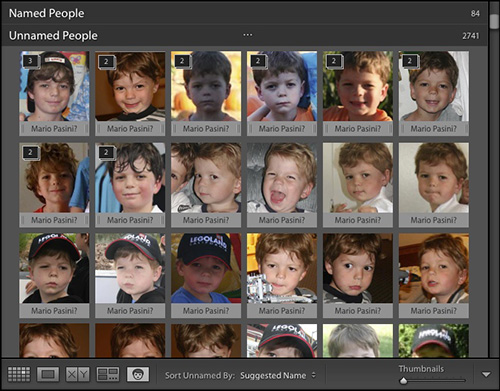
People. Handling ambiguities by asking for help.
Lightroom will report how many similar faces it finds and stack them together, waiting for you to name the stack.
To identify a stack, you double-click the thumbnail and type the person's name. That moves the stack to the Named People panel. There you can double-click the thumbnail to confirm the similar matches.
With a collection that has spanned 20 years, we were curious to see how well it would match people at various stages of their lives. Would Child Eric be in the same stack as Young Man Eric?
Lightroom handles those ambiguities intelligently.
When you type in someone's name and the stack moves up to the Named People panel, the name is used provisionally (marked with a question mark) in the Unnamed People panel for close matches.
You can confirm the match (yep, that's Mario) by sliding the mouse over the name and clicking on the check mark that appears. Or, if it isn't the right name, the no-match icon on the left side of the name.
In a brief test, Lightroom was pretty astute about it's guesses. And the process of identifying ambiguous matches went quickly.
Filter Brush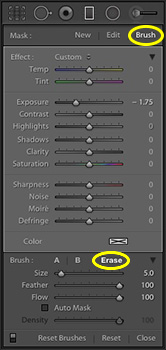
Filter Brush. To turn the Graduated filter tool into a Filter Brush, click the two highlighted options.
The new Filter Brush is the result of customer feedback, Mangalick said. Adobe has always encouraged feedback, particularly with the open beta releases of Lightroom, which seem to be a thing of the past since Creative Cloud.
Mangalick demonstrated how using a graduated filter to enrich a sky also unfortunately darkened the top of some rocks in the foreground of the image. He used a Filter Brush to remove the effect on the rocks by painting over them.
This is a little trickier than it sounds.
First apply that graduated mask to darken the sky. Nothing new there.
The tricky part is to stay in the Graduated Filter panel but click the Brush effect (not the Spot Brush tool above it) in the top right of the panel and turn it into an Erase brush below the settings. Then paint over the areas within the mask that you want to eliminate.
If you make a mistake, erasing too much, click the A setting of the Brush to switch the brush to Painting mode and paint it back in.
CONCLUSION
As our Friday slide shows attest, we are Lightroom frequent flyers. We find the desktop version a very efficient way to review, select and edit a set of images. We have a few annoyances accompanied by workarounds but otherwise we appreciate the mature sophistication of the application.
We're not going to complain about any of the new features, but we're a bit underwhelmed. We could merge HDRs and Panoramas before Lightroom CC 2015.
But while we lived without facial recognition for five versions, we're looking forward to using it. More than a few times we wish we had keyworded our images with the names of the people in them so we could hunt them down more efficiently than scrolling through the collection. Now we're a little glad we didn't bother.
We really do hope an update will at least restore v5's Develop module performance for our 2010 laptop (disabling the GPU should provide the same performance), although we really hope Lightroom inadvertently adds support for our no-longer-tested GPU the same way Photoshop has. But see our note.
And now that Adobe can release updates quickly and freuqently through the Creative Cloud scheme, we don't think we'll have to wait long for the fix. In fact, our wish may already have come true.
Comments
You wrote:
Just for fun, though, we processed the minus-one demo Raw file in the Develop module and got a frighteningly similar effect to the HDR Merge.
Well, yes. But in my experience this can be true of all the other HDR programs I have tried, including when more than two shots are used, particularly when (as almost always) I am not looking for an over-the-top HDR look, and am using a camera with good native dynamic range.
-- Ken Cameron
http://ekcameron.squarespace.comThe joke is that there wasn't much "H" in that HDR image. The -1 Raw file captured enough data to simulate the HDR image all by itself.
In the free Jardine video covering HDR, he shows an multiple-shot image in which HDR reduced noise and a two-shot HDR image that, except for noise reduction, delivered similar results to the multiple-shot image.
You don't need a lot of images to justify HDR but you do need a bigger tonal range than you can capture with a single Raw file to make it worth the trouble.
-- Mike