A S C R A P B O O K O F S O L U T I O N S F O R T H E P H O T O G R A P H E R
Enhancing the enjoyment of taking pictures with news that matters, features that entertain and images that delight. Published frequently.
Seeing Light With The Polaris Karat
23 July 2015
There's a lot to recommend the $290 Polaris Karat flash meter from OmegaBrandess Distribution and price is just one reason. While handling the typical metering duties of ambient reflective and incident light, it can also measure flash duration and can factor Auto ISO into the exposure equation as well.
It also has some more obscure functions that play off its ability to remember readings. We found those pretty interesting, too, once we figured them out.
We've been using a review unit for a month now. Our report decodes the badly-written documentation as it evaluates performance and explains why a device like this can be very useful.
Special features of the Polaris Karat light meter include:
Both reflected and incident ambient light readings
Reflected and incident flash readings
Multiple flash readings
Flash duration readings
Programmable over- or under-exposure
Memory functions to save, compare and average readings
Large backlight digital LCD display
Note that the Polaris Karat does not do spot metering in reflected mode, which it measures at 30 degrees. That's about the only thing it can't do, though.
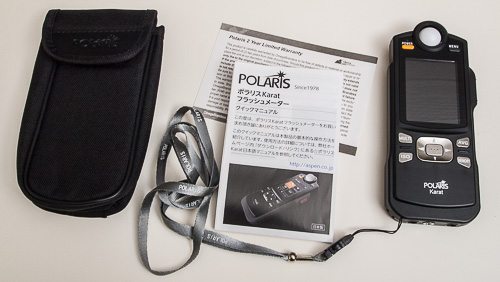
You'll have to supply two AA batteries. We used rechargeable Eneloops, which lasted a long time. And we can't tell you how happy we were to have a light meter that used nothing more exotic than AA batteries.
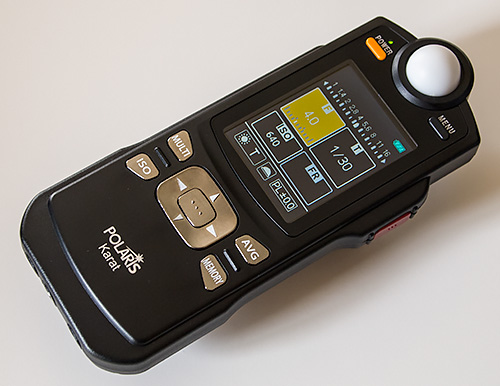
The photos of the Polaris Karat depict a quite attractive device. In person its plastic housing with chromed plastic buttons isn't quite as attractive. But it is certainly functional.
If the physical fit and finish fell a bit short of professional quality, the graphic design of the LCD icons and readouts were even less appealing, reminding us of 1980s IBM PC text.
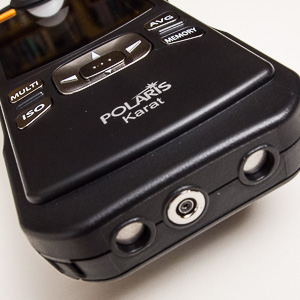
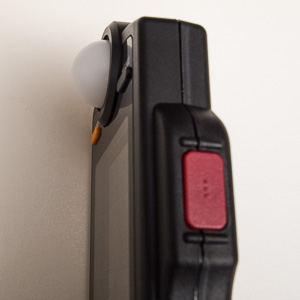
Image 1 of 4: Lanyard Image 2 of 4: Connections Image 3 of 4: Measuring Button Image 4 of 4: Incident Dome, Reflective Sensor Image 1 of 4: Lanyard
Details. Mouse over or tap for captions.
The screen is large enough and easy to read with big characters but these days it's hard to look at a large LCD and not want to press its onscreen buttons. It seems awkward to have to use adjacent physical buttons where a tap would do.
That would make the Polaris Karat a lot more expensive, no doubt, but in the era of the smartphone interface, it probably should be an option. Maybe in a Pro version.
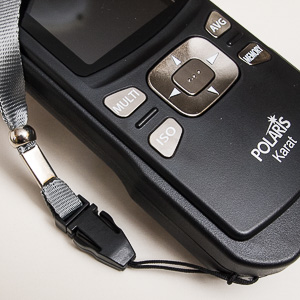
What we did admire about the physical design was how slim the unit is. It easily slipped into a front jeans pocket and, with the included lanyard (which is quite long and conveniently lets you detach the unit from the strap), happily hung around our neck without making us bend over.
The lanyard wasn't perfect either. It has a metal choke that can easily scratch the LCD if you put the Polaris Karat into its case bottom first. We avoided the problem by using a non-metal wrist strap we keep handy.
So flawed if functional design. But at this price, we're going to overlook that. And after a month of regularly use, it really wasn't an issue.
The manual, however, is harder to overlook. The Quick Manual sums up operations in one sheet but it's almost indecipherable English. And, unfortunately, the downloadable Instruction Manual PDF isn't much better.
The language is so bad, frankly, that it often fails to convey any sense.
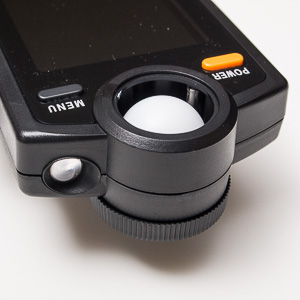
Some things are obvious, like how to enable incident readings by twisting a knob on the back of the unit to raise the incident dome into position.
But others will have you scratching your head. Here's a couple of examples from the Quick Manual:
"If there is a difference of brightness on the screen to shoot, it can easily calculate the average exposure value."
"Memory once for each measurement, can be up to three times."
"To be measured while set the number of times for flash, the Aperture (F) value will be displayed when flash fires once. If press Multiple Flash Button, number of times it was set and the Aperture (F) value that time is calculated."
If you've used a light meter and a calculator you can probably figure things out by trial and error, although a few features will remain obscure. We've tried to explain each operation in detail here to clarify what the manual so powerfully obscures.
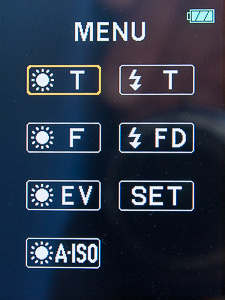
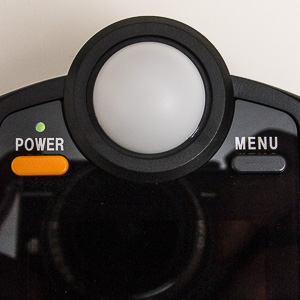
To use the Polaris Karat, you turn the meter on by pressing the Power button. To turn it off, you hold the Power button in a few heartbeats. The Main Menu displays seven options, four ambient light readings, two flash readings and a setup option:
Ambient Light: Shutter Speed Priority
Ambient Light: Aperture Priority
Ambient Light: EV
Ambient Light: Auto ISO
Flash: Shutter Speed Priority
Flash: Duration
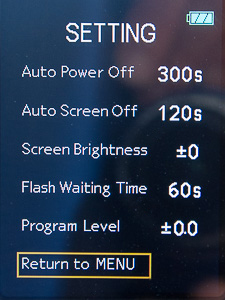
Setup for change Auto Power Off, Auto Screen Off, Screen Brightness, Flash Wait Time, Program Level
You use the back dial to raise or lower the incident light dome. An icon on the main screen indicates which mode you've selected.
A big red button on the right side of the unit takes light readings.
You navigate the Menu options with a four-way navigator (which the documentation calls a Cross Key) that has an OK button in the center. It's surrounded by four dedicated buttons:
Multi Button: aperture at multiple times light
ISO Button: sets ISO value
Average Button: figures exposure based on multiple readings stored in memory
Memory Button: remembers a light reading
The bottom of the unit has connections for a synchro terminal and the optional wireless trigger. We conducted our tests without using a sync cord.
On the back is the mode dial and the battery compartment. To open the battery compartment press down slightly on the raised bumps so the latch will clear and slide the cover toward the bottom of the unit.
Just a brief word about how we went about testing the Polaris Karat. Using it in isolation wasn't going to prove anything to us.
The alternatives are obvious: your camera's meter, a handheld meter and a metering app. We had all three.
None of them, though, cover the whole gamut of readings that the Polaris Karat can perform. Your camera doesn't do incident readings, our Gossen Luna Pro doesn't do flash metering and neither does the metering app on our smartphone.
But they all handle reflected ambient light, so we wondered how closely their readings would match.
Closely, we found. There was no measurable discrepancy between the comparison readings and the Polaris Karat. But the analog devices were more accommodating of odd f-stops and ISO values than the Polaris Karat. More on this later.
And just a word about readings, too. The point of a light meter isn't merely to tell you what aperture and shutter speed (and ISO) to set your camera.
It gives you a complete range of values for the scene. If at ISO 400 you want to use f5.6 then set the shutter speed to 1/60. But if at ISO 400 you want to use f8.0 then set the shutter speed to 1/30. And so on.
We wrote a little story about this recently to show how it works in real life. The initial incident reading required too high an ISO, so we asked the meter to show us our options. And we picked something we could live with.
On the Gossen Luna Pro, you see these values all at once on the outer rings of the big dial after you set the dial to match the light value the meter's needle indicates.
On the Polaris Karat, you cycle through one value with the arrow keys to see the corresponding values. After you take a reading, you can change either of two parameters to see the effect on the other.
Among the options on the Polaris Karat's Menu is Settings. The options under that Menu include:
Auto Power Off sets the number of seconds before the unit automatically turns off the power to save battery life (default 300 seconds, 120, 90 and 60 seconds available)
Auto Screen Off sets the number of seconds before the screen automatically turns off (default 120 seconds, 90, 60 30 seconds available)
Screen Brightness sets how bright the screen if (default 0, -5 to +5 available in whole steps)
Flash Wait Time sets how long the unit will wait to record a strobe value (default 60 seconds, 120 and 30 seconds available)
Program Level sets under- or over-exposure in 0.1 steps of an aperture value (default 0, -0.9 to +0.9 available)
Two settings you should configure for every shoot are the light receiving method and your preferred ISO setting (just to have a known default).
You can then set the aperture and let the meter report the setting for the shutter speed or set the shutter speed and let it report the setting for the aperture.
If you don't like what you see, you can always adjust the ISO until either the shutter speed or aperture is in range or set both shutter speed and aperture to let the meter determine the ISO that works with them.
This refers simply to whether you want to take a reflective reading by pointing the top of the meter at your subject or an incident reading using the white dome and putting it in front of your subject.
A large dial on the back of the unit raises or lowers the white dome. When raised, the meter measures incident light, or the light falling on the dome. When lowered, reflected light is measured from the sensor in the top right of the unit.
An icon in the middle of the last line of the LCD displays the current setting. Frankly, we just looked at the dome.
Which option you choose can dramatically affect what the meter recommends.
To set the ISO, hold down the ISO button and use the Up or Down arrow key to change the value displayed in the LCD.
If you are taking an Auto IS measurement, this isn't necessary. And you can always change the ISO value to see the effect of a different value on the aperture and shutter speed values for that light measurement.
But it's a good idea to make sure you've set an initial value. You'll be quite surprised at the results if you assume ISO 800 and the unit is set for ISO 200.
ISO values can be set from 50, 64, 80, 100, 125, 160, 200, 250, 320, 400, 500, 640, 800, 1000, 1250, 1600, 2000, 2500, 3200, 4000, 5000, 6400, 8000, 10,000, 12,800, 16,000, 20,000, 25,600 and 32,000.
With camera sensitivity ranging up to ISO 512,000, that upper limit may seem a bit low but we suspect in practical use it isn't an issue. If you're shooting in darkness, there's no light to measure.
We started our Polaris Karat adventure by making simple ambient light readings.
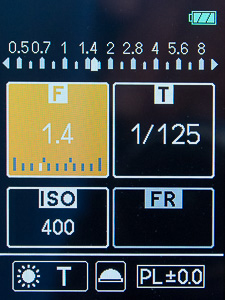
The Menu offers four of them on the left side with a sunlight icon preceding a letter code: Shutter Speed Priority (T), Aperture Priority (F), EV (EV) and Auto ISO (A-ISO).
Aperture settings are 0.5, 0.7, 1.0, 1.4, 2.0, 2.8, 4., 5.6, 8.0, 11, 16, 22, 32, 45, 64 and 90.
We have at least one camera where the correspondence is spotty. It offers 3.8, 4.0, 4.5, 5.0, 5.6, 6.3, 7.1, 8.0, 9.0, 10, 11, 13, 14, 16, 18, 20 and 22. On an analog meter like the Gossen Luna Pro, you can find those options on the dial. But on a digital meter like the Polaris Karat, you have to look beyond the readout to the measuring scales.
The trick to handling that intelligently is to read the measuring scales on the Polaris Karat. There are two:
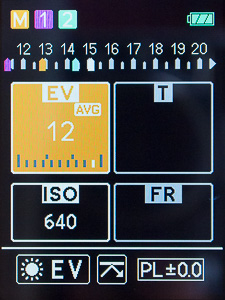
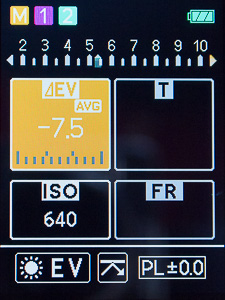
Value Scale at the top of the screen in Aperture mode shows the aperture scale for the current light reading and in EV mode it shows the EV value to compare with the value suggested for aperture or EV.
Analog Fractional Reading Scale in the Aperture window shows a scale with a marker indicating how closely the value matches (low on the scale is closer that high) the aperture and in EV mode the EV value.
So you get the equivalent of an analog reading. The top one is the full scale, the inset one is just how close the value matches.
Image 1 of 4: Shutter Priority Image 2 of 4: Aperture Priority Image 3 of 4: EV Image 3 of 4: Auto ISO Image 1 of 4: Shutter Priority
Ambient Light. Mouse over or tap for captions.
Indicated by a T in the button with a sunlight icon for ambient light, Shutter Priority mode lets you set the shutter speed you prefer and reports the corresponding aperture to be used at the predetermined ISO.
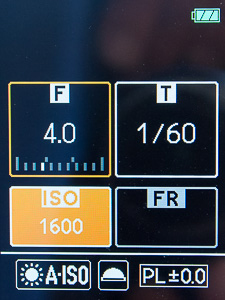
Indicated by an F in the button with a sunlight icon for ambient light, Aperture Priority mode lets you set the aperture you prefer and reports the corresponding shutter speed to be used at the predetermined ISO.
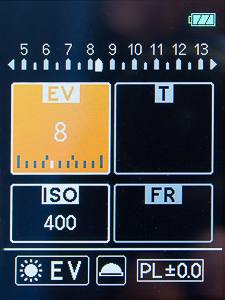
Indicated by an EV in the button with a sunlight icon for ambient mode, EV mode lets you set the ISO and get an EV reading:
Select the EV button on the Menu to enter EV mode.
Set the ISO value and take a measurement with the red button to get an EV value.
We found it especially helpful to keep an eye on the analog scales for evaluating the EV value, which is only reported in whole numbers. So a 9.5 EV on the Gossen Luna Pro would look show a 9 in the orange window on the Polaris Karat with a 9.5 in the top scale and about a midway setting on the analog scale in the orange EV window.
Indicated by an A-ISO in the button with a sunlight icon for ambient mode, this mode lets you set both aperture and shutter speed to get an ISO reading:
Select the A-ISO button on the Menu to enter Auto ISO mode.
Use the Left and Right buttons to select either the Aperture or Shutter Speed and the Up and Down arrows to set values for each of them.
Then just take a light reading with the red button to see what ISO to use.
This is helpful for determining the ideal ISO for any aperture/shutter speed combination. And it's also useful for predicting what Auto ISO on your camera will do.
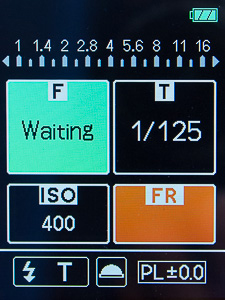
There are two flash measuring modes available on the right side of the Menu with a flash icon preceding the letter code. There is Shutter Priority (T) mode and a Flash Duration (FD) mode.
Image 1 of 2: Flash Image 2 of 2: Flash Duration Image 1 of 2: Flash
Flash. Mouse over or tap for captions.
The typical question you have setting exposure for flash is what the aperture should be. You know how high you can set your ISO from your output requirements. And you know what the fastest shutter sync speed your camera can handle. So that leaves the aperture.
You can plug a sync cord into a monobloc and connect it to the Polaris Karat to take readings (helpful under fluorescent lighting, which can confuse the meter) but again the more typical use is untethered. The flash meter can sit in the scene without the trouble of a cord winding around your props.
Here's the dance:
Select the Flash T option from Menu and enter the ISO and shutter speed you've set on the camera. Your camera will have a maximum shutter speed for flash sync that will determine how fast you can set the shutter. Slow shutter speeds are useful for capturing more ambient light.
Then just press the Measuring button. The aperture display on the LED turns green with a "Waiting..." message.
That's your cue to fire the flash. Either take a shot (if you're using a simple strobe) or press the Test button.
The Polaris Karat will display the aperture where the "Waiting..." message had been.
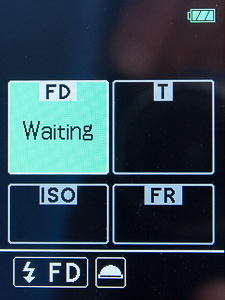
Indicated by an FD in the button with a flash icon for strobe light, this mode reports how long the flash lit up your scene.
Flash is so fast it functions as the shutter speed for most strobe photography. And if you are trying to stop motion (to freeze a hummingbird's wings, to take one famous example), knowing the flash duration tells you how frozen the image will be.
The Polaris Karat is the first hand-held meter that can tell you that in values from 1/100 to 1/9000 second.
We turned on our monobloc and hit the Test button to fire the flash after pressing the red Measuring button on the Polaris Karat and getting the green Waiting message.
Immediately after the monobloc fired, the meter reported the flash duration, which varied between 1/400 and 1/500 second. A second, battery-powered monobloc registered a consistent 1/700 second.
That was something we'd never known about these two units before the Polaris Karat.
So we thought we'd profile our built-in camera flashes and a Nikon SB-800. All of the cameras (digicams, Micro Four Thirds and dSLRs) fired at 1/9000 second. The SB-800 fired at 1/900 to 1/1000 second, faster than the monoblocs.
Here's the step-by-step procedure:
Select the Flash FD option from the Menu.
Press the red Measuring button until the green FD field shows "Waiting:
Fire your flash to get a duration reading in the FD field
The Polaris Karat can also tell you how many times the flash must be fired to match a given aperture. Here's how:
Take a basic Flash (T) reading to determine the aperture.
Hold down the Multi button to shut down the aperture one stop and report (at the top of the LCD) how many times the flash must be fired at that aperture.
By holding the Multi button down and using the Up and Down arrow keys you can change the aperture to any value to see how many times the flash has to be fired. Since the basic reading is for the whole flash output, the Up arrow will be more useful (you can't fire 1/2 a flash).
You don't of course have to fire the flash multiple times if you can increase its output, as you can on a monobloc. Double the flash power to simulate firing it twice. And cut it in half it for half the output. But you knew that, right?
When you've saved two or three readings, you can average them simply by pressing the Average button. The display will reflect the settings to capture a value between the highest and lowest values, shifted toward the third value.
The Contrast Function shows the difference in EV values between an average reading and new reading.
But it's tricky. Here's the gist of it:
Take more than one reading in Shutter Priority (T), EV (EV) or Flash (T) mode and then press the Memory button to record the value.
Press the Average button to report the average exposure settings.
Hold the red Measuring button in to show a Delta EV value in the orange box representing how different what you are looking at is from the average reading.
You can use this to compare the light falling on the background to general exposure, for example. Or to accurately measure flash ratios from several light sources.
We shot our Everyday Textures slide show in Manual mode based on readings taken with the Polaris Karat. And the product shots for this review were based on flash readings taken with the unit.
We also used it for several weeks for less ambitious projects, usually to make manual settings from incident light readings but also to compare with the camera's reflected readings.
In each case, it was easy to use and gave us accurate exposure settings. We particularly liked using it for incident readings. And because we don't usually meter our flash exposures, we liked getting a head start on those, too.
We almost never set up a product shot or studio shot with flash without consulting it. And even took it along on a photo walk or two. Which suggests it proved it's worth to us because, well, we used it.
The Polaris Karat Flash Meter lists for $329.99. Both Adorama and B&H discount it to $289.99.
Alternately, the $199 Sekonic L-308S Flashmate is an alternative but much simpler flash meter, yielding only aperture and EV options from its readings and ISO only ranges to 8000. And, of course, it does not report flash duration.
We were certainly put off by the documentation. But we've explained operations much more clearly in this review, so that really won't be an issue for our readers. And OmegaBrandess Distribution assures us they are working on improved versions of both the quick and full instruction manuals.
After a few weeks with the Polaris Karat, though, it became second nature. Very easy to use and always at our side, like a caddy who knows the distance to the flag.
It told us things about both our ambient and flash lighting setups that we otherwise would not have known. And when we took its advice, the ball rolled right into the hole.


