C O N T E N T S
•
Photo Corners headlinesarchivemikepasini.com
![]()
A S C R A P B O O K O F S O L U T I O N S F O R T H E P H O T O G R A P H E R
![]()
Enhancing the enjoyment of taking pictures with news that matters, features that entertain and images that delight. Published frequently.
Exposure X: Browsing, Organizing


16 December 2015
While the import function of the standalone version of Exposure X is optional, the browsing and organizing functions are attractive approaches even if prefer other software to import and edit your images.
In this installment of multi-part our Exposure X review, we'll take a look at both of these functions.
BROWSING
The file browsing we missed in the import dialog is otherwise always accessible in Exposure X. You don't have to move to a different module (like the Library module in Lightroom) or launch a different tool (Photo Mechanic, say, or Bridge).
One reason you use a file browser is to quickly review your shoot. How'd it go? Did you get anything good? Focus OK?
Navigation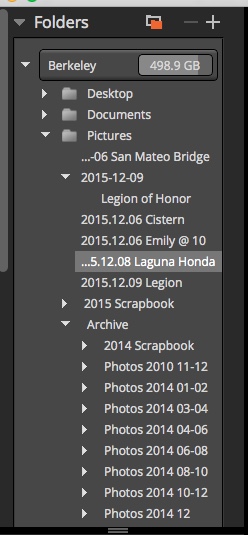
Because your file system is the catalog, the Folders pane is how you navigate your collection.
Exposure X presents three default folder locations or bookmarks: Desktop, Documents and Pictures. You can easily navigate to any others.
And, we hasten to add, the listings are easy to read because they show you the right end of the file name (
..5/12/08 Laguna Honda), not the repetitive left end (Pictures/2105.12..).You can bookmark any folder to keep it around using the plus sign at the top right of the pane or a contextual menu item. You would bookmark enclosing folders (like Pictures) but don't have to bookmark everything within it.
That's because clicking the double folder icon near the Minus sign for the Show Subfolders option will display any subfolders too. So you can see everything under Pictures if you enable subfolder display.
With the Show Subfolders option enabled, the browser pane will show everything under that folder, with each folder separated by a bar in a very attractive and clear display. It reminded us of looking at Events in Apple or Google Photos.
We experienced pretty heavy CPU use with Show Subfolders enabled, though, with directories full of Raw files. Exposure X was apparently busy rendering the thumbnails.
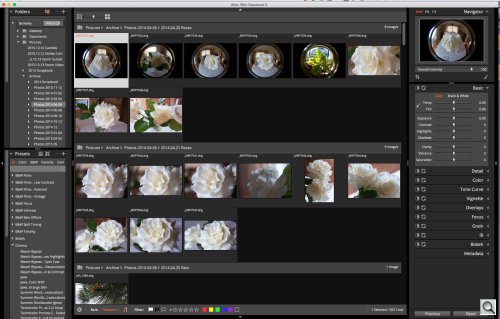
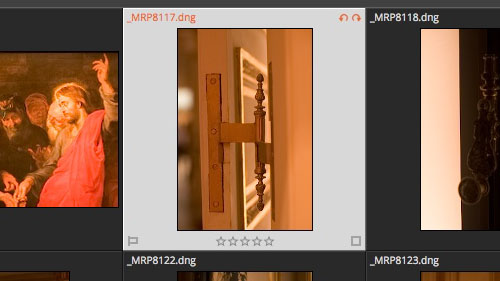
Browsing. Looking at several folders of images.
You can also drag folders onto the Exposure X icon to create a bookmark for them. And you can create subfolders within bookmarks, too.
ReviewThumbnail size is set by a slider on the browser pane's toolbar (it's the only thing on the toolbar, actually). And it works very well. Images aren't arbitrarily resized but jump to the next size that fills the row. Which, you know, is what you want anyway.
We got 10 across at the small setting and two across at the largest. Which surprised us. We thought the largest setting would be just one. But you get there by double clicking the image. You can then navigate the collection with the arrow keys. And escape back to the browser display.
Each thumbnail shows the file name in the top left corner. As you hover over the thumbnail, two tastefully-designed rotation controls appear in the top right corner. Below the thumbnail are rating and filtering tools: a Flag, Stars and Colors.
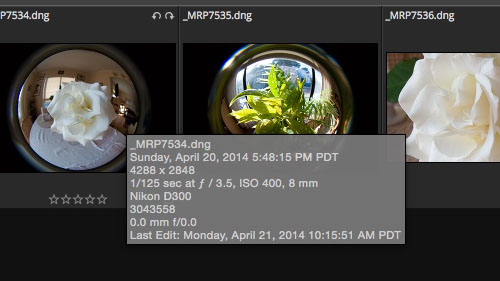
File Info. Hover to show file info that includes exposure data.
And if you leave your cursor over the thumbnail a count or two, you'll see a small window appear with file information with filename, date, image size, exposure information, file size, camera, lens information and last edit time.
We're always scrolling through Lightroom's Library module panes to read all that information.
One piece of data that's not available is the focus point. We don't see this in many browsers but it's helpful. Show Focus Points is a free plug-in for Lightroom that shows Canon and Nikon focus points, for example.
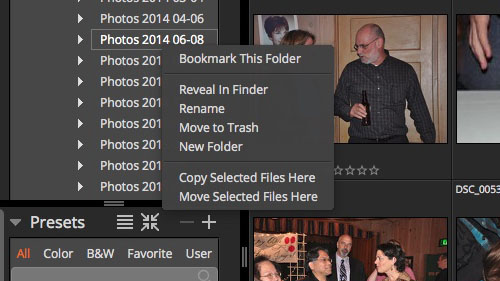
File Operations. A contextual menu.
You can also do extensive file operations that you'd normally do in the Finder. But doing them in Exposure X gives you the advantage of working with the thumbnail. The Browsing video demonstrates all of them.
RotationPart of any review involves rotating images that display in the wrong orientation. That's unfortunately common with some cameras like the iPhone and Olympus we use.
We use Photo Mechanic precisely because it edits the orientation Exif tag within the file to reflect our changes.
But Exposure X writes all its changes to a side car file, never touching your original. That's usually a good thing. But not in this case. We really do want to rotate the images into the correct orientation and have it stick.
With a side car, an application has to read the side car file and then apply the changes listed there to the original data. Your operating system isn't one of those applications. So even though you've rotated the image in Exposure X, the original is not changed. When you copy it or email it or otherwise access just the original file, you don't get the rotation.
So we'd argue for an exception to the non-destructive editing rule for rotation.
Supported FilesExposure X can read JPEG and TIFF files as well as some Raw files. The Raw support is actually a good deal more comprehensive than Exposure 7.
But as the support page above notes, this is important only if you use Exposure X in standalone mode. As a plugin the host application will have already process the Raw file using Adobe Camera Raw.
Alien Skin FolderYou can browse your image collection freely without worrying about creating an Alien Skin folder for side car files as long as you don't rotate any images. Exposure X won't alter your folders.
ORGANIZING
Your on-disk file organization is really the fundamental scheme by which your collection of images is organized. But within that, Exposure X offers ways to rank, filter and sort your images that are common in any browser.
Organize. Thumbnails offer Flags, Star Ratings and Color Labels.
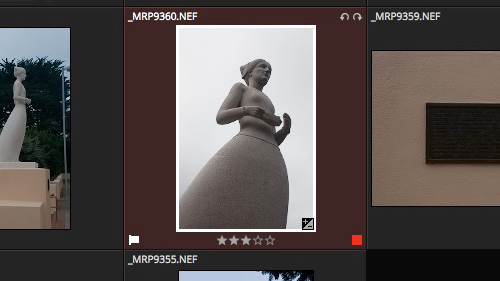
Organized. Flags set as Picked, Star Ratings set and Color Labels set to Red.
There are several options that work together. Let's look at each of them.
FlagsFlags allow you to Pick or Reject images and can be set at any time. You can click the Flag on any thumbnail or use the keyboard commands to quickly go through a set of images.
Use the Plus key to Pick or the Minus to Reject. Hold down Shift when you hit Plus or Minus to assign the flag and move to the next image.
Star RatingsStar Ratings, available on the thumbnail, allow you to assign from zero to five stars to an image, ranking your shoots hierarchically.
You can also use keyboard commands to quickly navigate a set. Keys 0 through 5 set Star Ratings. Holding down Shift moves to the next image, as in Lightroom.
A Comparison symbol on the toolbar at the bottom of the main pane lets you restrict a Star Ratings selection to a precise match or a minimal match, for example.
Color LabelsColor Labels_, available on the thumbnail, allow you to color the frame of the thumbnail to indicate, well, anything you like.
Options include Red, yellow, green, blue and purple. There are keyboard shortcuts for all but purple (Alien Skin ran out of keys).
FilteringFiltering allows you see only images that are flagged/unflagged or have been ranked with a certain number of stars. The toolbar is on the bottom of the main pane. Just click on the filtering option you want.
Options include Picked/Rejected/Unflagged, Stars 0 to 5 (plus a Comparison operator) and five colors plus untagged.
This is as close to searching as Exposure X gets. It works well for a shoot but falls short for a collection of images (say, everything you shot this year). You simply need more than filtering to find images in our archives.
SortingSorting allows you to reorder the thumbnail display using file information or criteria from the Exif header of the images.
Options include Filename, Flag, Rating, Color, File Extension, Camera Make, Camera Model, Capture Time and Edit Time. There isn't, however, a custom option.

Sorting. Several options, including a few from the Exif data.
You can change the order in which thumbnails are displayed in the browser using the Sort tool on the toolbar at the bottom of the main pane.
You can also set the sort order to Ascending or Descending with the Direction option. The arrows are a little confused, though. The one pointing down (on the left) is Ascending while the one pointing up (on the right) is Descending.
ExamplesA few typical uses of these organizing features might be:
- Go through a shoot Picking your favorite images and Rejecting the bad ones with Flags. You can filter the shoot to display just the Picks. Or even any you skipped.
- Go through the shoot assigning Star Ratings to your favorites. Then filter the shoot incrementally by the Star Ratings to get a sense of how higher ratings narrow down the selection.
- Assign color labels to images according to how they will be used. Then filter by the color label and batch process each group. You might export at a reduced size for the Web, for example. Or move all the Reds to a new folder.
Exposure X provides icons on the bottom of thumbnails as well as keyboard commands to flag, rate and filter images.
EVALUATION
Browsing in Exposure X, to our surprise, really taxed our CPU. The fans on our MacBook Pro fired up whenever we launched it, using 130+ percent of our CPU (multiple cores means you can exceed 100 percent).
We had pointed it to multiple directories full of DNG files. Which meant, if we understand correctly, that it would display the embedded JPEG for a quick peek before going back through the files to render the DNG data.
With one directory displayed, that isn't taxing. With a set of subdirectories displayed, it is taxing.
We resolved that issue simply by pointing it to a single directory.
As far as organizing goes, Exposure X offers no compelling advantage over Lightroom. One of the things we prize about the Lightroom experience is being able to get from our first task to our last in one application. Exposure X can winnow down a shoot to the best images for editing and export but Lightroom can do a lot more with your selection (like print it or create a book or Web page).
Filtering works well but is less useful than full text search on Exif data. Rather than filter an entire collection of images based on a custom search criteria (something we do all the time in Lightroom, hunting our 55,000+ collection for obscure criteria like
Thanksgiving), Exposure X just looks at one directory by one of nine fixed criteria, none of them a text search.Those are important limitations for our workflow.
But we do like how Exposure X manages what it does do. It's an intelligent approach. The question is whether it's sufficient for you. And again, the fallback if it isn't is to use it as plug-in.
There are no real deal breakers with Exposure X.
(Editor's Note: This is the second part of a multi-part review of Alien Skin's Exposure X. Links to the other stories are in the main table of contents at the top right of each story.)