C O N T E N T S
•
Photo Corners headlinesarchivemikepasini.com
![]()
A S C R A P B O O K O F S O L U T I O N S F O R T H E P H O T O G R A P H E R
![]()
Enhancing the enjoyment of taking pictures with news that matters, features that entertain and images that delight. Published frequently.
FastFoto: Scanning


19 December 2016
With the scanner hardware connected and the software installed, you're ready to tackle that shoebox (or closet shelf full of shoeboxes).
The actual scanning process is very straightforward and Epson has taken pains to help you keep your scans organized. More so than any other scanning application we've ever seen, in fact.
But the real work, as you might expect, is organizing the prints in the first place.
If you've got lots of loose prints floating around in a drawer or a box with no idea when they were taken, organizing them is going to take a lot longer than scanning them. It may even be impossible.
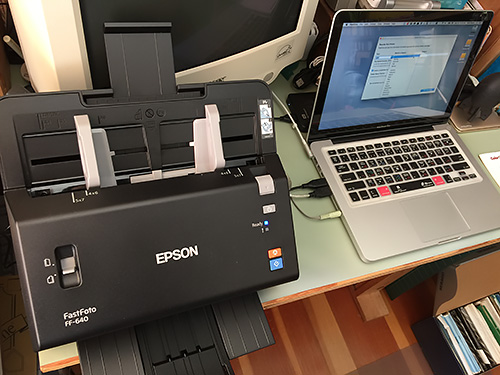
Setup. The compact scanner seems to fit anywhere, even the corner of our table. Note the shoebox in the lower right corner.
But if you've been good about dating the prints and keeping them in their envelopes with the negatives, all you have to do is stack them up. You don't have to scan them in chronological order because the software helps you write folder names that will sort themselves. But more about that later.
First lets discuss a few of the finer points of feeding the FastFoto.
PAPER HANDLING
You can always count on us to screw things up and it didn't take long. About the only thing you can screw up on this unit, though, is paper handling, so we were rather disappointed.
We loaded a stack of about 10 4x6 prints into the scanner and sure enough they jammed. No particular reason.
But it was the last jam we had on the FastFoto because we devised a procedure for preventing jams.
First of all, fan the prints. Get some air between them. Separate them. Treat them like a deck of cards. If they're dusty, clean them before you put them through the scanner.
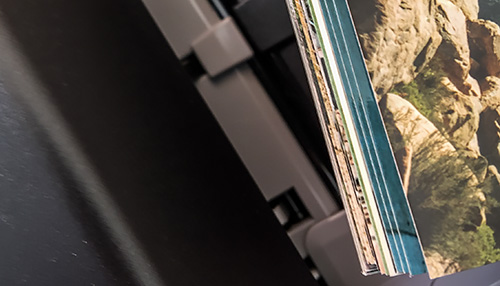
Fanned and Staggered Prints. Recommended for perfectly flat prints that seem bound together.
Secondly, stagger the lead edge. This was the big reveal. Rollers are round and if you give them an edge to bite on, they will. They won't bite on two at a time.
Clearing the jam was simple, by the way. Just pop the hood and take the prints out. They weren't damaged in any way.
The paper path on the scanner seems very robustly designed.
And, in fact, when we scanned a stack of prints that were warped by time and didn't quite lie flat, they went through just fine. It was properly stored, perfectly flat prints that caused our earlier jam.
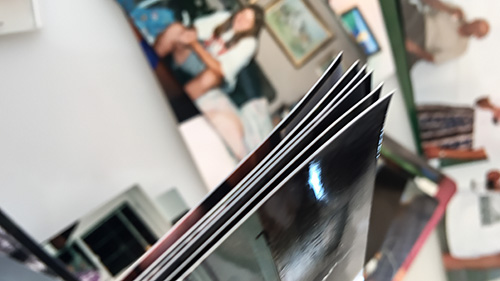
Warped Prints. No problem for the FastFoto.
Prints come in a variety of sizes. And you may have found yourself organizing them into batches that themselves contain different sized prints.
Different orientations is also a problem for scans because unlike a digital camera capture, the scanner has no way to know what the correct orientation should be. To the scanner the image is just an image with no up or down.
So how does the FastFoto handle these two issues?
We were actually able to scan both different sizes and different orientations at the same time.
The trick to different sizes is simply to center them. Same with different orientations.
Of course, you can rotate scans with the wrong orientation after (even losslessly, considering their JPEGs already). So all is not lost. But it's less work to simply stack your portrait shots with the short end going through first.
The User's Guide says you can mix 4x6 and 5x7 print sizes but we mixed a variety of sizes. The scanner can handle prints as small as 2x2 inches. We were also able to scan panorama prints but the scanner failed to recognize the date imprinted on the back, despite having double-sided scanning enabled.
We didn't get any misfeeds doing this, we're happy to report.
RESOLUTION
We scanned a set of images at both 300 and 600 dpi.
We have a DNP DS620 dye sub printer here for testing and we'll note those are the two output options on it as well. We almost always print at the default 300 dpi, so if you're scanning 4x6 prints, 300 will be fine.
It will also be fast. Very fast. And compact. File sizes were about 200-300K.
Scanning at 600 dpi seems leisurely in comparison. But it's still faster than scanning on a flatbed. File sizes are much larger at 1.0-1.3-MB.
So when would you use 600 dpi? It would be a smart choice for very small originals that you'd like to see enlarged. They'll display quite a bit bigger on your screen if your scan them at 600 dpi instead of 300 dpi. And you'll see things you'd otherwise miss, even looking at the original.
THE CARRIER SHEET
The included carrier sheet is handy for scanning fragile or torn prints that would not, on their own, make it through the scanner.
It's two pieces of plastic bound at one of the short ends, which is the front edge. You simply make a print sandwich, slipping your print between the two sheets of plastic.
You can only load one image at a time in the carrier sheet. Make sure the image is face down and the top edge is closest to the front edge of the carrier sheet.
When you use the carrier sheet, you should flip the Page Selection Lever to the upper position whose icon vaguely resemble the carrier sheet.
POLAROIDS
With all that, there is one kind of print Epson warns against scanning: Polaroids. "Do not scan Polaroid photos," the User's Guide says. "Polaroid photos are too thick, and can damage the photo or your scanner."
We assume this goes for Kodak Instant Film as well and perhaps for Fujifilm's instant prints, not to mention Project Impossible's film.
The problem is thickness. According to the specs, the thickest print the FastFoto can handle is 0.3mm.
Instant prints are ideal candidates for scanning because they are all one of a kind with no negative to create a second copy. But it's probably wise, considering the various technologies (we're thinking especially of those pink waxy coatings of black-and-white Polaroids) not to run them through anything. It's safer to scan them on a flatbed.
ENHANCEMENT
We found ourselves constantly enabling and disabling the software's enhancement option.
The first thing to keep in mind is that the FastFoto doesn't keep your shadows clean or save your highlights. It increases contrast. So someone with dark hair will have black hair with no details. And a white shirt with pinstripes will lose its pinstripes.
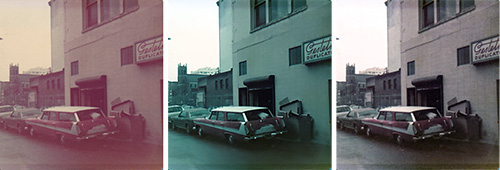
Enhancement. Original (left), FastFoto (middle) and a manual correction using the Camera Raw plug-in of Photoshop CC.
When you enhance an image like that, the software adds contrast, so it's even worse. So we turned off enhancement for contrasty images.
That meant, though, that white balance wasn't corrected. And on old, yellowing images that can be a tradeoff you don't want to make.
Fortunately Epson has made it possible for you to have your cake and eat it too. It will save both the original unenhanced scan and the enhanced version with an a and b suffix to the root filename.
That's how we evaluated the enhancements, in fact.
What we decided after scanning a few dozen images was that we'd only turn on enhancement if the originals were pretty bad. For good quality originals, we just left it off.
In the image above, the middle one is the auto enhanced FastFoto scan. At first, we didn't like it at all. So we ran the original, unenhanced scan (left) through the Camera Raw filter in Photoshop CC. We really didn't do very well with it, though, so we tried the enhanced version. That's what you see on the right.
In fact, the enhanced scan wasn't too far off and was much easier to manually correct than the unenhanced scan.
PRINT TEXTURES
The FastFoto scanner did admirably with every print surface we fed it. Glossy was, as you might expect, no problem. Neither was a flat finish.
Linen Print. This 100 percent crop of an uncorrected linen print scan shows only a little of the texture with no speckled highlighting.
We were particularly impressed, though, with how it handled the notoriously difficult linen textured prints of the 1980s. This cloth-like texture bounces light all over the place causing speckled highlights in conventional scans.
But the FastFoto handled them very well, showing only a barely perceptible hint of the textured surface and no speckled highlighting.
EXIF DATA
When you take a photo with your smartphone or camera, a lot of information about it is recorded to the Exif header of the image file. We wondered what FastFoto would record, especially since it doesn't know when the image was taken.
It's very minimal. Just the filename, date scanned and file size:
---- ExifTool ----
ExifToolVersion: 10.36
---- System ----
FileName: 2000s_Fall_Scrimmage_0027.jpg
Directory: /Users/mrpasini/Pictures/FastFoto/2000s_Fall_Scrimmage
FileSize: 1002 kB
FileModifyDate: 2016:11:19 13:02:15-08:00
FileAccessDate: 2016:11:29 10:01:12-08:00
FileInodeChangeDate: 2016:11:19 13:02:15-08:00
FilePermissions: rw-r--r--
---- File ----
FileType: JPEG
FileTypeExtension: jpg
MIMEType: image/jpeg
ExifByteOrder: Little-endian (Intel, II)
ImageWidth: 3454
ImageHeight: 2367
EncodingProcess: Baseline DCT, Huffman coding
BitsPerSample: 8
ColorComponents: 3
YCbCrSubSampling: YCbCr4:2:0 (2 2)
---- JFIF ----
JFIFVersion: 1.01
ResolutionUnit: inches
XResolution: 600
YResolution: 600
---- ExifIFD ----
DateTimeOriginal: 2000:10:01 00:00:00
---- XMP-ff ----
FFMetaData: 02
---- XMP-dc ----
Subject: Scrimmage
---- Composite ----
ImageSize: 3454x2367
Megapixels: 8.2
FASTFOTO VERSIONS
We were a little confused about the software. Our briefing clearly showed thumbnails in the scanning application but the FastFoto software we launched didn't offer that option.
The thumbnails we saw at the briefing are only displayed in the Windows version of the software.
The Mac version allows you to select the Finder, Preview or Photos to display the scans. Unfortunately, that takes you out of FastFoto so scanning more images to the same folder is interrupted. But when you switch back to FotoScan, you can resume scanning to the same folder.
SETUP
When you launch FastFoto to start scanning your prints, it presents two options to you: Scan and Settings.
Scan will let you get to work but the first thing you want to do is check the Settings to make sure FastFoto does the work the way you want it done.
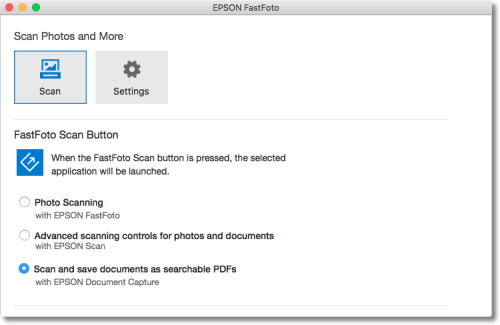
Scan. Start scanning or set the button behavior.
The initial screen displays the Scan options. Clicking the big Scan button starts the scanning process. You can also define the behavior of the blue button on the scanner itself.
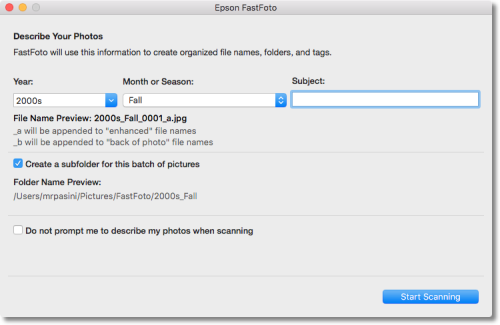
Describe. You can (and should) describe each batch of photos before scanning.
The screen above shows the options Epson FastFoto provides for naming the folder where your scans will be written. By using these conventions, you can automatically organize your collection of images.
If you click Settings instead, you can set a variety of options on four panes.

Organization. Four panels of options.
Basic settings are set in the Organization panel. Options include:
- Save my scanned photos here: Choose a default folder to save your scanned photos. If you do not specify a folder during a scan, your photos will be saved to this location. On OS X, you can save your photos to the Photos application and to a folder. Select the Save my files to Photos and to a folder option to create an album in the Photos application in addition to saving your files to the chosen folder.
- Prompt me to describe each batch of photos before scanning: Select this checkbox to be prompted during scanning to add a subject and date to your photos and create a subfolder. If you deselect the checkbox, FastFoto uses the default file name prefix and folder.
- After scanning, open my photos with: Choose a program from this list to view your scanned photos after scanning them with FastFoto.
That second option is key to FastFoto's efficiency. We recommend enabling it so you can date and describe each batch of scans.
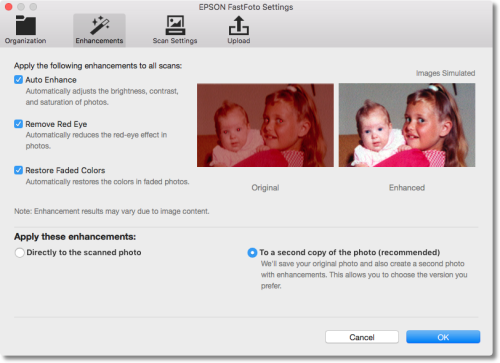
Enhancement. Auto, Red Eye, Faded Colors, Copies.
The Enhancement pane provides the following options:
- Auto Enhance: Automatically adjusts the brightness, contrast and saturation of your photos. But see our reservations above.
- Remove Red Eye: Automatically reduces the red-eye effect in your photos.
- Restore Faded Colors: Restores the colors in faded photos automatically.
- Apply these enhancements: Choose whether to apply the enhancements to the original photos or create a separate enhanced copy with "_a" appended to the filename.
As we said above, we reconfigured these options for each batch depending on whether the prints were aged, faded or in good shape.
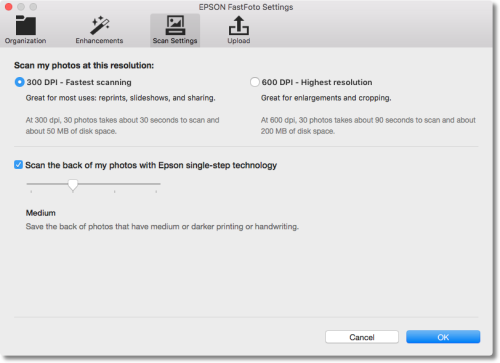
Scan Settings. Resolution, Backs.
The Scan Settings pane offers these options:
- Scan my photos at this resolution: Select the resolution at which to scan your photos. Options are 300 or 600 and we found 300 to be fine for 4x6 prints and above but 600 better for small prints or images you want to enlarge.
- Scan the back of my photos as well: Select whether to scan both sides of your photos when FastFoto detects writing or printing on the back of them. There's no speed penalty, either. Adjust the slider to determine the detection's sensitivity level (which didn't help on our panoramas).
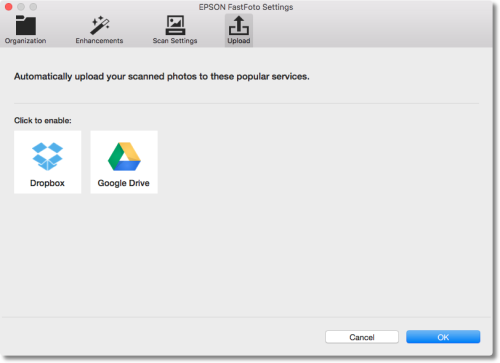
Upload
The Upload pane lets you automatically send your scans to your favorite sharing services.
You can manually select photos to upload after scanning individually or as a group or you can automatically upload all the scans. You can also select the type of photos to upload automatically.
DOCUMENT CAPTURE
& OCRThe FastFoto can also scan documents (but not at the same time as prints). And it does a very fast and pretty good job of it, too.
We tried it on a complicated document. It was a library handout not particularly well laid-out consisting of two sheets, printed back and front in landscape format, forming four pages.
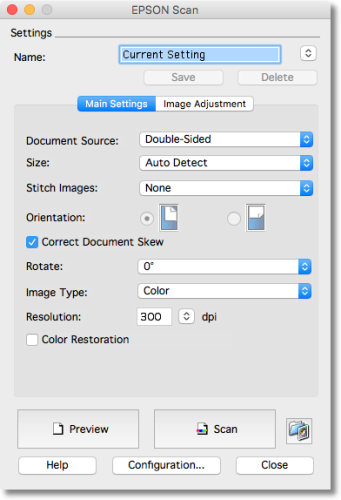
We used the included Epson Scan software to scan the document and the processed the scan in ABBYY FineReader Sprint.
While the FastFoto software is optimized for image scanning, with Epson Scan you can set a few options useful for text capture like image rotation and get a preview of the scan as well.
The FastFoto itself makes a picture of your text when it scans it. You have to use an optical character recognition program to convert that image of the text into actual letters and words that can be searched.
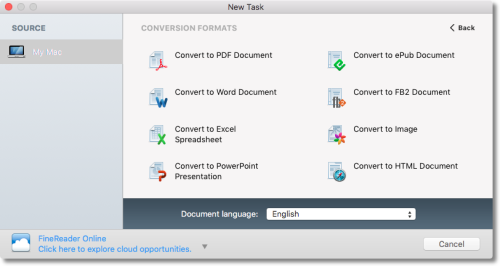
FineReader. Lots of options but PDF was our choice.
Epson includes the venerable ABBYY FineReader Sprint OCR software to do just that for you. The software can convert scans into PDFs, Word documents, HTML, Excel spreadsheets, PowerPoint presentations and more. Options include enhancing images, splitting facing pages and detecting the page orientation.

FineReader. Recognizing the document.
FineReader. Searchable PDF completed.
We converted some legal documents we only had as printouts into searchable PDFS and it was a godsend in looking for specific clauses and conditions we otherwise could easily have missed.
Document Capture with ABBYY FineReader certainly works but there are more efficient ways to turn documents into searchable PDFs. One such is Adobe Acrobat.
Our test machine has a copy of the venerable Acrobat 9 Pro, so we launched it to see if it would recognize the FastFoto.

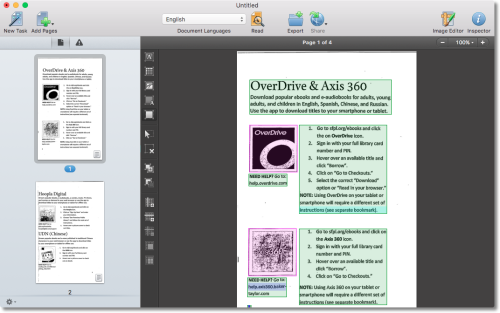
Acrobat 9 Pro. Searchable PDF completed. We searched the word 'Sign'.
It did indeed. So we set a few options and hit Scan whereupon Epson Scan came up. We hit Scan again and the scanner flew into action, scanning both sides of our document at once.
Acrobat processed the file using its built-in optical character recognition in a few seconds we had a searchable PDF. It was much faster than using the Epson solution.
Emboldened by our success we launched VueScan to see if it could find the scanner. No such luck. At least not with this version.
NEXT
In the next installment of our multipart review, we'll show how FastFoto's scan of a print compares with several other methods of digitizing the same image, including a scan of the negative, a flatbed scan of the same print, a camera shot of the print and Google PhotoScan app's reconstruction of the print.
(Editor's Note: This is the third part of a multi-part review of the Epson FastFoto FF-640. Links to the other stories are in the main table of contents at the top right of each story.)