Photo Corners headlinesarchivemikepasini.com
![]()
A S C R A P B O O K O F S O L U T I O N S F O R T H E P H O T O G R A P H E R
![]()
Enhancing the enjoyment of taking pictures with news that matters, features that entertain and images that delight. Published frequently.
Napkin: A Keyboard Maestro Macro With Photo Filters


23 October 2019
Recently we released Napkin, a Keyboard Maestro macro that is a small application in itself. It can record text notes, doodles and apply filters to photographs, the sorts of things you might abuse a napkin for.
TWO MODES
Text and images are two different species so Napkin has two modes, a Text mode and a Draw mode, to handle each.
Each mode has a Help button that explains the user interface in detail and offers a few usage tips.
In addition to the Help button at the bottom of the window, both modes have Quit, View and Save buttons.
- Quit closes Napkin. It's the only way to exit the macro.
- View opens your napkin in the default application. On my system BBEdit opens the text notes and Preview opens the images (after saving the current canvas).
- Save writes the current work to the active File.
Let's look at each mode in more detail.
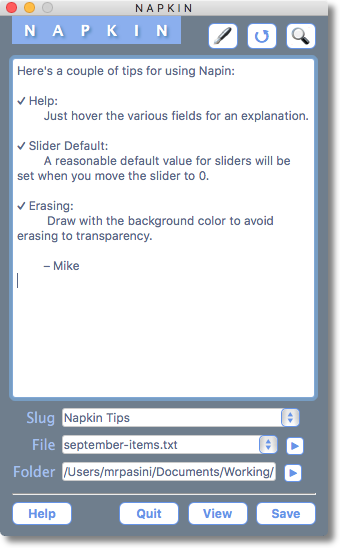
Text Mode. Type, drag a selection or dictate.
TEXT MODE
In Text mode, the dashboard below the text entry area has a Slug, File and Folder field.
Slugs are optional but the thing you change the most if you use them. I use them to identify the source of the material I'm annotating. They appear just before the timestamp applied to each Saved text section.
File and Folder need no introduction. You simply pick an existing one or create one by typing a new name in the field.
There are also popup menus of favorite Files and Slugs. You'll have to plug in your own but the Help button shows you how to do it. A sample set is included.
The buttons in Text mode on top are: Mode, Restore and Search.
- Mode switches between Text and Draw modes.
- Restore will put any backed up text (saved automatically) into the text field.
- Search calls Textcavator, a Keyboard Maestro you'll have to download and install separately, that can search directories for text. You can certainly point it to whatever search utility you prefer, too.
The heart of Text mode, though, is the text entry area.
You can type notes in there. But you can also dictate them. And, of course, you can drag-and-drop or copy and paste them from whatever you're reading.
But you can also use tabs to create outlines, promoting or demoting selections.
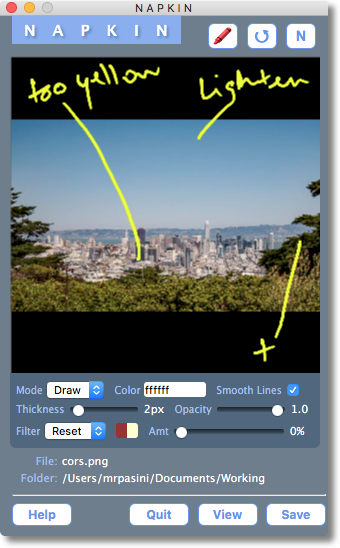
Draw Mode. You can doodle or drop an image onto the canvas.
DRAW MODE
Draw mode is a little different. The dashboard below the canvas displays the Status and File and Folder names.
The buttons on top are: Mode, Reload and New.
- Mode switches between Draw and Text modes.
- Reload will prompt for an existing Napkin-sized image in the current Folder.
- New wipes the canvas clean, presenting a new napkin canvas.
The heart of Draw mode, though, is the canvas area.
The 310x317-pixel canvas itself is transparent. When you enter Draw mode, it is painted white for drawings. The canvas itself is actually transparent so if you use Erase mode, you'll see nothing at all.
If you drop a JPEG, PNG or GIF image onto the canvas, the canvas is first painted with a black background and then with the image, preserving the image's aspect ratio. The black background provides a margin that helps any annotations stand out.
At the bottom of the canvas is a palette of controls that include both drawing controls and image editing filters.
On the first line you'll find:
- Mode offers Draw, Fill and Erase options. Draw for line drawing, Fill to fill shapes or the background with the current color in a single click and Erase to erase to the transparent layer.
- Color displays a palette of hues and a slider for tones to set the Active Color that is represented in the background of the field as well as in "rrggbb" format.
- Smooth Lines enables antialiased line strokes. Turn it off if it slows down your system.
On the second line:
- Thickness is the width in pixels of the line you are drawing.
- Opacity is the opacity of the line you are drawing on a scale of 0.0 to 1.0.
On the third line:
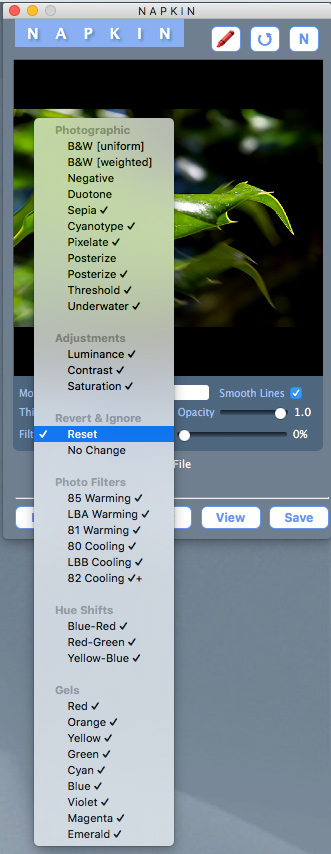
Filters. Five groups of options.
- Filter offers a number of options that make global changes to the image. You can convert a color image to black and white, turn the image into a negative, posterize it to varying degrees, brighten it up or darken it, correct its color or repaint it as a duotone. You can also recover the starting image.
- Duotone Color buttons set the Shadow color and the Highlight color. We don't actually create a traditional lihtographic duotone but apply a gradient based on those colors to a grayscale rendering of the image.
- Amount varies the effect of filters marked with a check mark after their name. The slider disappears if the filter doesn't support variations (like Duotone or Negative).
I've tried to make Napkin reasonable about what data it uses when applying filters and when adjusting their strength. When Napkin misbehaves, I've found it easy enough to recreate what I was doing but you can also save the last stage that survives, Reload that and continue editing.
You can also View images in the default application while working on them to confirm changes. On my system that application is Preview.
Saved PNG images tend to be well under 200K each for photos (130-150K) while simple drawings come in under 20K. Napkin only writes PNG files but it can read PNG or JPEG files (even GIFs but just the first frame and, surprisingly, even the JPEG thumbnail embedded in a DNG file).
The .png extension is enforced regardless of what you name the file because PNGs are what Napkin writes to preserve any transparency.
FILTERS
There are quite a few image filters. The strength of those followed by a check mark can be varied using the Amount slider but if you set the value to 0, it will use a reasonable (but hidden) default value.
The original image data is saved in a JavaScript variable so if you get lost, you can return to it without dragging the original file onto the canvas. Just select Reset from the Filter menu.
The filters are a superset of those we used in our Ineractive Editing piece in August. We added quite a few options.
And unlike that piece, which used a single image to demonstrate the technology, you can drag your own images into Napkin and save the edits.
They aren't full-size images, but they're a great learning tool for making color cast adjustments, understanding tonality and testing special effects.
CONCLUSION
Napkin is a free download but does require Keyboard Maestro v8 or v9. A fuller discussion of it can be found in the Keyboard Maestro forum. Enjoy!